Manual timesheets are a thing of the past. Invite your team to track time using Avaza Timesheets and bring your time tracking and invoicing processes into the future.
Our online time tracking solution is not only a more efficient solution for time tracking, it provides you with all the data you need to understand employee performance and project profitability.
Highlight your star performers, and gain insights into your real project costs, so you can make smarter pricing decisions. Run a better business with Avaza today!
Getting Started
To get started with tracking time, there are a few account and project level settings that need to be configured.
1. Setup a Project
Time is tracked on projects so you need to create at least one project before you can start tracking time. Create a new project by clicking “Create a Project” button.
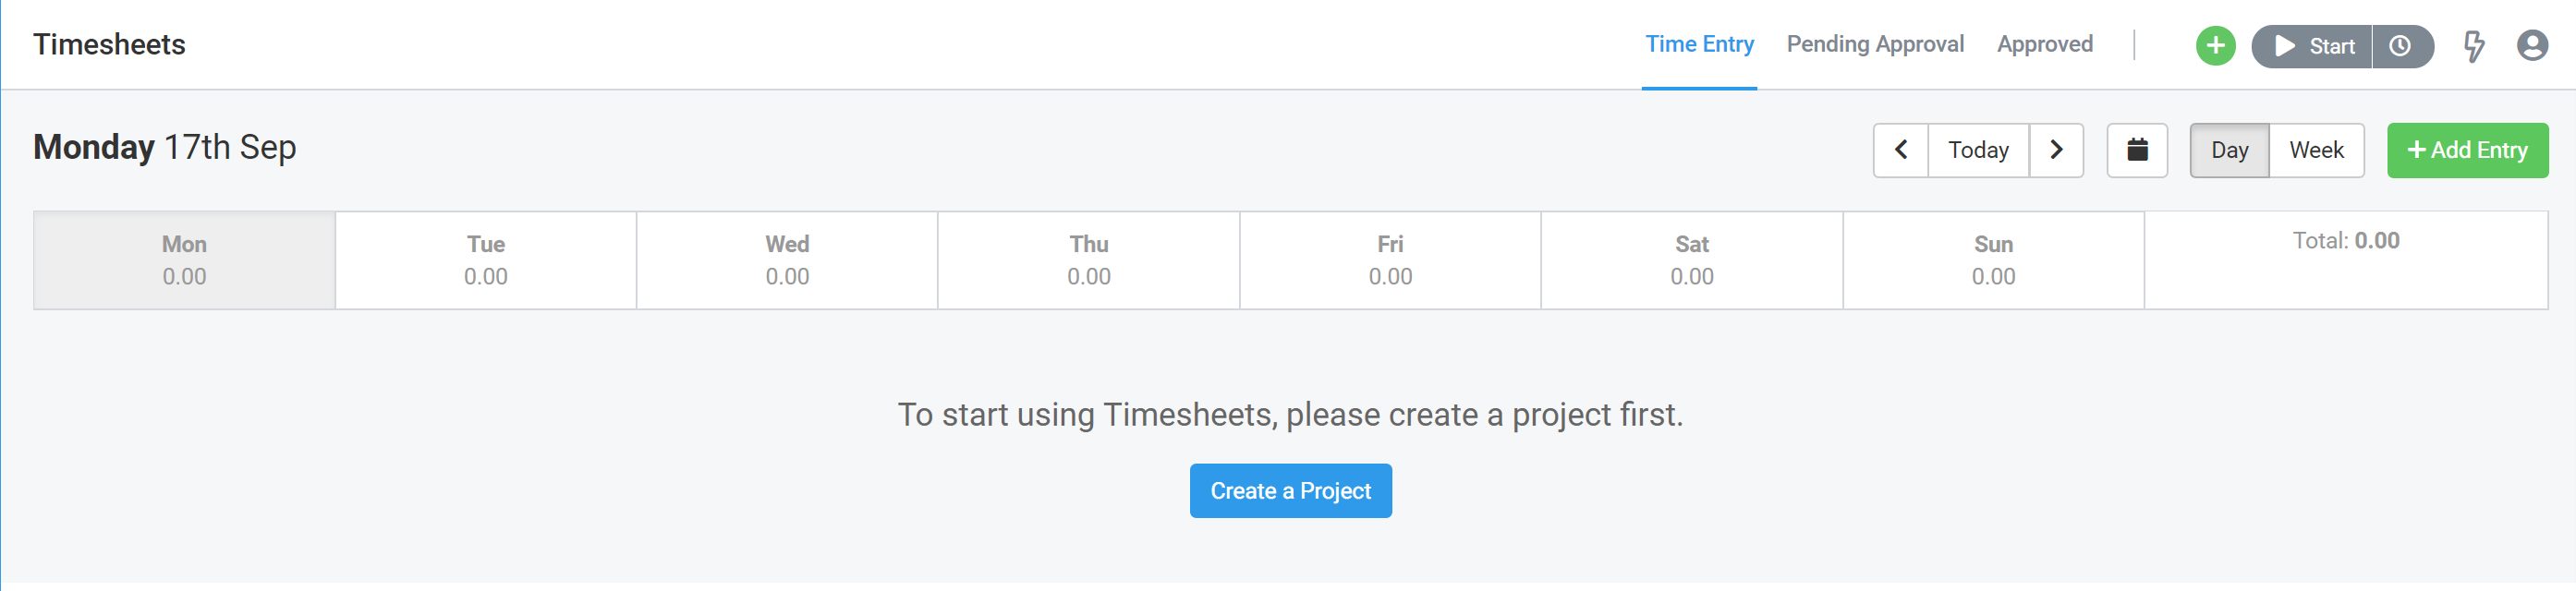 Figure: Create Your First Project To Track Time
Here is a guide on Getting Started with Projects that has detailed information.
2. Setup Timesheet Categories
Timesheet categories define the type of work you’re tracking time against.
To edit, or add new, timesheet categories, navigate to Settings > Timesheet Settings. Here is a quick FAQ on how to add Timesheet Categories. These categories can be billable or non-billable, payable or non-payable.
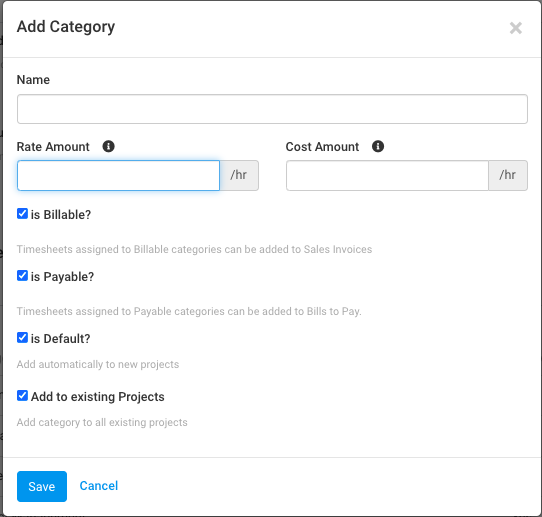
Figure: Create Timesheet Categories in Settings > Timesheet Categories
Timesheet categories can also be created on the Project Settings page.
Existing Timesheet Categories can also be archived so that they can’t be used until enabled. Once the ‘Is Disabled’ flag is checked the ‘Is Default’ flag will be automatically disabled.
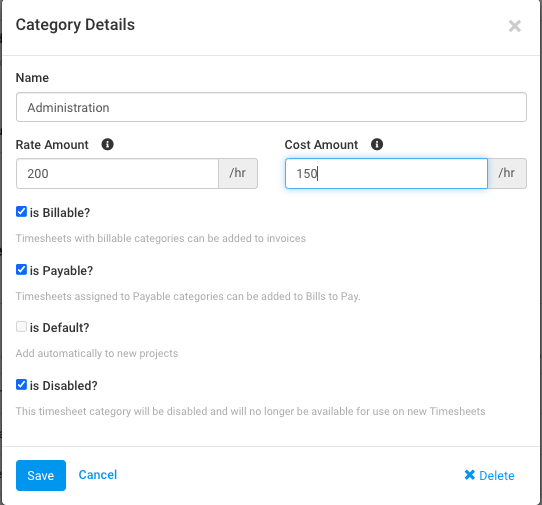
Figure: Create Timesheet Categories in Settings > Timesheet Categories
Note: When calculating Timesheet Costs, we prioritize the Timesheet Category Cost Rate over the Person Cost Rate. If you would prefer to use use the Person Cost Rate, then do not enter a cost rate for Timesheet Categories on that project.
You can learn about the Project Settings page here.
3. Assign Timesheet Users
Only users with the Timesheet/Expense user role can track time against projects they have access to. To give them this role, navigate to Contacts > Team or External Contacts tab, then click the User Name and check off the “Timesheet/Expense User” checkbox.
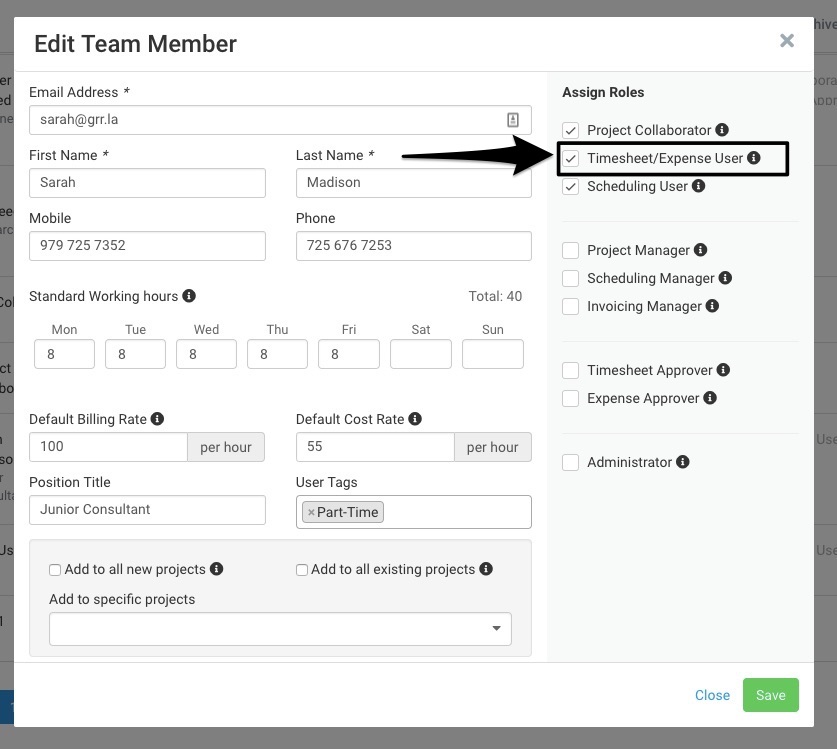 Figure: Give Users Global Timesheet/Expense permissions via Contacts Page
The user will also need to be added to the Project which you are tracking time on, and have the “Timesheet entry allowed” box checked off.
You can do this by navigating to Project Members panel on Project Settings page for a particular project. Once on the Project Settings page, click the name of the user to open the Edit pop-up.
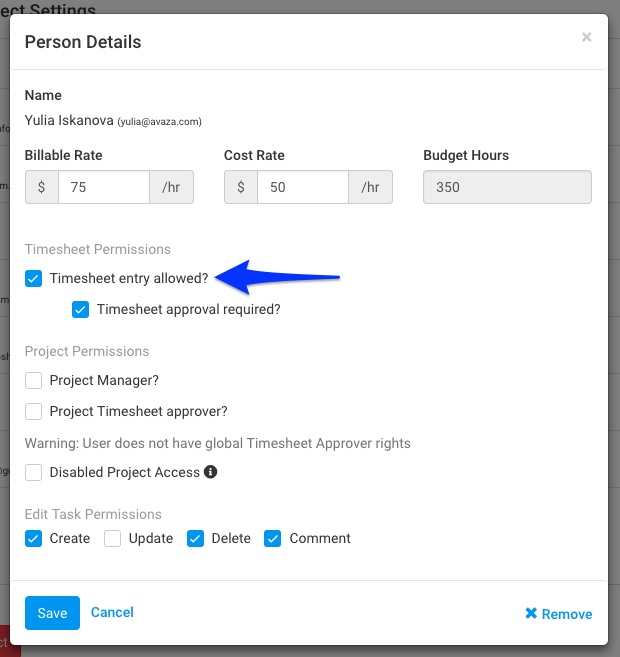 Figure: Allow Access to Time Tracking via Project-Specific Settings
Tracking Time with Avaza
Avaza lets you track time in multiple ways. Your team has the flexibility to start and stop Timers as they work, enter & edit timesheets in day view or enter time in bulk using the week view.
1. Global Time Tracker
The Global Time Tracker widget allows you to track time from any page within Avaza. The global widget is broken into two components.
Timer
- Click the start button to start the timer immediately
- You can view the running timer on the widget or in the browser tab
- Click the same button again to stop the timer. The user is prompted with a dialogue to fill the essential details such as Project and Timesheet Category. If you don’t have time to add these details immediately, you can close the popup and continue working. Draft time entries are still available in the timesheet list and can be updated later.
 Figure: Start/Stop Timer
Global Timesheet Popup
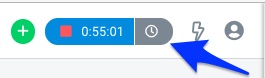 Figure: Click on the Global Timesheet View to Open Daily Timesheets
The Global Timesheet popup can be accessed by clicking the clock icon next to the timer at the top of your screen. This popup shows you existing timesheet entries, and allows you to edit or create new entries manually. While the popup displays today’s timesheets for the logged in user, you can navigate to any day by using the right or left arrows at the top of the popup.
The Pencil icon allows you to Edit existing timesheets, and you can use the Add Entry button to create a new timesheet.
If the logged in user has created timesheet entries for one or more projects where they require approval then the “Submit for Approval” button will be visible. Clicking that button will submit draft timesheets for approval.You can read more about Timesheet Approvals here.
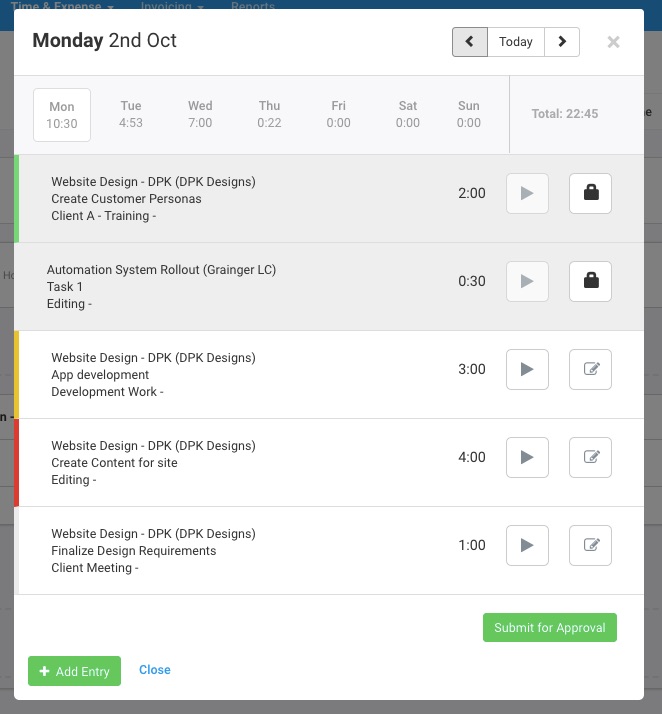 Figure: Add/Update Timesheets on Global Timesheet Popup
2. Timesheet Day View
You can enter & manage time in the dedicated Timesheet area. Click on the “Timesheets” menu item from the side navigation.
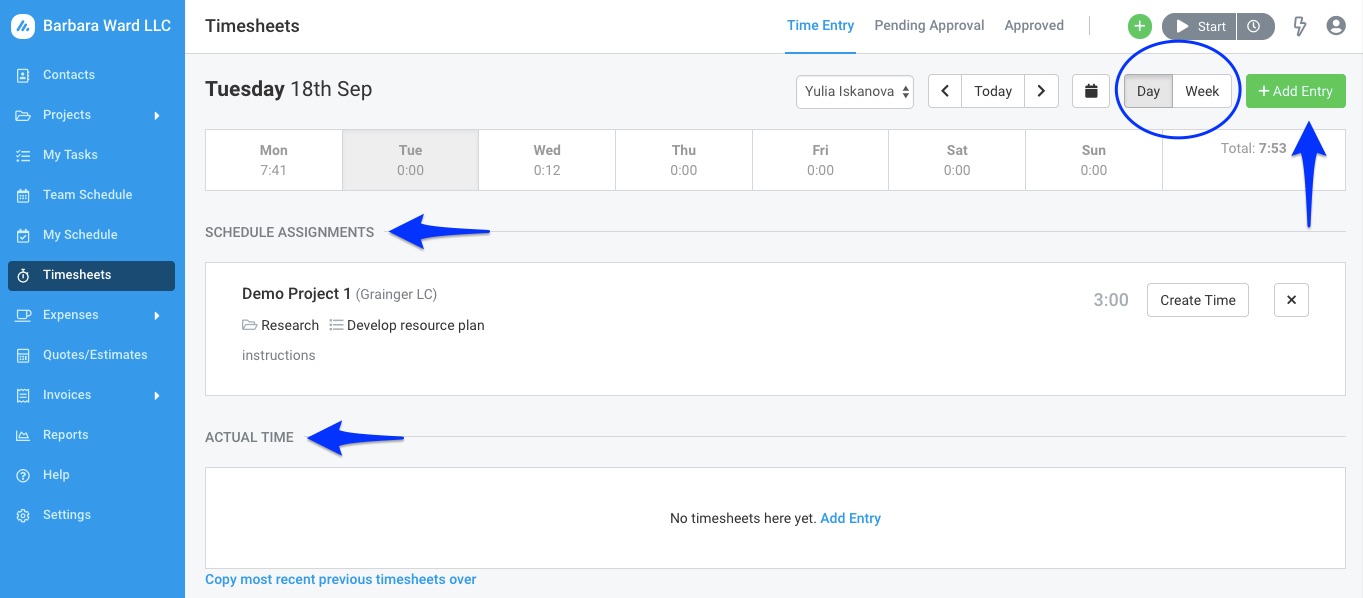 Figure: Open Timesheets Page to Add Timesheets Entry in Day View
In Timesheet Day View, we show scheduled assignments created for your scheduling users. The Schedule Assignments allow your users to automatically convert them into actual timesheets.
To create a new entry, click the “Add Entry” button to view the “New timesheet entry” popup, and select one of the existing projects and categories. If you haven’t created a project yet then please refer to the Getting Started with Projects guide for more details on how to create your first project.
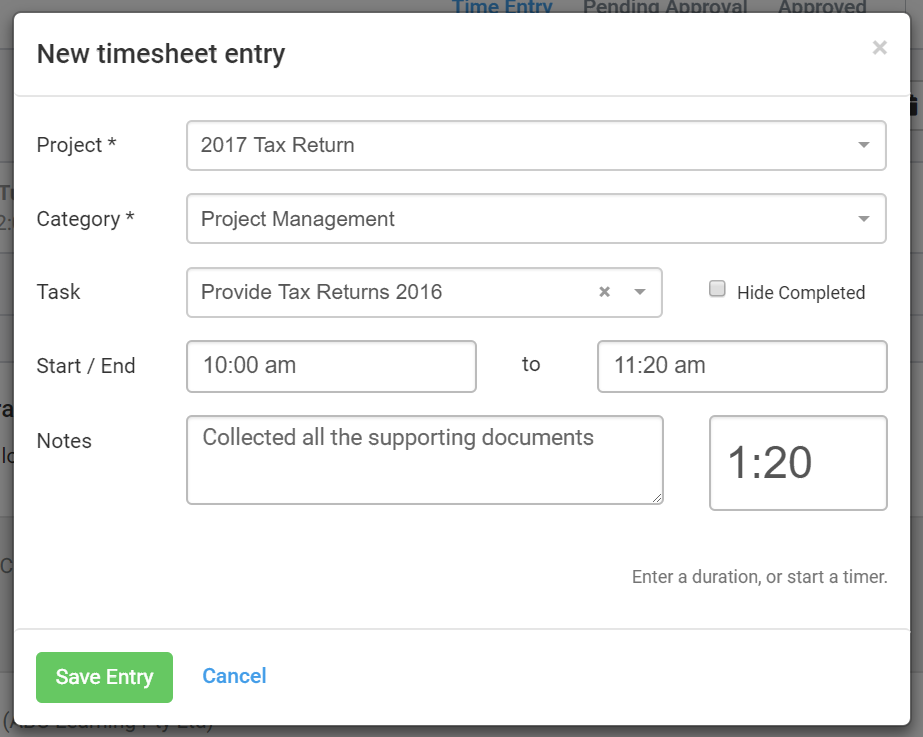
Figure: Timesheet Entry Popup
When adding a timesheet, you can also optionally choose a task, enter start & end time and notes. Enter the duration directly into the Duration box if required.
When managing & entering timesheets, you can easily jump to another date by clicking the “Calendar Control”. Select the date you wish to enter and view timesheet entries for that particular date. Simply click the “Today” button to jump back to the current date.
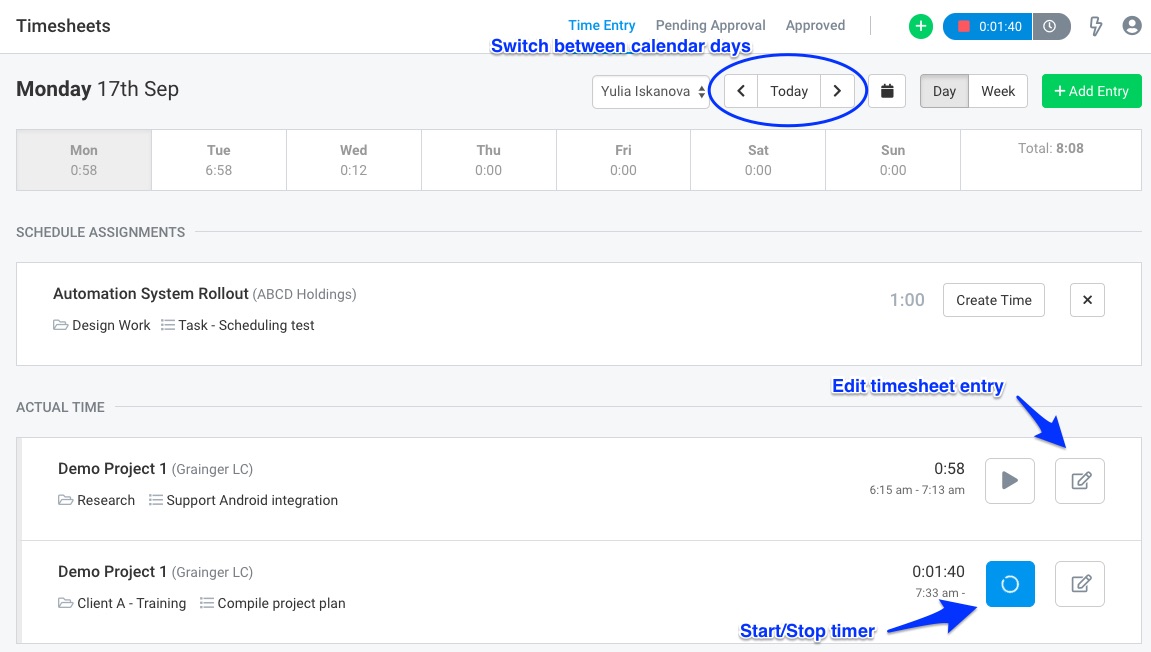 Figure: Timesheet Entry Day View with Running Timer
3. Timesheet Week view
Week view is ideal for entering timesheet entries in bulk for the entire week. This view is also quite handy to review the entire week before submitting it for approval. Click the “Add Row” button to add a new row to the week view. Select the relevant Project, Category, and Task. Enter the duration for each day in the blank cells along with notes and click Save. Easy!
If you are working on the same projects week on week then click the “Copy over previous week’s timesheets” link to copy previous weeks entries with a click of a button.
Use the left and right arrows or the calendar control to jump between weeks.
 Figure: Timesheet Week View
4. Time Estimate Tab on Tasks
When viewing a task, there’s a tab dedicated to timesheets (time clock icon). The Task Time tab lets you both track time, and view timesheet entries against the task.
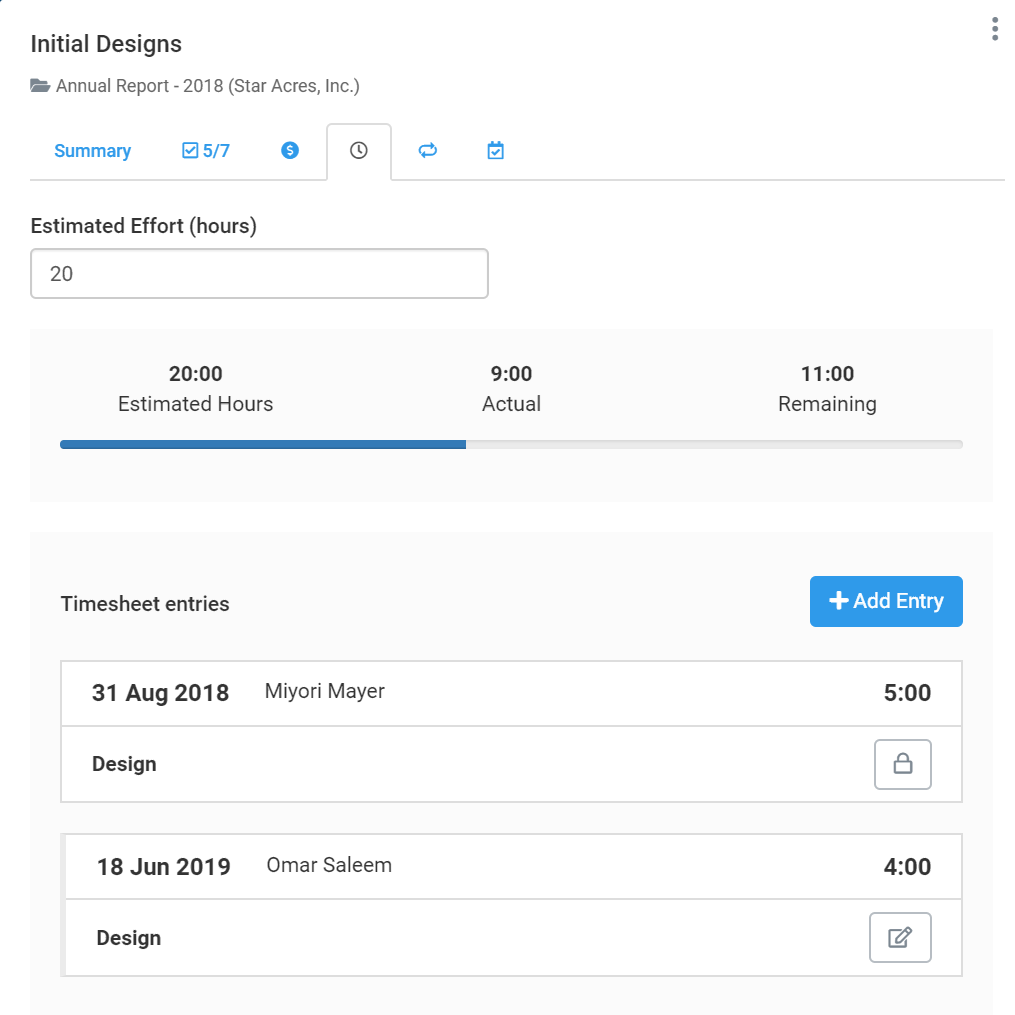 Figure: Task Time Tab with Timesheet Entries
You will be able to see a list of all your timesheet entries on that task, plus add new entries or edit old ones. Admin users and Portfolio Managers can see all user timesheets on the task.
To start entering time from this popup, click on the Add Entry button to open a pre-populated New Timesheet Entry popup where you can either Start the Timer or enter a Duration in the field provided.
For tasks with a time estimate added, you will be able to see a line graph indicating Estimated versus Actual time logged against the task. This progress indicator shows you total time tracked by the entire team on this task.
To provide visual cues as to which tasks have time tracked on them, or have estimated time entered, we have an icon that appears on tasks in List and Kanban views.
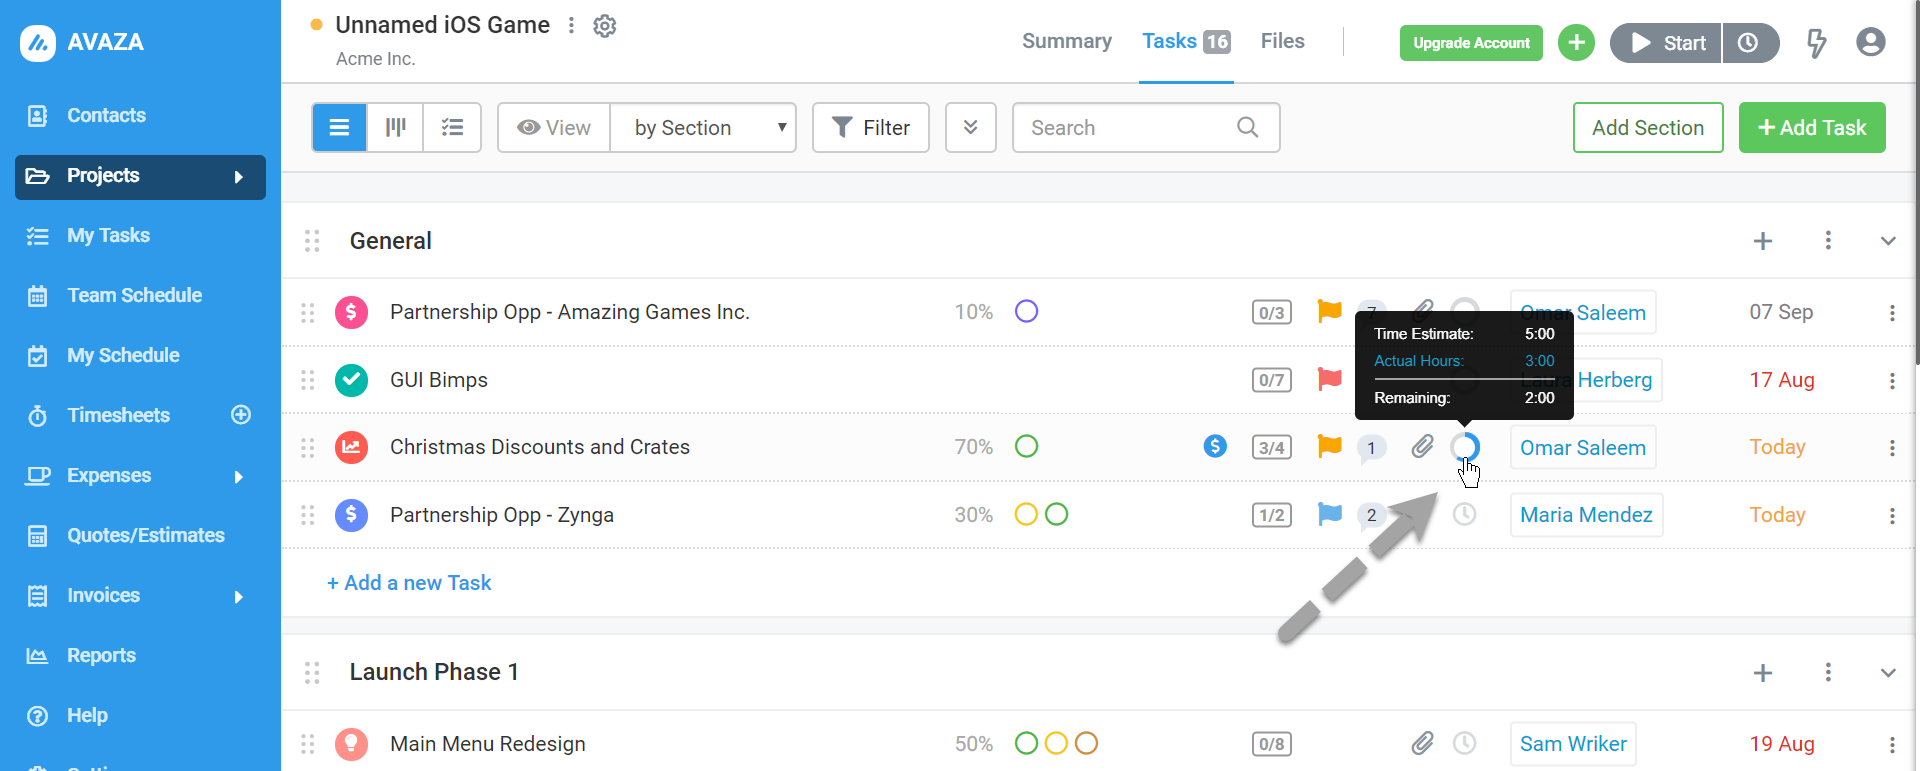 Figure: A Task with Estimate vs Actual Time, and a Task Without an Estimate
Tasks that have time estimates will have a visual indicator to track estimated versus actual time. For tasks that have no time estimate added but have timesheets added, a clock icon will be displayed. Hovering over the icon will show the current duration (hours) tracked against that task. The clock icon is greyed out when no time has been entered against a task.
Impersonation (Day & Week View only)
The Timesheet screen also provides users with Administrator or Portfolio Manager role access to view and edit other user’s timesheet entries. Click the drop-down with your name and select another user to view and edit their timesheet entries. This is a simple way to make amendments to other users entries. You can read more about entering time on behalf of other users here.
 Figure: Timesheet Day View Impersonation
Add Time to Invoices
Click the “Invoices” menu and select “Invoices” from the drop-down. Click “Create Invoice” and select the customer you will like to invoice the billable timesheets. You can check the “Only display customers with uninvoiced time or expense” box to filter the customer list to only those with uninvoiced timesheets and expenses.
Click “Create” button after selecting the customer.
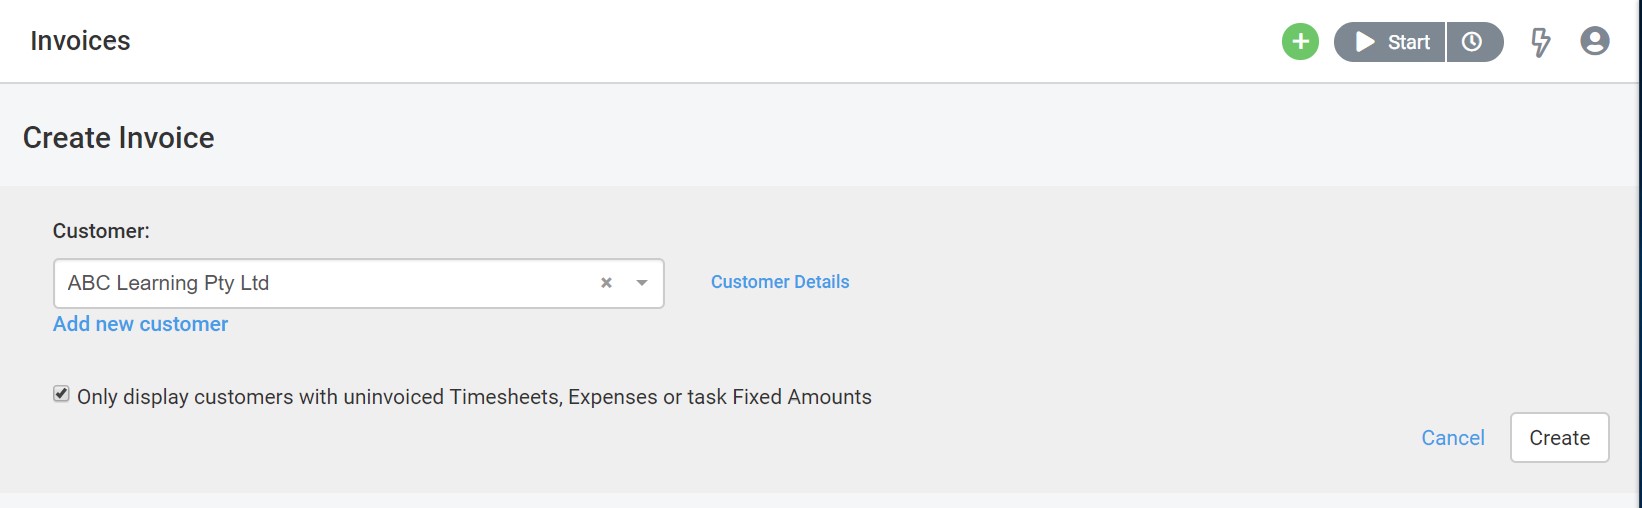 Figure: Invoice Create Slider
Click “Add Time” on create invoice page.
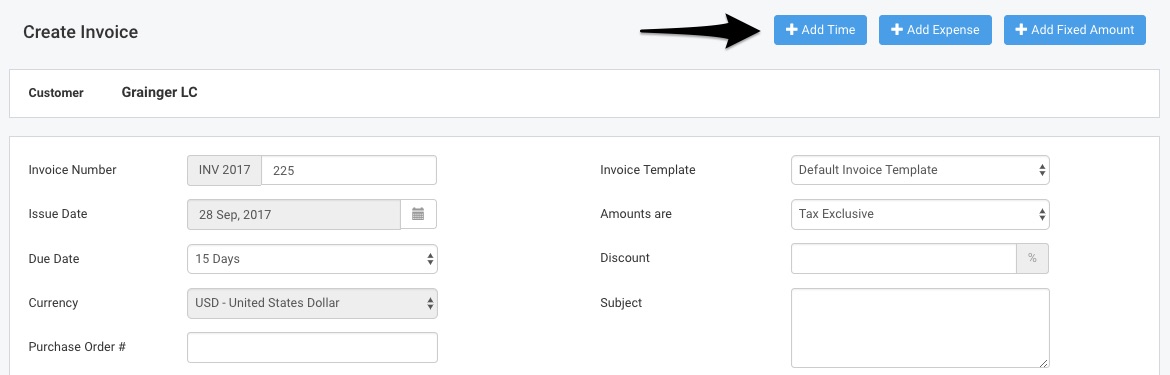
Figure: Create Invoice Add Time Button
- On the “Add Time” popup you can apply filters and choose how timesheets should be grouped.
Filter timesheet entries by one or more Projects, Timesheet Users, Timesheet Categories, Tasks and Date Range. - You can choose to group your timesheet entries by Project, Project & Category, Project & Timesheet User, Project & Section, Project & Task or No Grouping. For example, Grouping by Project will add a single invoice line item for all timesheets belonging to a particular project.
- If you select No Grouping, you can choose what timesheet fields should be displayed on the invoice line item description field. You can choose Project, Timesheet Category, Project Task, Start & End Time, Date, People and Notes.
You can read more about adding Un-invoiced Time to Invoices here.
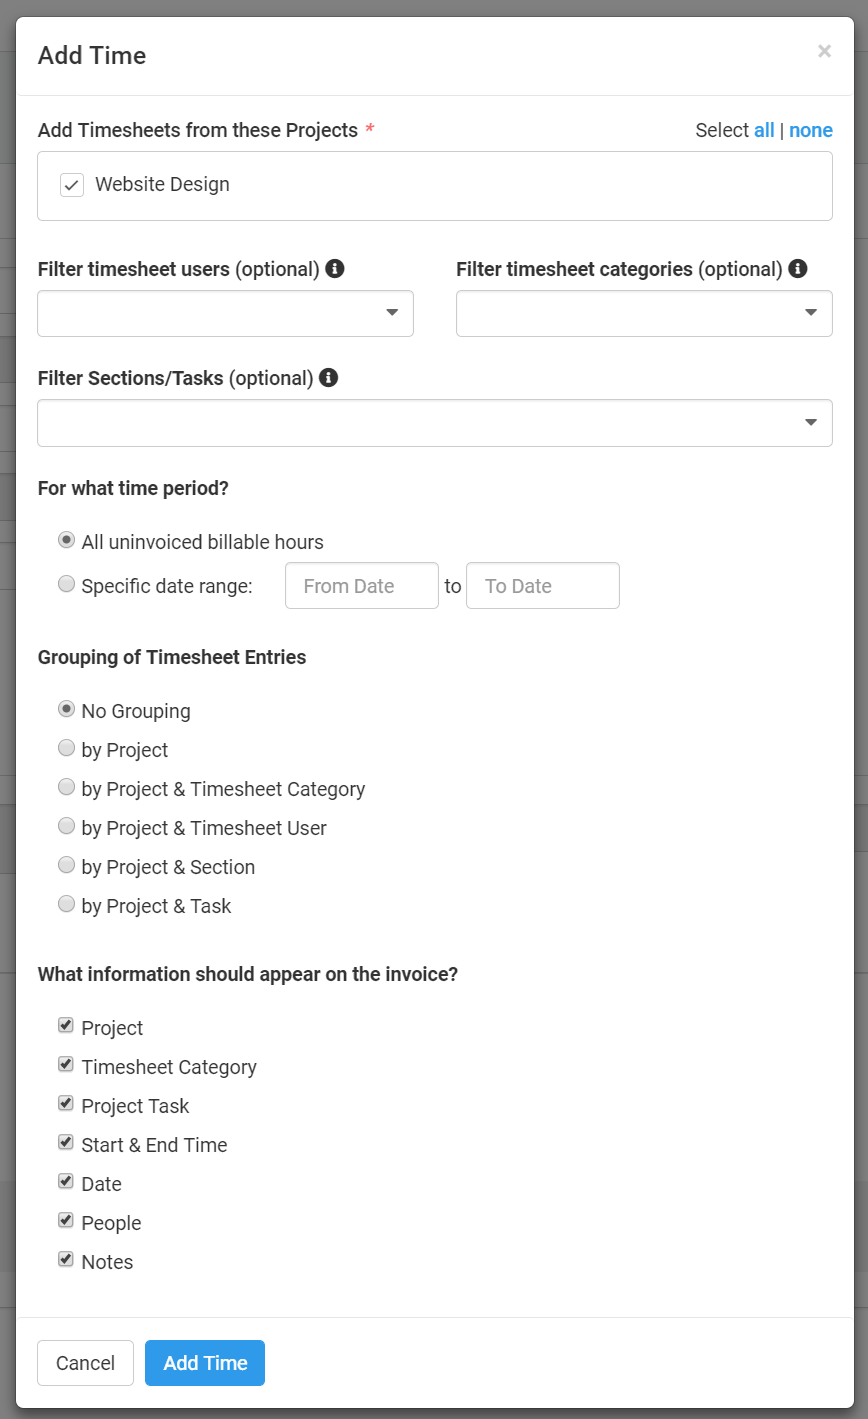 Figure: Add Time Popup
Click “Add Time” button to add the timesheet entries as invoice line items. The timesheet hours are entered as quantity and the unit price is set based on the project billing method and billable rates. Please refer to the Project Settings guide for further details.
 Figure: Time Entries as Invoice Items
Optionally enter invoice subject and notes and then click “Save Invoice”.
Hope this guide helps you understand how to create and manage timesheets in Avaza. If you need further help, feel free to contact our support team via chat or by emailing support@avaza.com.