A retainer subscription is a business arrangement where customers pay in advance for ongoing work. This model is particularly beneficial for services provided regularly, such as monthly consulting, ongoing project work, or other recurring services.
In Avaza, you can set up a retainer subscription with a recurring schedule, allowing the system to automatically generate a retainer invoice. This invoice prompts the customer to make an advance payment, which is then held as retainer credit. This credit can be applied to regular invoices for completed work, such as tracked time, expenses, fixed fees, or other billable services.
The main advantage of a retainer subscription is that it ensures consistent cash flow by securing payment upfront while giving customers a clear understanding of their ongoing financial commitment.
Retainer Subscription Settings
Before creating a retainer subscription, review the relevant settings by navigating to Settings > Invoice & Bill Settings to ensure they are configured to meet your needs.
- Retainer Prefix: Located in the Sales area panel, this prefix will be used at the beginning of the invoice number created by the retainer subscriptions.
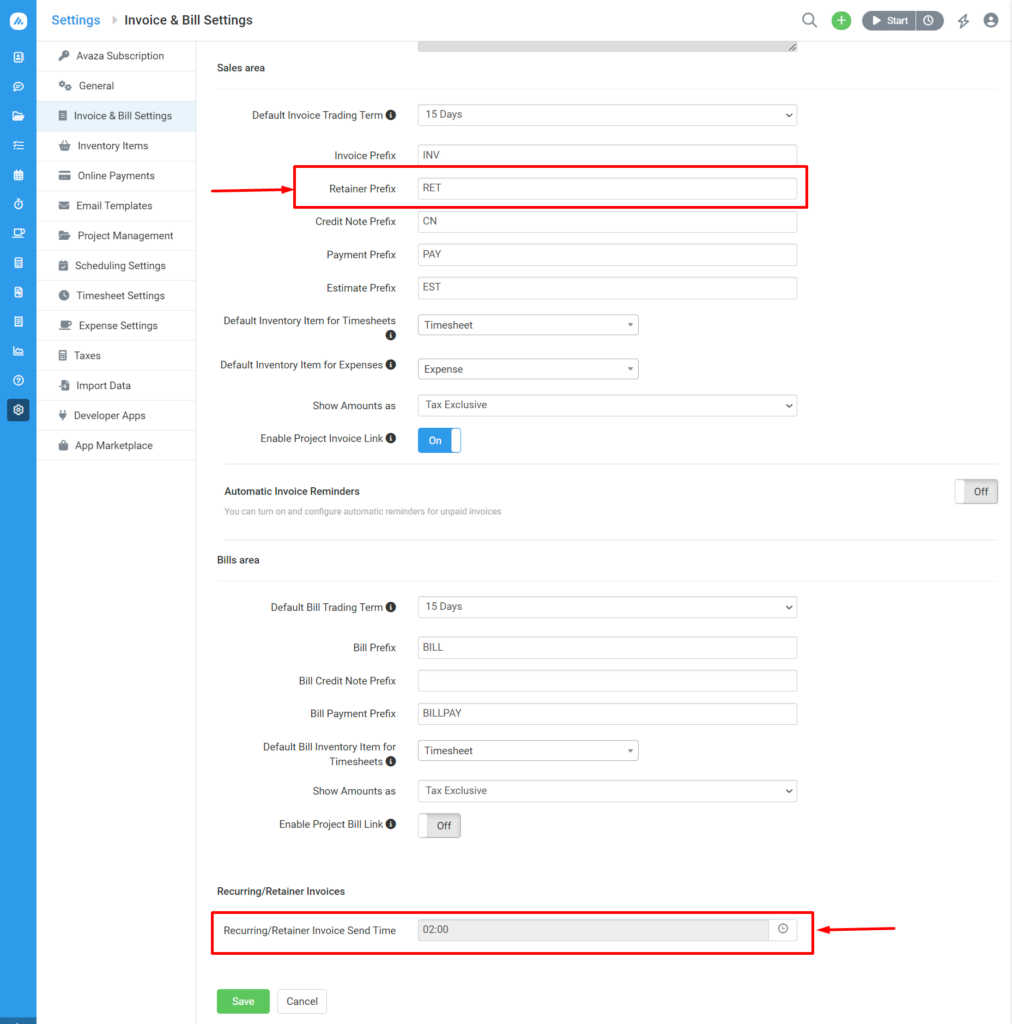
- Recurring/Retainer Invoice Send Time: This setting determines when the invoice generation engine creates new invoices that need to be generated. Configure this to be the time you would like the new invoices to be created.
- Default Retainer Template: Ensure this is configured under the Invoice & Quotes/Estimate Templates section. Open an existing template check the “Set as Default Retainer template” checkbox and click Save to make that template the Default Retainer Template. You can customize this default template for each customer, but the default set on the Invoice Settings page will populate when a new customer is created.
How to Create a Retainer Subscription
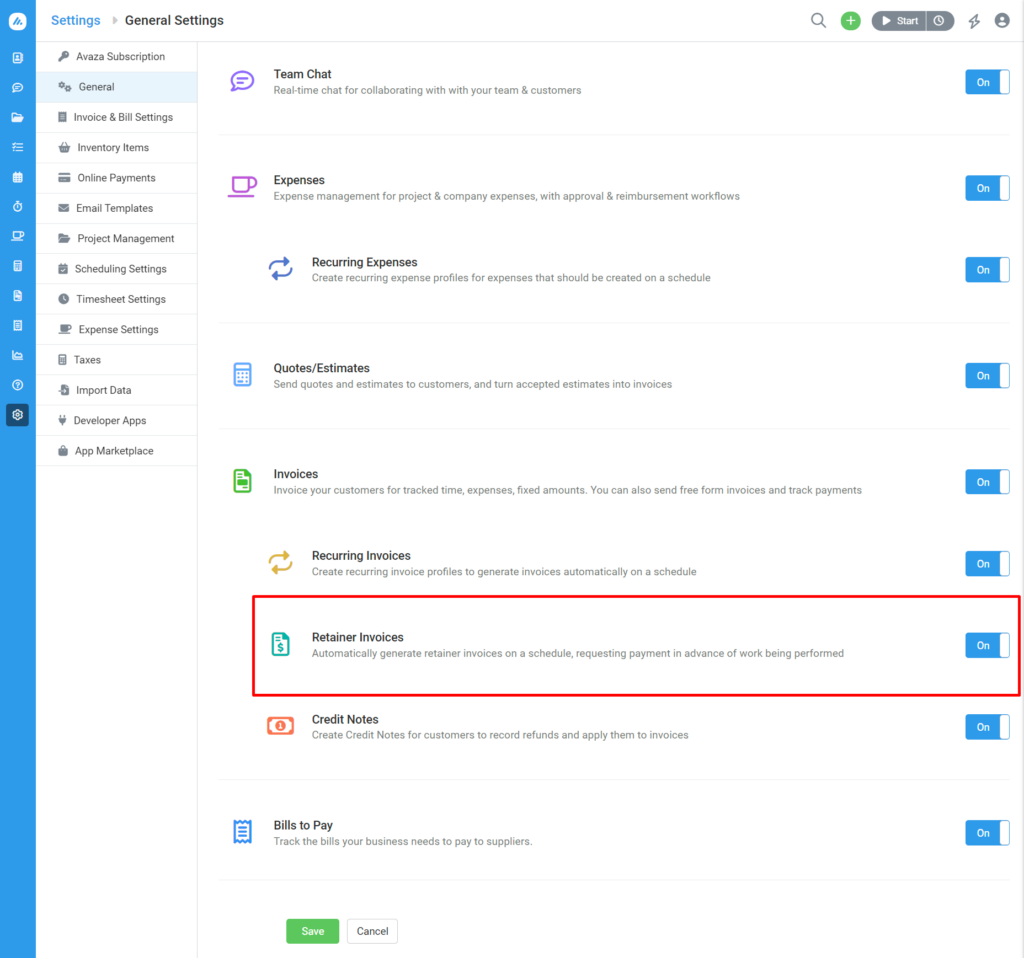
To use the retainer subscription module, enable it on the Settings > General Settings page.
Once enabled, navigate to Invoices > Retainer Subscriptions.
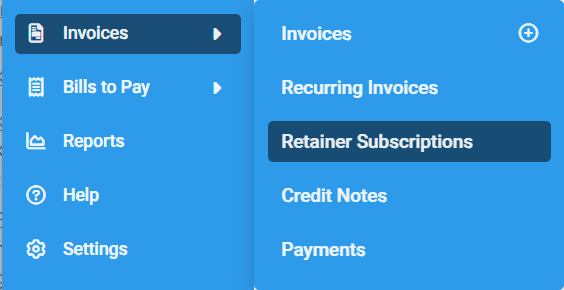
- Click the Create button on the Retainer Subscription page.
- Select an existing customer or add a new one, then click Create.

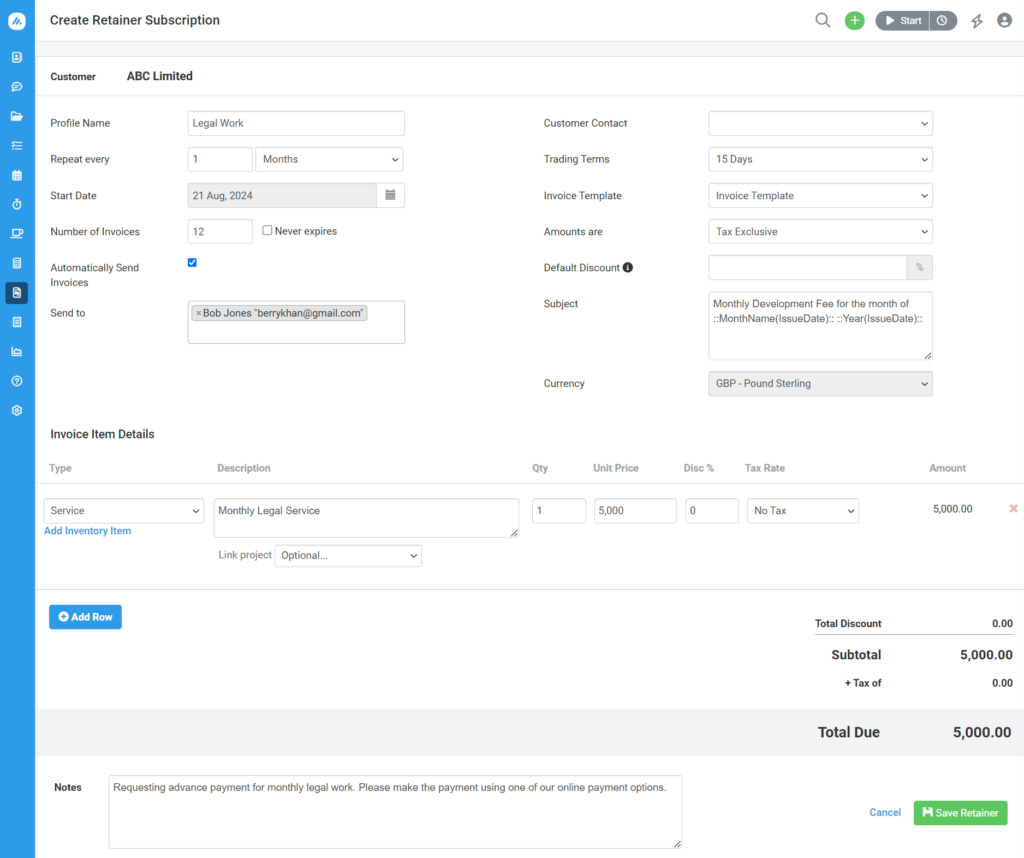
- You will be taken to the Retainer Subscription Create page.
Setting Up the Retainer Subscription Profile
- Profile Name: Enter a unique and descriptive name for the retainer subscription. This name will be used to identify the retainer subscription in your records and on invoices shared with your customer. A clear name helps you and your customer easily reference the retainer agreement. This field is required to ensure accurate tracking and management of your retainers. Here are a few examples.
- ABC Corp – Monthly Consulting Retainer
- XYZ Ltd – Quarterly IT Support Retainer
- Marketing Services – Annual Retainer
- Design Work – Bi-Weekly Retainer for Smith & Co
- Project Management – Retainer for Q4 2024
- Repeat Every: Select the frequency at which the invoice should be generated, based on days or months (e.g., 14 days for bi-weekly, 3 months for quarterly).
- Start Date: Choose when the first invoice will be generated, either today or at a future date.
- Number of Invoices: Enter the total number of invoices to be created. For ongoing contracts, select the ‘Never expires’ checkbox.
- Automatically Send Invoices: Check this box to automatically send invoices to the customer or leave it unchecked to review drafts before sending.
- Invoice Item Details: Enter details for the items you want to invoice regularly. Taxes and discounts can also be applied.
- Notes: Add any additional notes and click Save Invoice.
Tip: Use smart tags (dynamic variables) to automatically include specific dates in the subject, line item description, or notes. For example, adding the tags ::MonthName(IssueDate):: ::Year(IssueDate):: will generate the corresponding month and year in the subject line of the invoice. So for the invoice issued on 01 March 2024, the tag will automatically generate the result ‘March 2024’ in the subject line.
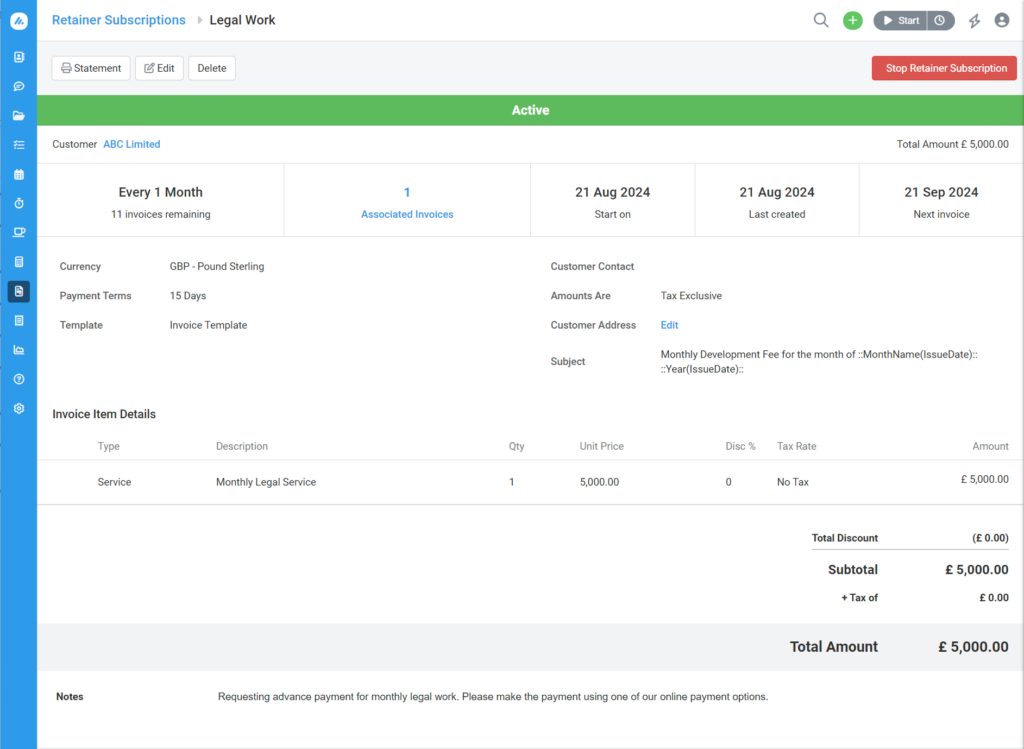
After saving the retainer subscription, you’ll be redirected to the Retainer Subscription Details page.
Retainer Subscription Details Page
On the Retainer Subscription Details page, you can:
- Stop an active subscription or restart a paused one.
- View linked retainer invoices via the Associated Invoices modal.
- Edit the subscription details.
- Generate a statement report for the subscription.
- Delete the subscription if no retainer invoices have been generated yet.
Associate Retainer Invoice Popup
Click the Associated Invoices panel on the Retainer Subscription details page to view the list of created retainer invoices and the key details.
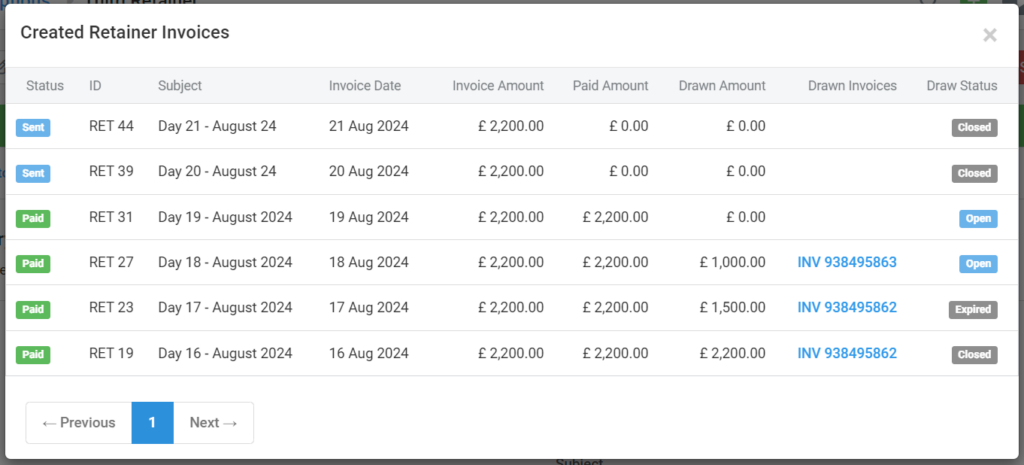
- Status: This is the current status of the retainer invoice. A retainer invoice goes through the same statuses as a regular invoice.
- ID: Unique identifier for each retainer invoice.
- Subject: The subject field content of each retainer invoice.
- Invoice Date: The issue date of the retainer invoice.
- Invoice Amount: The total amount of the invoice.
- Paid Amount: The total amount of payments applied to the retainer invoice.
- Drawn Amount: The amount of retainer credit drawn by regular invoices.
- Drawn Invoices: The invoice IDs and links of regular invoices using the retainer credit.
- Drawn Status: Indicates whether the retainer credit is still available (Open), fully applied or not available (Closed), or has expired (Expired).
Retainer Statement
The Retainer Statement provides a comprehensive view of all activities related to a particular retainer subscription. It can be shared with customers to show payments received and how they’ve been applied to the work performed.
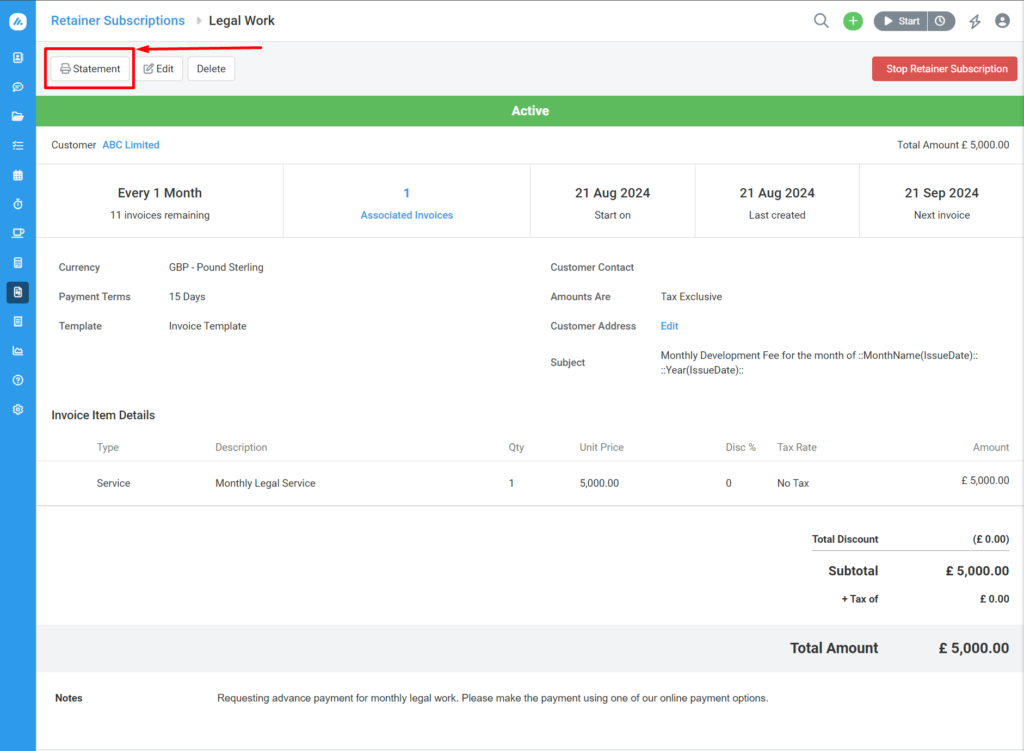
Generate the PDF report by clicking the Statement button from the Retainer Subscription Details page.
The statement lists all transactions in ascending date order:
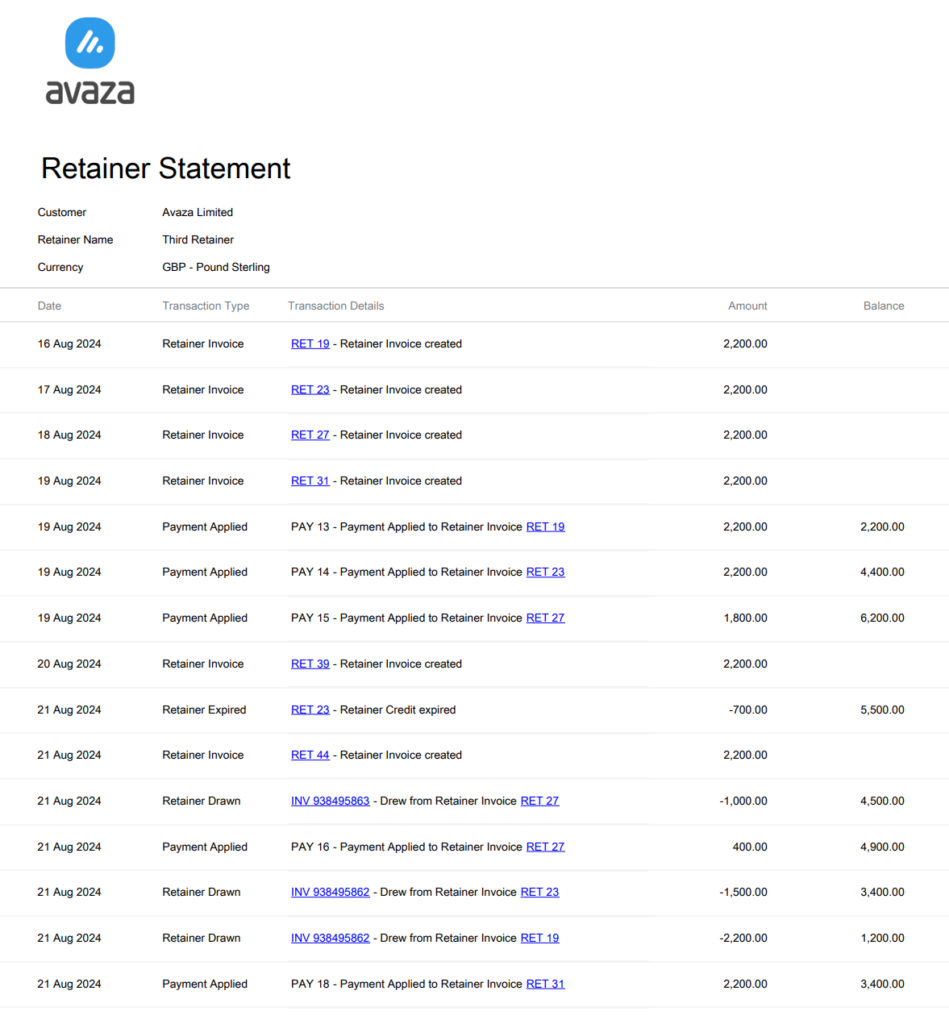
- Retainer Invoice: This is the retainer invoice generated by the subscription requesting advance payment. Since this transaction is only a request, not an actual payment, it does not impact the retainer subscription balance.
- Payment Applied: This records an actual payment applied to a retainer invoice. This transaction increases the balance of the statement and indicates a retainer credit available for use. A positive balance indicates that your business has received a payment from the customer in advance.
- Retainer Drawn: This is a record of retainer invoice credit being drawn by a regular invoice. A regular invoice is created when actual work is performed for a customer. You can apply the available retainer credit instead of requesting payment for the work performed. This action will be displayed as a Retainer Drawn transaction on the statement and will reduce the balance of the statement.
Retainer Expired: Based on your terms and conditions, you may choose to expire any unused retainer credit after a certain period. That will be displayed on the statement as such and will reduce the balance of the statement.
Retainer Subscription List
To view all retainer subscriptions, go to Invoices > Retainer Subscriptions. This list shows each subscription’s status, frequency, amount, next retainer invoice generation date, and more.
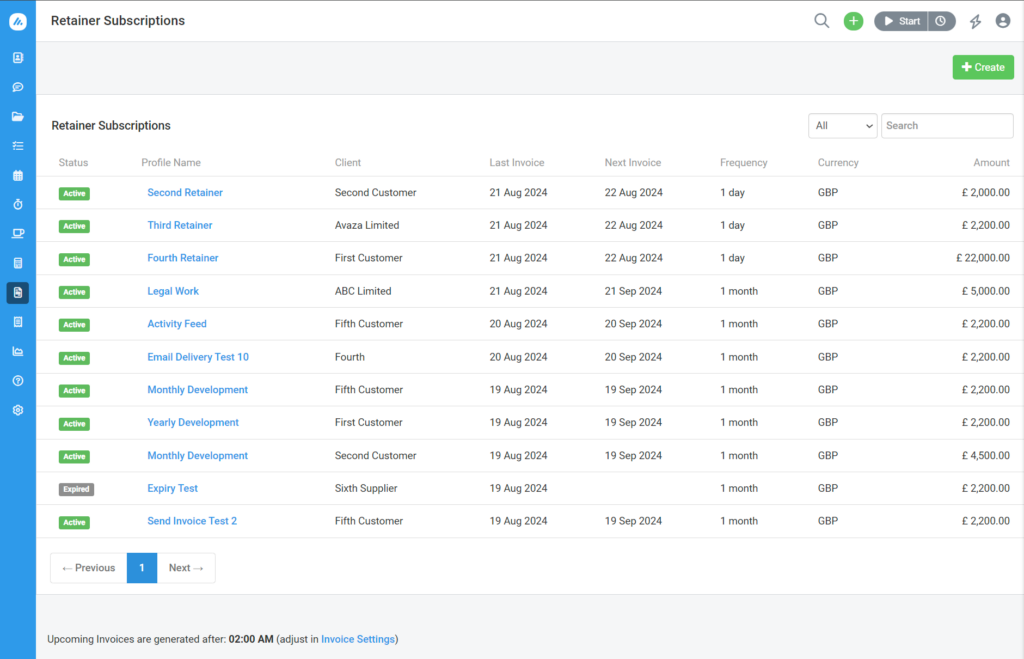
Subscriptions can be filtered by the following statuses:
- Active: Scheduled to generate one or more invoices.
- Stopped: The profile has been paused and won’t generate further invoices until resumed.
- Expired: The profile has no remaining invoices to generate.
Retainer Invoice Details
Access retainer invoices linked to a subscription by selecting the relevant row in the Associated Invoices popup or searching directly on the Invoice list page.
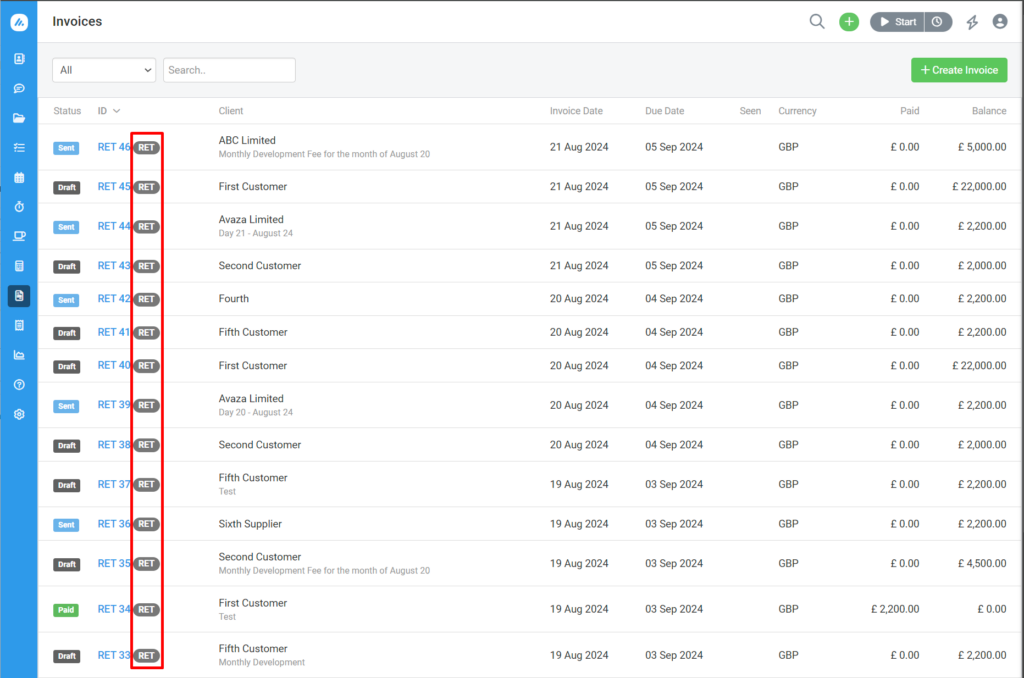
On the Invoice list page, retainer invoices are tagged with “RET” in the ID column, indicating a retainer subscription generated them. If using a separate prefix for retainer invoices, search by that prefix to filter results.
Click one of the retainer invoice records to open the details page. Here are some of the differences from a regular invoice.
- “Retainer” tag next to the retainer invoice ID at the top of the page.
- The Retainer Subscription Profile name and link are in the header section under the Invoice Number. This allows you to quickly jump to the retainer subscription from the retainer invoice
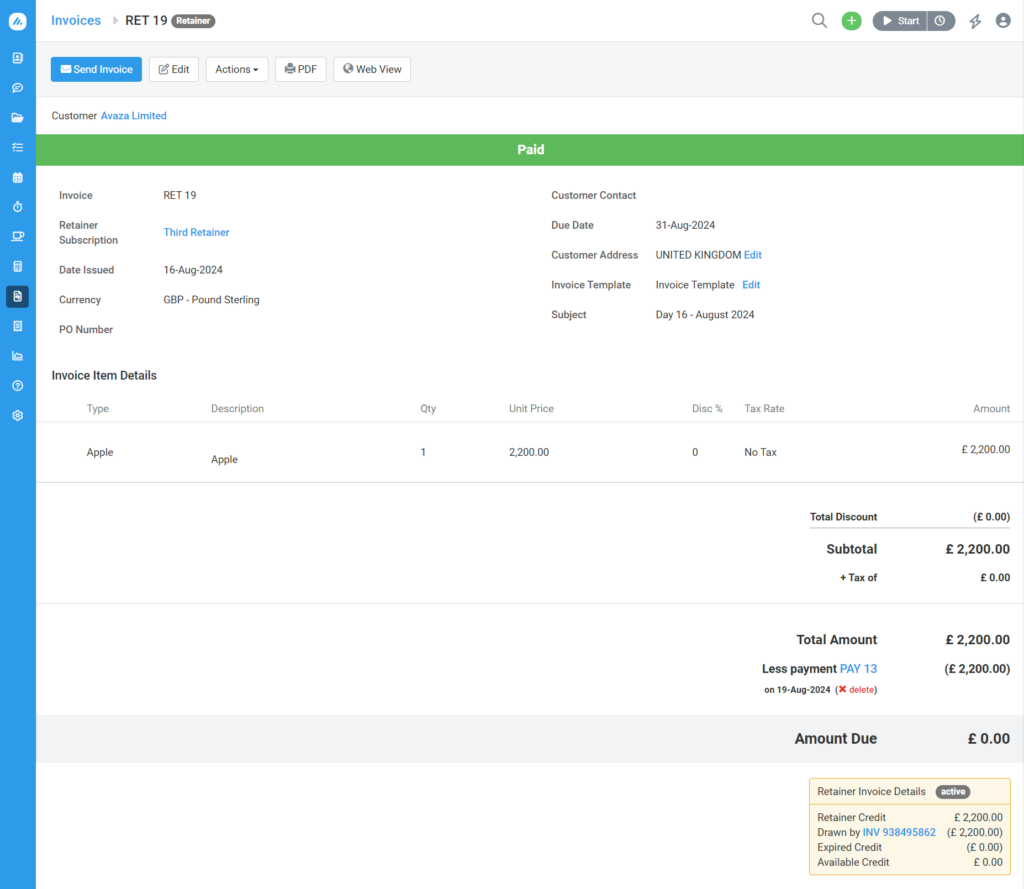
- Towards the bottom of the page, you will see a new panel labeled “Retainer Invoice Details” Here are the details displayed in this new panel.
- Retainer Credit: This is the credit created by this retainer invoice. It is equal to the payment amount applied to the retainer invoice.
- Drawn by: This displays the list of regular invoices, their links, and the amounts drawn from this retainer invoice.
- Expired Credit: Any unused available credit amount that has expired. If the retainer credit has expired, this panel is displayed in grey.
- Available Credit: If the retainer credit has expired, this amount is zero; otherwise, it is Retainer Credit—Drawn Amount. This amount is still available to be drawn.
Besides these changes, the retainer invoice can access the same functions as a regular invoice.
Applying Retainer Credit to a Regular Invoice
Once a payment is applied to a retainer invoice, the retainer credit becomes available for regular invoices.
To apply retainer credit:
- Open a regular invoice.
- From the Actions dropdown, select Apply Retainer Credit.
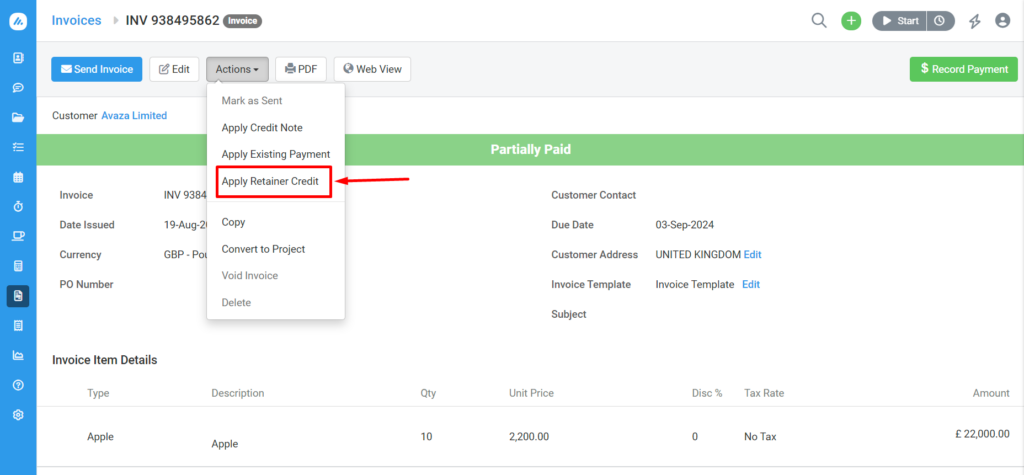
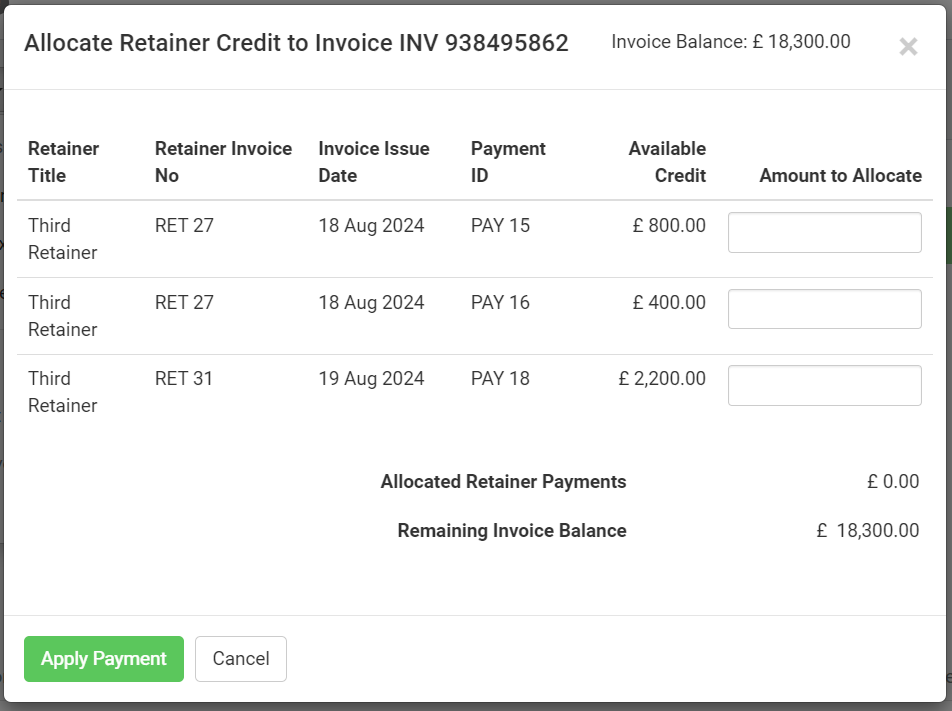
- A popup will display available retainers with credit to allocate. Enter the amount to allocate and click Apply Payment.
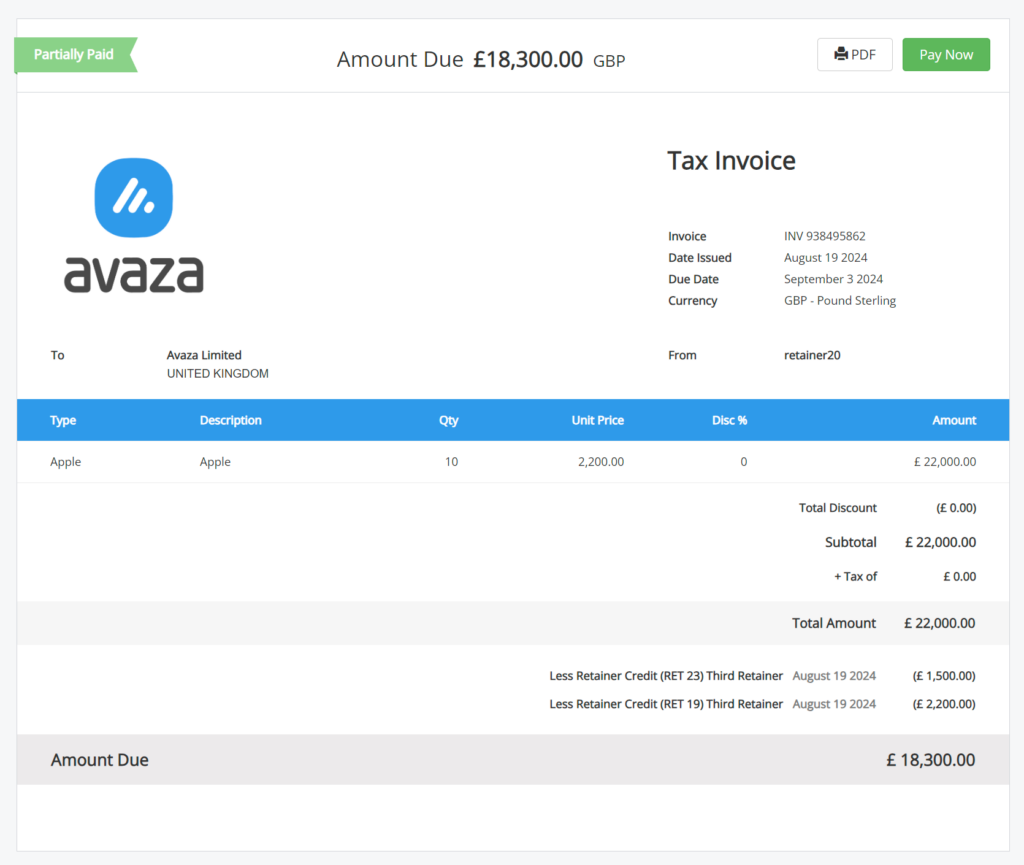
- If the regular invoice still has a balance after exhausting the retainer credit, you can send the invoice to the customer for the remaining amount. The customer on the Web and PDF view of the regular invoice towards the bottom of the invoice will be able to see if any retainer credit was applied to the invoice, as seen in the screenshot below.
Expiring Unused Retainer Credit
You can expire unused retainer credit based on your terms and conditions.
To do this:
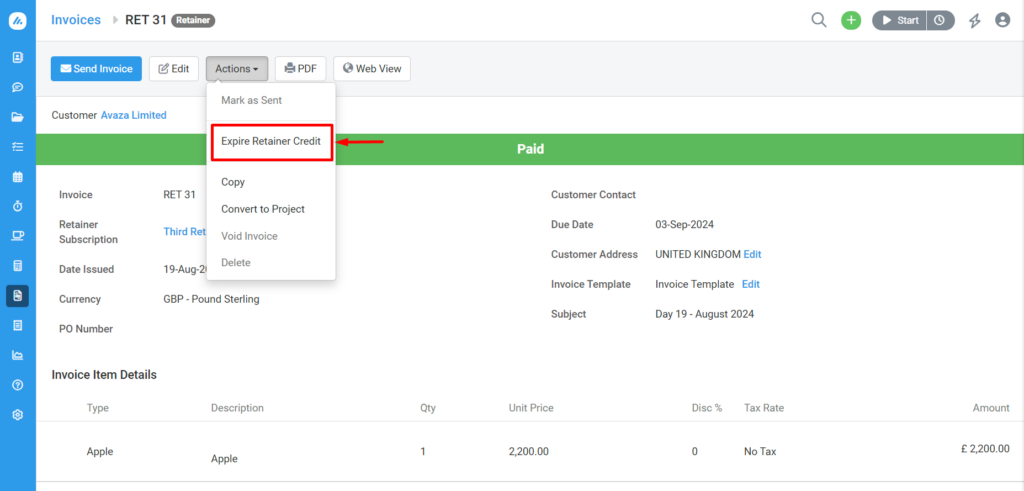
- On the retainer invoice details page, select Expire Retainer Credit from the Actions dropdown.
- Enter the expiry date on the popup and click Expire Credit.
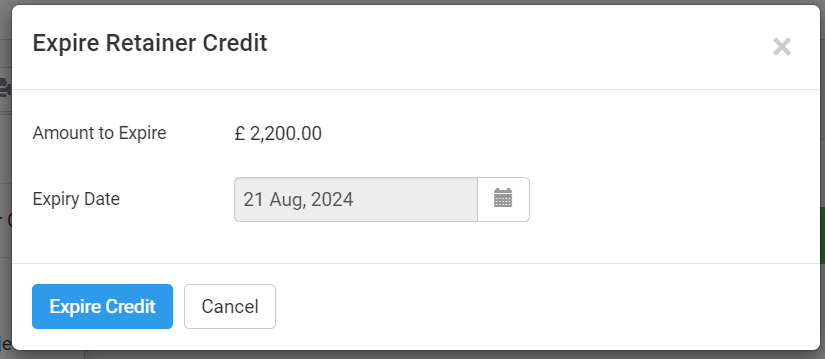
This action will reduce the available credit to zero and mark it as expired. The expired tag will be displayed in the additional info box toward the bottom of the retainer invoice details page.
This information will also appear in the retainer statement and the linked retainer invoice popup on the subscription details page.
Frequently Asked Questions
Are retainer invoices sent to Xero & QuickBooks Online?
No, retainer invoices are not copied to Xero or QuickBooks Online because they are considered a liability until the credit is used to offset a regular invoice. If retainer invoices were copied, it would result in double-counting, throwing off your financial records.
Regular invoices that draw from a retainer are copied to Xero or QuickBooks Online as usual.
What is the difference between a recurring invoice and a retainer subscription?
The difference between a recurring invoice and a retainer subscription lies primarily in the timing and purpose of the invoicing process, as well as how payments and credits are managed:
1. Purpose:
- Recurring Invoice: A recurring invoice is used to bill customers for services or products delivered on a regular, ongoing basis. It automates the invoicing process for repeated services, such as a monthly subscription fee, maintenance services, or regular product deliveries. Each invoice reflects the specific services or products delivered during the billing period.
- Retainer Subscription: On the other hand, a retainer subscription is used to secure payment in advance for future work. It’s typically set up when a customer agrees to pay a fixed amount upfront, which is then held as credit. This credit is later applied to invoices as work is completed, such as for consulting hours, project work, or other billable services.
2. Timing of Payment:
- Recurring Invoice: Payment is made after the services or products are delivered for the billing period. The invoice is generated regularly, and payment is expected upon or after the services or goods are delivered.
- Retainer Subscription: Payment is made in advance of any work being done. The retainer invoice requests an upfront payment, held as credit, and applied against future invoices as the work is completed.
3. Invoice Content:
- Recurring Invoice: Each invoice in a recurring series typically lists the specific services or products provided during the billing period. It’s a straightforward bill for services rendered.
- Retainer Subscription: The retainer invoice does not bill for specific services rendered during the billing period but for a pre-agreed amount that will be used as a credit against future work. The retainer credit is then drawn down as actual work is completed and billed.
4. Cash Flow Management:
- Recurring Invoice: This method allows for predictable revenue but may create cash flow challenges if payments are delayed after services are rendered.
- Retainer Subscription: This method ensures better cash flow management since payment is received upfront, providing financial security before work begins.
5. Flexibility:
- Recurring Invoice: Invoicing is generally fixed to a schedule and for specific services or products.
- Retainer Subscription: This offers more flexibility, as the retainer credit can be applied to various types of work as completed, allowing for adjustments in the scope of services provided.
In summary, while recurring and retainer subscriptions are tools for managing regular billing, a recurring invoice is for delivered services. In contrast, a retainer subscription involves collecting payment in advance, with the credit being used against future invoices as work is completed.
