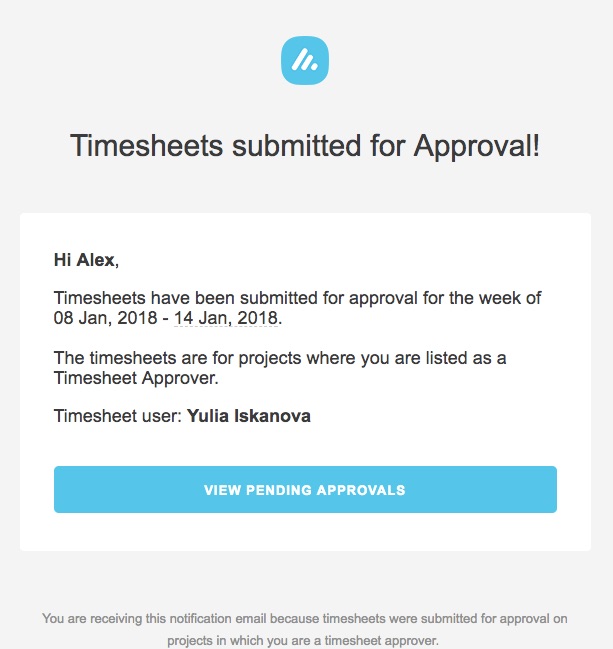
Create a flexible timesheet approval workflow for your business with Avaza. Enable timesheet approvals at the project or individual level, and assign Timesheet Approvers in your team.
 Figure: Timesheet Approval Workflow
Account & Project-Level Settings
To get started with Timesheet Approvals, you will need to first ensure the correct user roles are assigned and appropriate project settings are enabled.
1. Account-Level User Roles
To assign account-level roles, head over to Contacts > Team Members. On each team member’s page, you can assign them the appropriate roles required.
Timesheet/Expense User
Timesheets can only be created by, or on behalf of, Timesheet/Expense users. Please make sure all users that need to enter time have the Timesheet/Expense user role assigned to them at the account level.
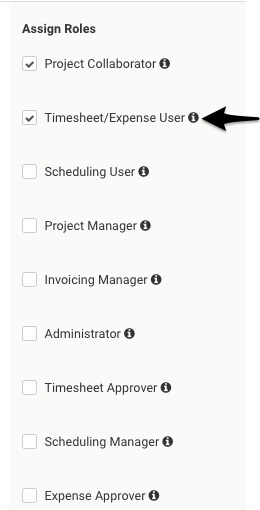 Figure: Assign Timesheet/Expense User Role
Timesheet Approver
Similarly, timesheets can only be approved by users who have the account-level Timesheet Approver role. Please assign this role to all users who will be approving Timesheets at the account-level first. You can also assign this role to Customer Contacts if your client wants to approve timesheets themselves.
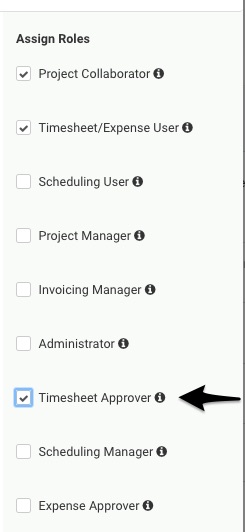 Figure: Assign Timesheet Approver Role
2. Project Settings
Project-level settings provide you with flexibility over which users need timesheet approvals, and who can track and approve time in your team.
Switch on Timesheet Approvals
When you create a new Project, enable the “Require Timesheets Approval by Default” checkbox to enable timesheet approvals for all users added to the project by default.
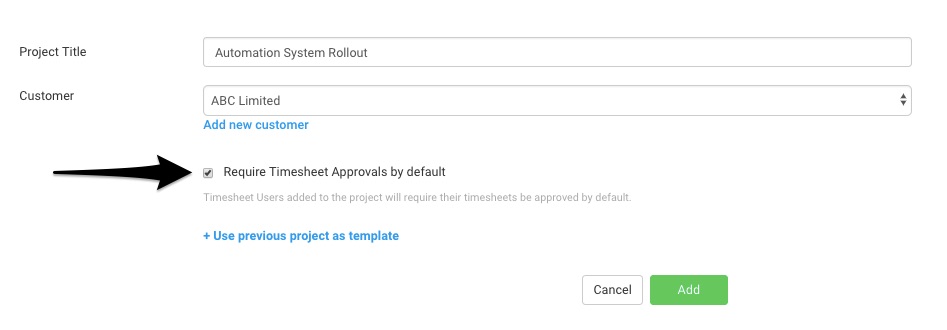 Figure: Switch on Timesheet Approval when Creating Project
You can edit these later if needed by opening Project Settings and switching this option on or off.
 Figure: Switch on Timesheet Approval in Project Settings
Assign Timesheet Entry & Approver Role
To assign team members the appropriate project-level roles, head over to Project Settings > Scroll down to Project Members > and Click on the team member whose role you want to adjust.
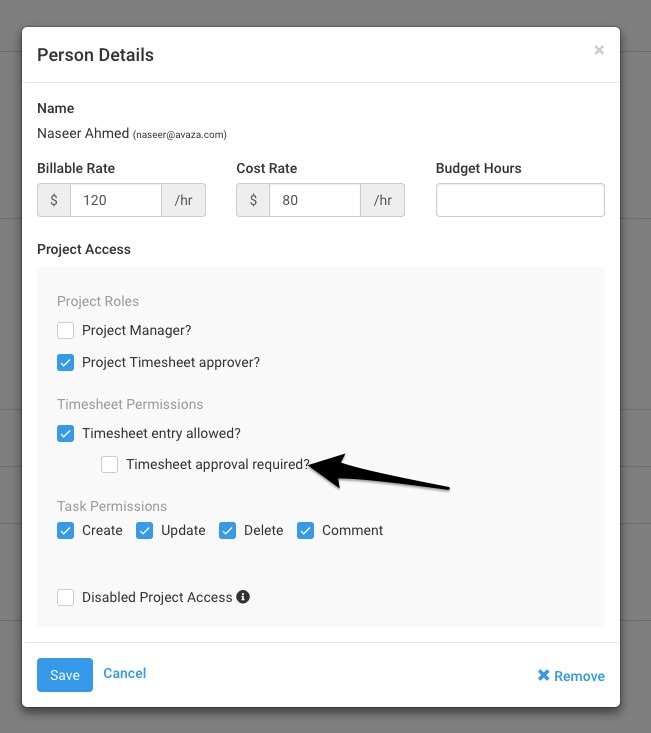 Figure: Switch on Timesheet Approval Required at Person-Level
Enable “Timesheet Entry Allowed” for project members who need to enter time, and then enable the “Timesheet Approval Required” checkbox if their timesheets need to be approved. This setting should already be enabled if the user was added to a project with the “require timesheet approvals by default” setting on.
Similarly, you can enable the “Project Timesheet Approver Role” for project members who can approve timesheet entries. This setting should also be automatically on for anyone who has the account-level Timesheet approver role. The project-level role only works if the user has the account-level Timesheet Approver role assigned to them.
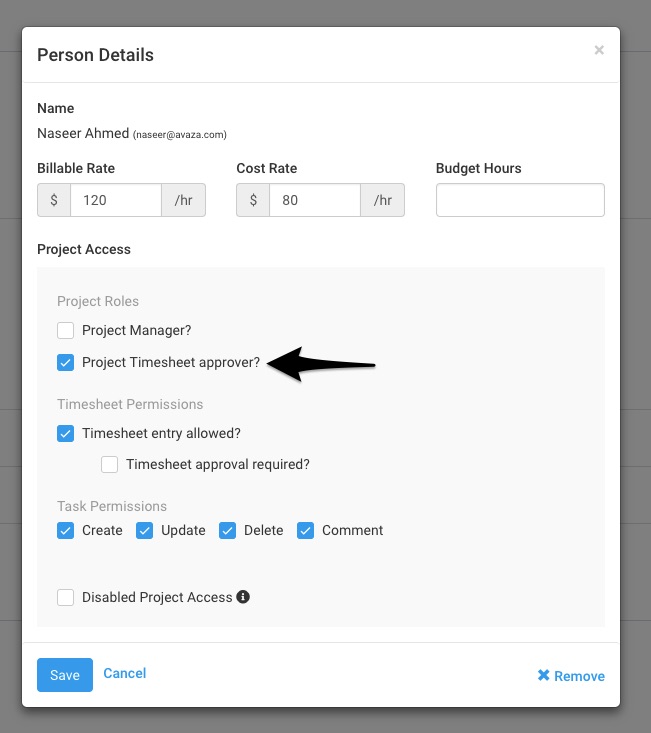 Figure: Switch on Timesheet Approver Role at Project Level
Timesheet Submission and Approval Process
Submitting Timesheets
Once project members who need to submit timesheets for approval have the appropriate role, they will see a “Submit for Approval” button under any new timesheet entries for relevant projects.
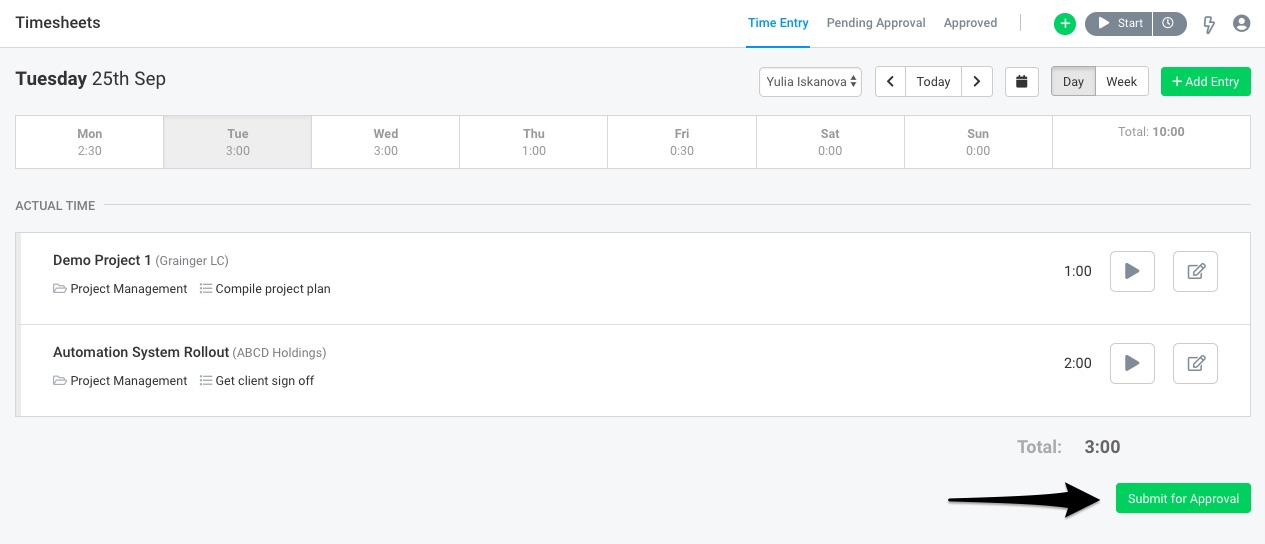 Figure: Submit Timesheets for Approval in Day-View
This button will be visible on the Global Timesheet popup, as well as the Day-View and Week-View of timesheets, and is only visible to users when a timesheet they create needs to go through the approval process.
 Figure: Submit Timesheets for Approval in Week-View
 Figure: Submit Timesheets for Approval on the Global Timesheet popup
Approving or Rejecting Timesheets
Users with the Timesheet Approver role will receive an email notification whenever timesheets are submitted for projects they are approvers on.
To approve or reject timesheets, Timesheet Approvers need to navigate to Timesheets and click on the Pending Approval tab.
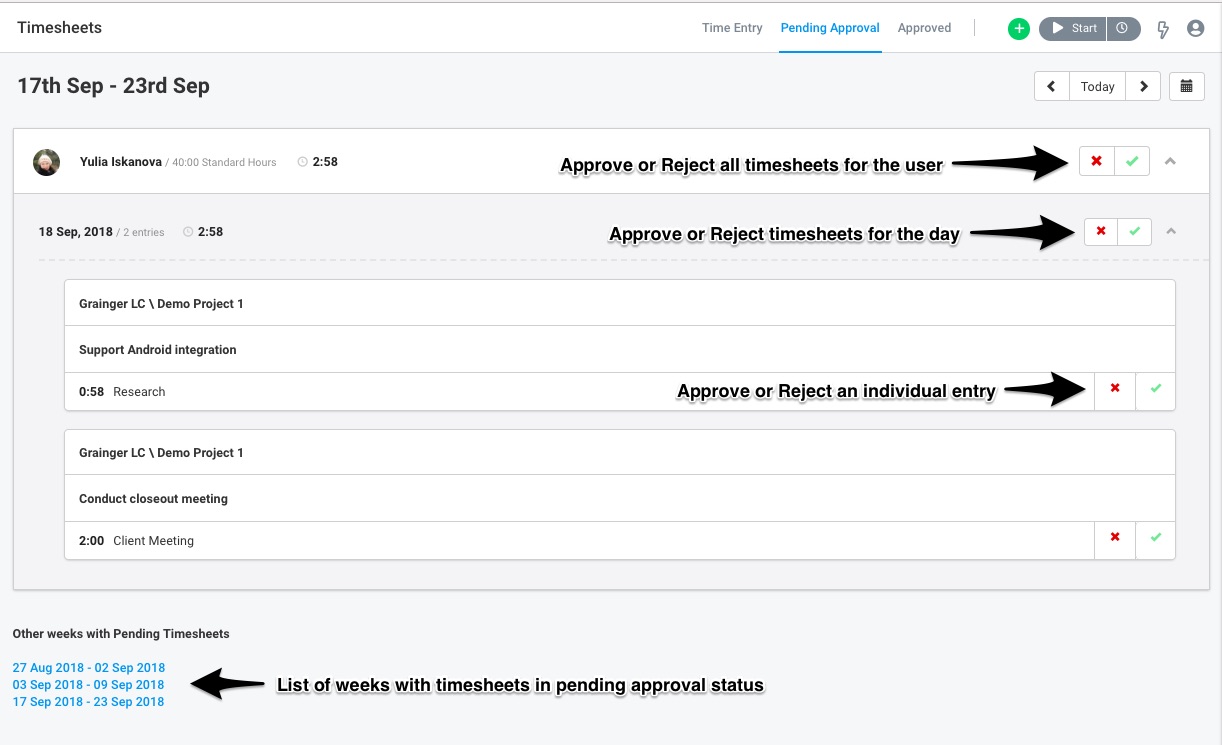 Figure: Approve/Reject Timesheets at Person, Day or Entry-Level
On this tab, they will be able to see all pending timesheet entries by week and can either approve or reject all timesheets for a team member, all timesheets for a particular date, or each individual timesheet entry.
They can also go back to previous weeks, or click on the links under “Other weeks with Pending Timesheets” to view other unapproved timesheet entries.
Viewing Approved Timesheets
All approved timesheets and those timesheets that are automatically approved are moved to the Approved tab, where they can be viewed by users who have the Timesheet Approver or Admin role.
On the Timesheet Approved Tab, the logged-in user can only view approved timesheet records of projects for which their project member record has the “Project Timesheet Approver?” checkbox checked.
Clicking on the collapse/expand button will collapse or expand the grouped timesheets so you can see more details. Approved timesheets also show the name of the user who approved the timesheet and the date it was approved on.
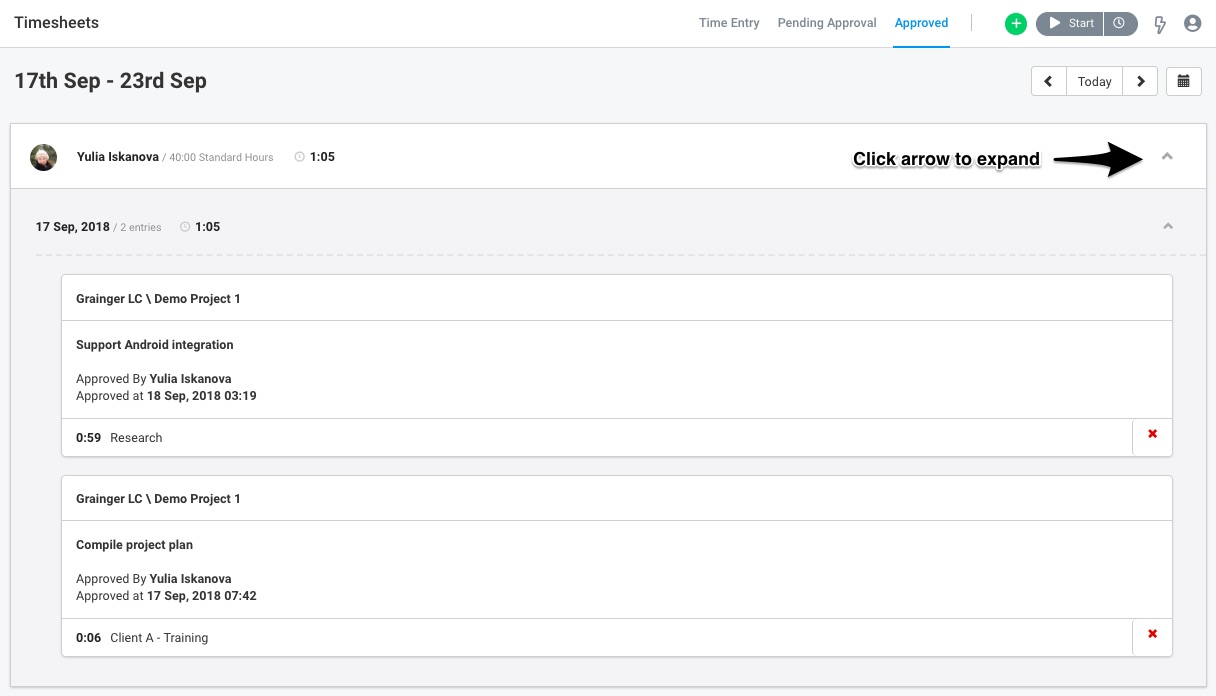 Figure: View all Approved and Auto-Approved Timesheets
They can also go in and reject already approved timesheets if needed.
Viewing Timesheet Status
On both Day-View and Week-View, users can see which timesheets of theirs are pending, approved or rejected. This is done using color-codes.
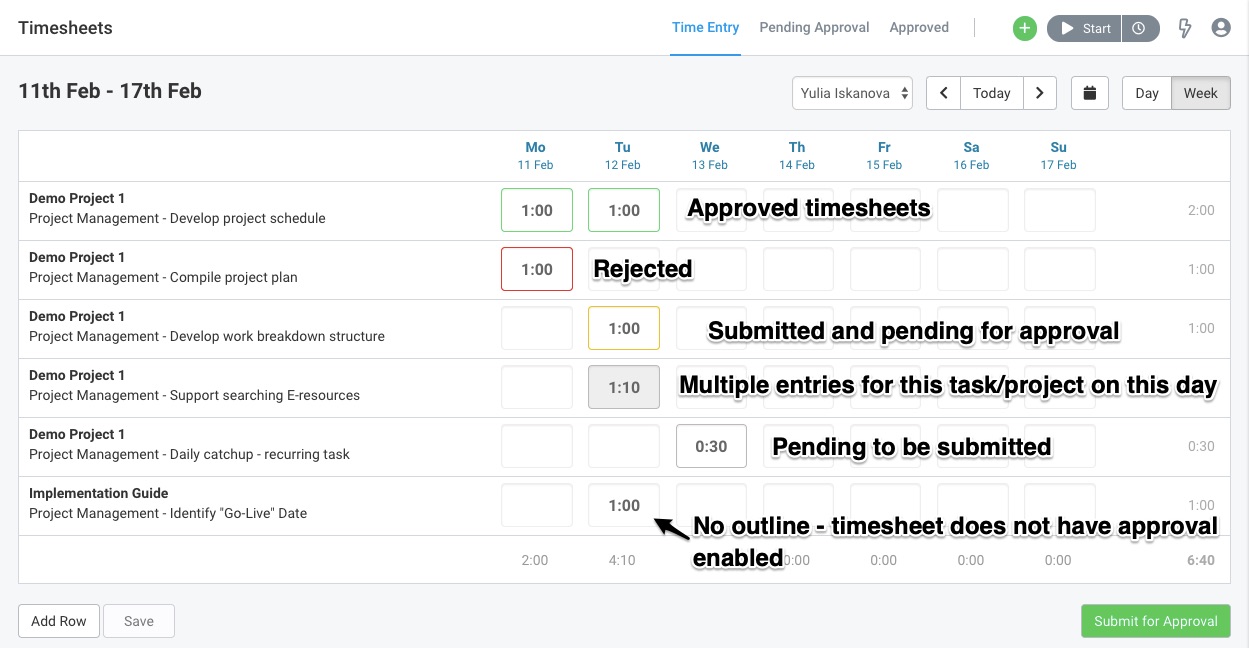 Figure: View Status of Each Timesheet Entry
- Green (with box grayed out): Timesheet Approved, and locked for further edits.
- Green: Timesheet Approved.
- Orange: Pending Approval.
- Red: Rejected. This entry can be edited and re-submitted,
- Greyed out cell: There are multiple timesheet entries added for the same task/project for the same date. To edit, switch to the Day-view.
Hope this guide helps you understand how to submit and approve timesheets in Avaza. If you need further help, feel free to contact our support team via chat or by emailing support@avaza.com.

