The overall success of each project is the project manager’s top priority. Projects that go wildly over-budget are not considered successes, even if delivered on time and according to client specifications.
The Project Settings page in Avaza is instrumental for project managers who want to bill, budget and provide project collaborators access to projects. Project settings can be accessed by users assigned Admin, Finance Manager or Project Manager roles.
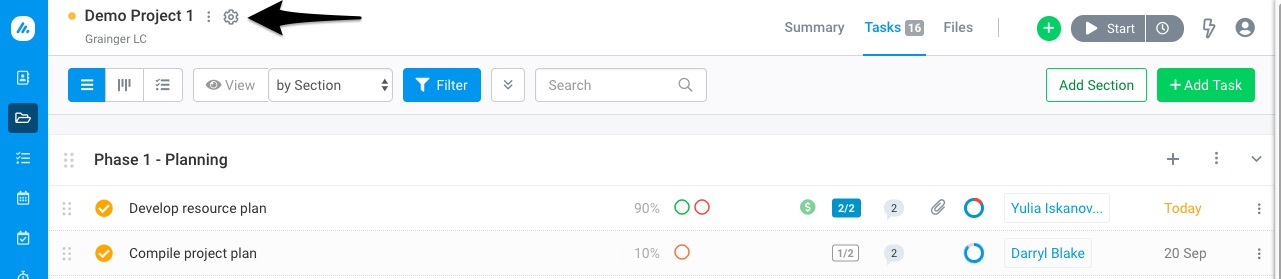 Figure: Click the Project Settings Cog to Access the Page
Important concepts to understand before we dive into this guide:
Timesheet Categories
Essential when you’re tracking time against your projects, timesheet categories you set up here will be available for users to select when entering a timesheet. This is also where you specify which categories of work are billable or non-billable for invoicing purposes.
For example, if you are a design agency, you may want to breakdown timesheet entries by time spent on research, design, administrative activities, and meetings, and you might decide all those categories are billable except for administrative activities.
Various useful reports are available to help you understand the types of work your team is performing (e.g. Timesheet Summary Report & Timesheet Details Report).
Since timesheet categories are set as billable and non-billable, this also helps you keep track of how much of your team’s time is spent on activities that you cannot charge a client for.
Billable Rates Versus Cost Rates
For both timesheet categories and project members, you can establish billable and cost rates.
On each project, you can choose whether to bill based on a Project-wide hourly rate, per Project Member rates, or on the Timesheet Category rates. Once you’ve selected one of these approaches, you can set up Billable and Cost rates on the Project Settings page.
Billable rates, referred to simply as “Rates” in the app, are the rate that is invoiced to your client. John may have a rate of $200/hour or you may be charging $40/hour for each hour of editing.
Cost rates equate to the cost you incur for having that team member work on a project. These are used in reports to help you optimize the performance of your business. One such report would be the Project Summary Report or the Project Profit Margin Analysis report.
Note: When calculating Timesheet Costs, we prioritize the Timesheet Category Cost Rate over the Person Cost Rate. If you would prefer to use use the Person Cost Rate, then do not enter a cost rate for Timesheet Categories on that project.
Only your Admins, Finance Managers and Project Managers can see Billable and Cost rates.
Project Members
Project members are the people that work on your project with you. They can collaborate on a project and work with tasks, files & task discussions. When given timesheet access, they can track time on the project. Project members are explained in more detail later in this guide.
The Project Settings Page
Project Title
You’ve already selected a project title when you started the project, but you can change it at any time if you need to. Only Admin, Finance Managers and Project Manager level users can change the name of the project.
Customer
Similar to project title, you can change the customer the project is assigned to using this field. Changing the customer is possible when no transactions (for example invoices) have been created for the project.
Start/End Date
Set the Start date or End date for your project. You can change this at a later stage.
Project Status
Keep an eye on the overall status of your project using Project Status. This is used in some of the reports and is displayed on the All Projects page.
Project Category
Projects can be labeled using Categories, which are created via Settings > Project Management Settings. Categories are color-coded, so you can easily spot them in a list and will also show up on resource scheduling. Only an administrator can set up and modify categories. These can also be used to filter project lists while using reports.
Project Tags
Project Tags are used to organize and add context to your projects. You can assign multiple tags to projects by entering them directly in the provided field. The project tags can be used to search for Projects on the All Projects page, the Team Schedule page, and used for filtering/grouping in reports.
Admin users can head over to Settings > Project Management Settings to manage all project tags in their account.
Setting up a Time Billing Method
Businesses bill their clients in many different ways. The methods vary by industry, project type, and even country. Avaza makes it easy for you to bill your clients using the method that works best for you.
Note: Does your project require you to track time? If not, then you do not need to worry about time billing methods. The Time Billing method field is only relevant for projects that need to bill based on hourly rates.
You can set the Billing Method as “Not Billable” so you can continue to track time without billing it, yet still invoice for fixed amounts and expenses.
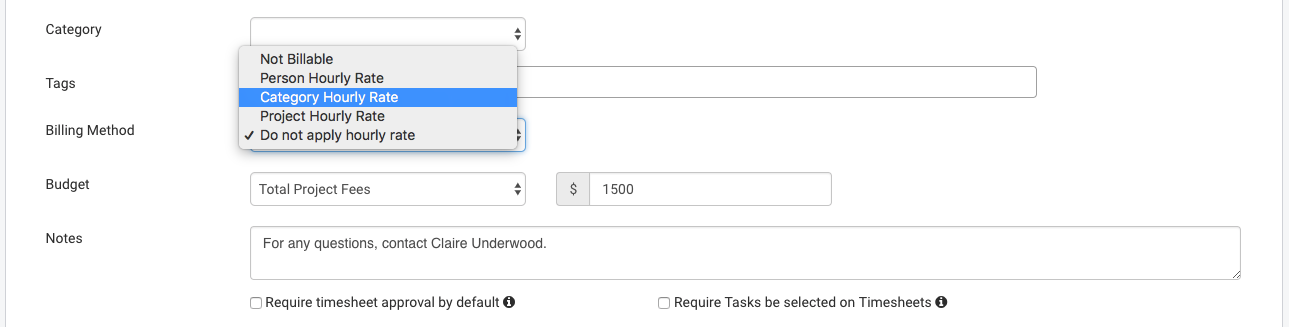 Figure: Options for Time Billing Methods
Projects that need to be time billed can be invoiced in one of four ways:
1. Time Billing by Person Hourly Rate
Some project member’s time is worth more than others. This is especially true for consultants, where senior consultants can charge double what a junior consultant can.
With Person Hourly Rate billing, you can enter different hourly rates for each person working on the project, and the client will be billed according to those individual rates.
Example:
Jack has a rate of $85.00/hour. He tracked 18 hours towards the Task “Homepage Design”
Sally has a rate of $110.00/hour. She tracked 7 hours towards the Task “Homepage Copy” and 4 hours to “Blog Content”
When the Invoice is generated, your Client will be billed:
18 hours at $85/hour (Jack’s hours)
11 hours at $110/hour (Sally’s hours).
Total Amount Invoiced to Client: [18 x $85 + 11 x $110] = $2740
2. Time Billing by Category Hourly Rate
Sometimes you need to bill a client a different rate for the type of work being done. A website designer, for instance, may want to bill one rate for time spent on research and another rate for the time spent actually designing a website. They may even have a third rate for client calls.
With Category Hourly Rate, you can bill clients based on timesheet categories. When you’re creating or editing a project, you can easily add timesheet categories (which we talk about later in this guide), set rates for them, and choose whether they are billable or not.
Example:
“Website Development” has a rate of $120/hour.
“Graphic Design” has a rate of $50/hour.
Jack tracks 4 hours to Website Development and 7 hours to Graphic Design. Sally tracks 3 hours to Website Development and 5 hours to Graphic Design.
When the Invoice is generated, your Client will be billed:
7 hours at $120/hour (Website Development)
12 hours at $50/hour (Graphic Design).
Total Amount Invoiced to Client: [7 x $120 + 12 x $50] = $1440.
3. Time Billing by Project Hourly Rate
Some businesses bill clients based on project hourly rates. The project will have one hourly rate and regardless of the type of work or person, this is the rate the client will be billed. This means each hour tracked on this project will be billed at the same rate.
4. Time Billing – Do not apply hourly rate
For projects where you would prefer to enter a rate at the time of invoicing, you can choose the “Do not apply hourly rate” option. This is also a great option for pro-bono projects.
Setting up Project Budgeting Methods
Setting a project budget can help you track how time is being utilized on a project, and help you prevent going over-budget. Avaza lets you choose the budgeting method that works best for your business so you can keep a track of project profitability.
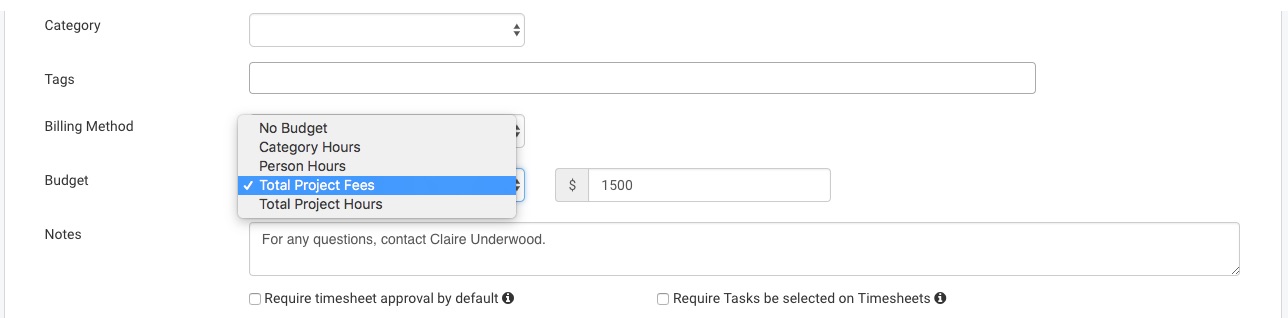 Figure: Options for Project Budgeting Methods
1. No Budget
For projects that don’t need a budget, simply choose No Budget and move on to the next part of this guide.
2. Total Project Fees
Choose Total Project Fee and simply enter the budget for the entire project. This Total Project Fee is used in the Project Dashboard Report and the Project Profitability Report.
3. Timesheet Category Hours
Budgeting a specific number of hours for each timesheet category helps you divide the total hours you expect your team to put in on a project by timesheet category, and then track actual versus planned time usage. Project Summary Report allows you to compare budgeted hours vs actual hours tracked.
This budget method is useful where you care more about the hour-based effort used rather than any rates and is especially popular on internal projects or when billing by Category. (e.g. Let’s aim for 300 hours of design and 30 hours of meetings)
4. Person Hours
Do you want to track how much time each project member is spending on a project? Use Person Hours as a budgeting method to enter budget hours for each team member, and then track the time they are allocating using Project Summary report.
5. Total Project Hours
Track the overall time spent on a project using Total Project Hours and compare it to actual hours tracked to stay on budget.
Timesheet Settings
Enabling Timesheet Approval ensures that all new timesheet users added to the project will require timesheet approvals by default.
If you require all timesheets to be linked to specific tasks, check the box “
Notes
Enter notes that will be displayed to project members on the Project page under the Project title. You can use this field to communicate important messages to the team. For example; hard deadlines.
Setting Timesheet Categories
We’ve already explained why you need billable or non-billable Timesheet Categories earlier in this guide.
In this table, you can view all current Timesheet Categories in the Timesheet Categories list, as well as their billable status.
To add a Timesheet Category, click the +Add Category button. Choose from the list of Existing Categories, or create a new Category. Timesheet Categories can also be created by going to Settings > Timesheet Settings.
While setting up a new Timesheet Category you can choose whether it should be added to all new projects by default or manually pull it into relevant projects as needed.
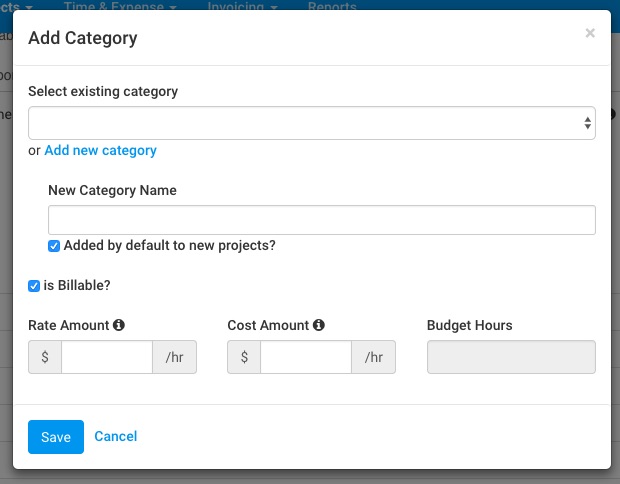 Figure: Create Timesheet Categories Using the Add Timesheet Category Popup
Based on your business needs you can mark the categories as billable or non-billable for each project. Just enable the box if you want to make a category billable.
Enter a Billable rate for the category, and where applicable, a Cost Rate. You can also set a budget for the number of hours you don’t want to exceed for each category.
Setting Expense Category Budgets
You can define an expense budget per expense category for a project in this section. To can view expense budget per category, and actual expenses tracked against it, use the Project Summary Report.
All expense categories that users can enter expenses against can be seen on the Settings > Expense Settings page. To assist with managing budgets at the project level you can choose to add Budgets for one or more of these expense categories. Expense category budgets allow you to track expenses incurred in specific categories, for example, travel or meals.
To add a new Expense Category Budget, click on the +Add Category button, choose from the existing expense category list or add a new category, and set a budget amount. New expense categories can also be created by going to Settings > Expense settings.
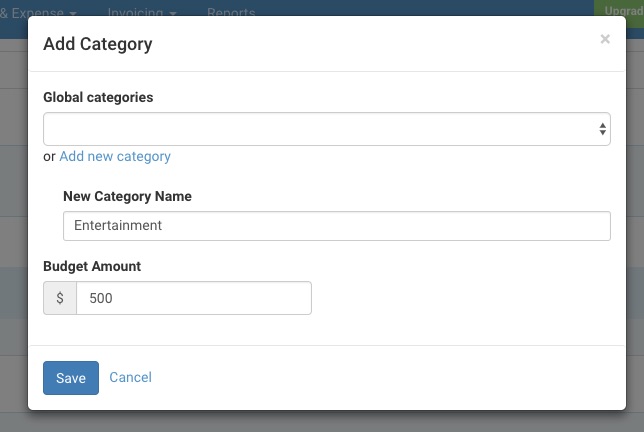 Figure: Create Expense Category Budgets Using the Add Expense Category Popup
Managing Project Members
To give team members access to a specific project, you first need to add them as an account member and assign them the Project Collaborator role (or another project role) globally via the Contacts page. Then you can add them as a Project Member on a project so they have access to the project and associated tasks.
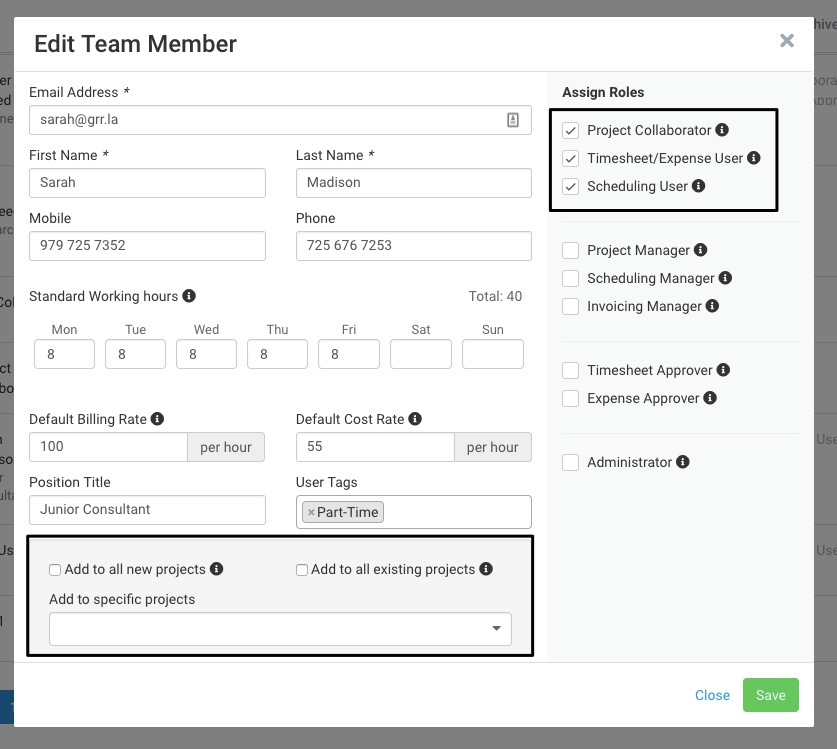 Figure: Assign User Roles and Add New Users to Projects via Contacts
You can also add users to a Project from the Project Settings page.
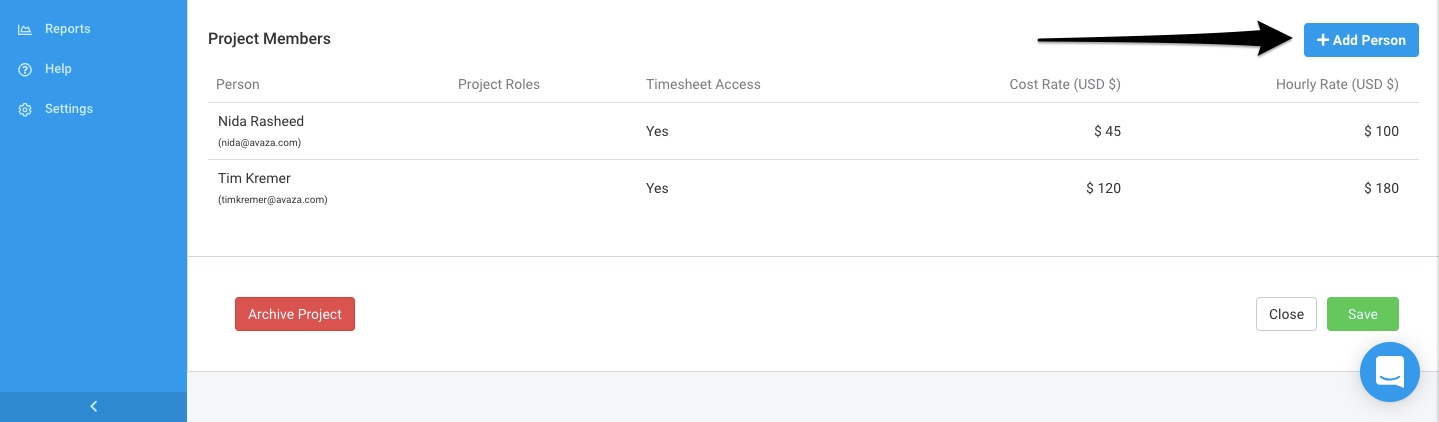 Figure: Add Users to Projects via Project Settings Page
When viewing team members on a project, you can see timesheet approval settings, and for projects that are being charged by “person hourly rate”, you will see the cost and billable rates per user. If your project is using the Person hours budget method, you can also set budget hours for each user.
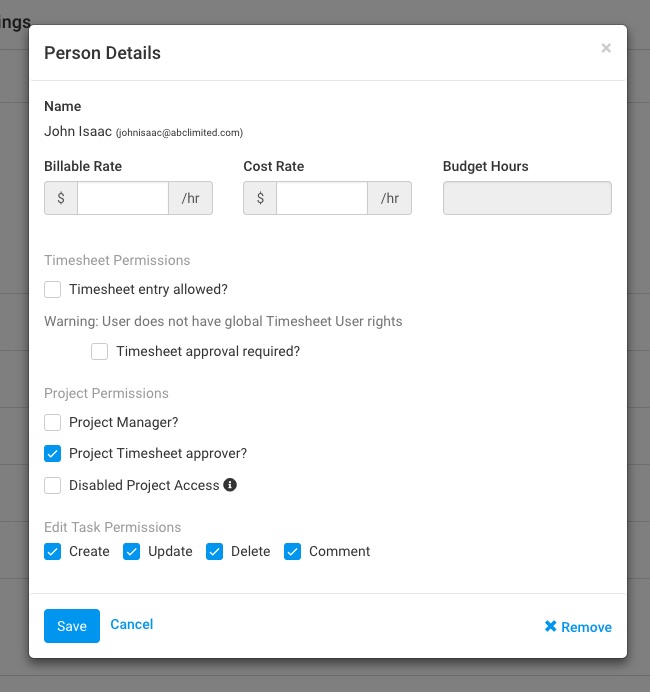 Figure: Adjust Project Members and Project-Level Roles
There are various roles you can assign to each project member:
Timesheet Permissions
Timesheet Entry Allowed: User that already have the global timesheet/expense user role can be given access to track time per project. To provide this access, tick the Timesheet Entry Allowed box.
The reason we have both project and account level permissions is so you can have users who can track time on one project, but not another.
Timesheet Approval Required:
You might have some team members whose timesheet entries need to be approved. For these, you can tick the Timesheet Approval Required box. This enables Timesheet Approval for this user’s timesheets on the project.
Only users who have the “timesheet approval required” checkbox enabled need timesheet approvals for the project.
Project Permissions
Can Manage this Project’s Settings:
By checking Can Manage this Project’s Settings you are granting the project member access to the project settings page. However, in order for the project member to be able to access the Project Settings page they must also be assigned the Project Manager role at the Contact level.
Can Manage Project Member Cost & Billable Rates:
In order to allow the user who can access the Project Settings page to view and manage Cost & Billable rates for project members check this option.
Can Manage Fixed Amounts on project:
In order to allow a project member to access Fixed Amounts on tasks check this option. The user must also be assigned the Project Manager role at the Contact level.
Project Timesheet Approver:
This project-level role allows a user to approve timesheet entries submitted by other project members. These users must have Global Timesheet Approver role as well.
Both internal team members and external contacts can be given the timesheet approver role. This allows your customer contacts to approve your timesheets if desired.
Project Expense Approver:
The Expense Approver at Project Level feature allows you to assign specific approvers for project-related expenses, similar to timesheet approvals. Project Expense Approvers can only approve expenses linked to projects they are assigned to, ensuring better control and accountability.
These users must have Global Expense Approver role as well.
Disabled Project Access:
Should you need to disable a user’s access to a project entirely, you can enable “disabled project access” for them. This retains all their data for the project but removes their access to the project. They can still work on other projects on your account. This setting is automatically enabled for all users who are archived at the account level.
Edit Task Permissions
Choose what access each project collaborator has when working with tasks. You can choose to give them access to create, update, comment on and delete tasks.
You can also Archive the project from this page. Archived Projects can be deleted by going to Projects > All Projects > Archived tab > 3-dot control.
Hope this guide helps you understand how to manage Project Settings in Avaza. If you need further help, feel free to contact our support team via chat or via email.