Tasks are the heartbeat of Avaza Projects. Work is created, estimated, assigned, collaborated on and delivered via tasks.
Big projects can be managed best when broken down into sections, task types, individual tasks, and subtasks. A new product launch, for instance, may have multiple project sections, that help you create a more efficient workflow for your project, with 30-40 individual tasks under each section that need to be completed, sometimes by different team members.
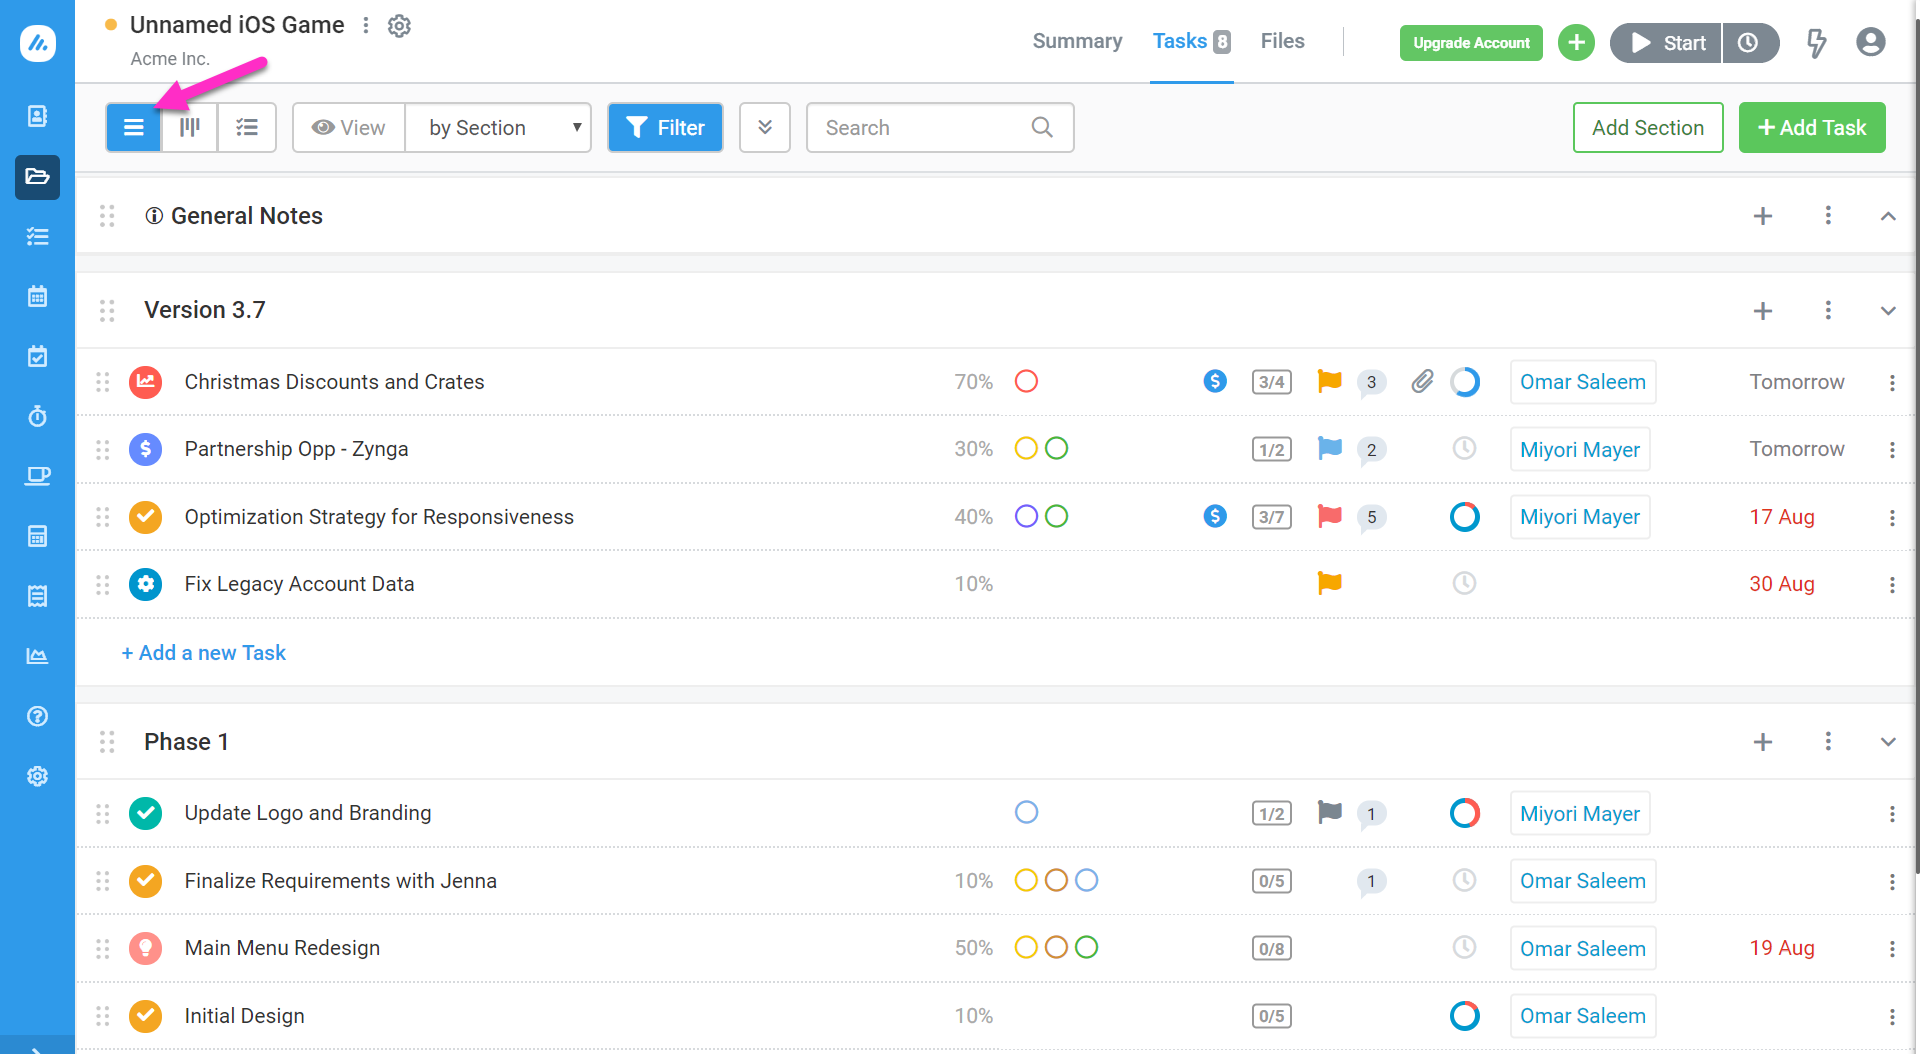 Figure: Project Tasks in List-View
Avaza Tasks lets you create those tasks, assign due dates, keep all the files and notes in one place, and then track what’s been done or not while collaborating with your team.
Managing Tasks
Large projects with 100s of tasks make it hard to find relevant tasks in a hurry. This can slow down projects and collaboration. Avaza has easy and powerful features for Grouping, Filtering, Tagging & Searching tasks.
Task Views
When viewing a project, or using the My Tasks view to see all your assigned tasks across projects, you can switch between a vertical list of tasks, a Kanban view that shows each group of tasks as a column or a Gantt Chart for establishing dependencies and auto-scheduling linked tasks.
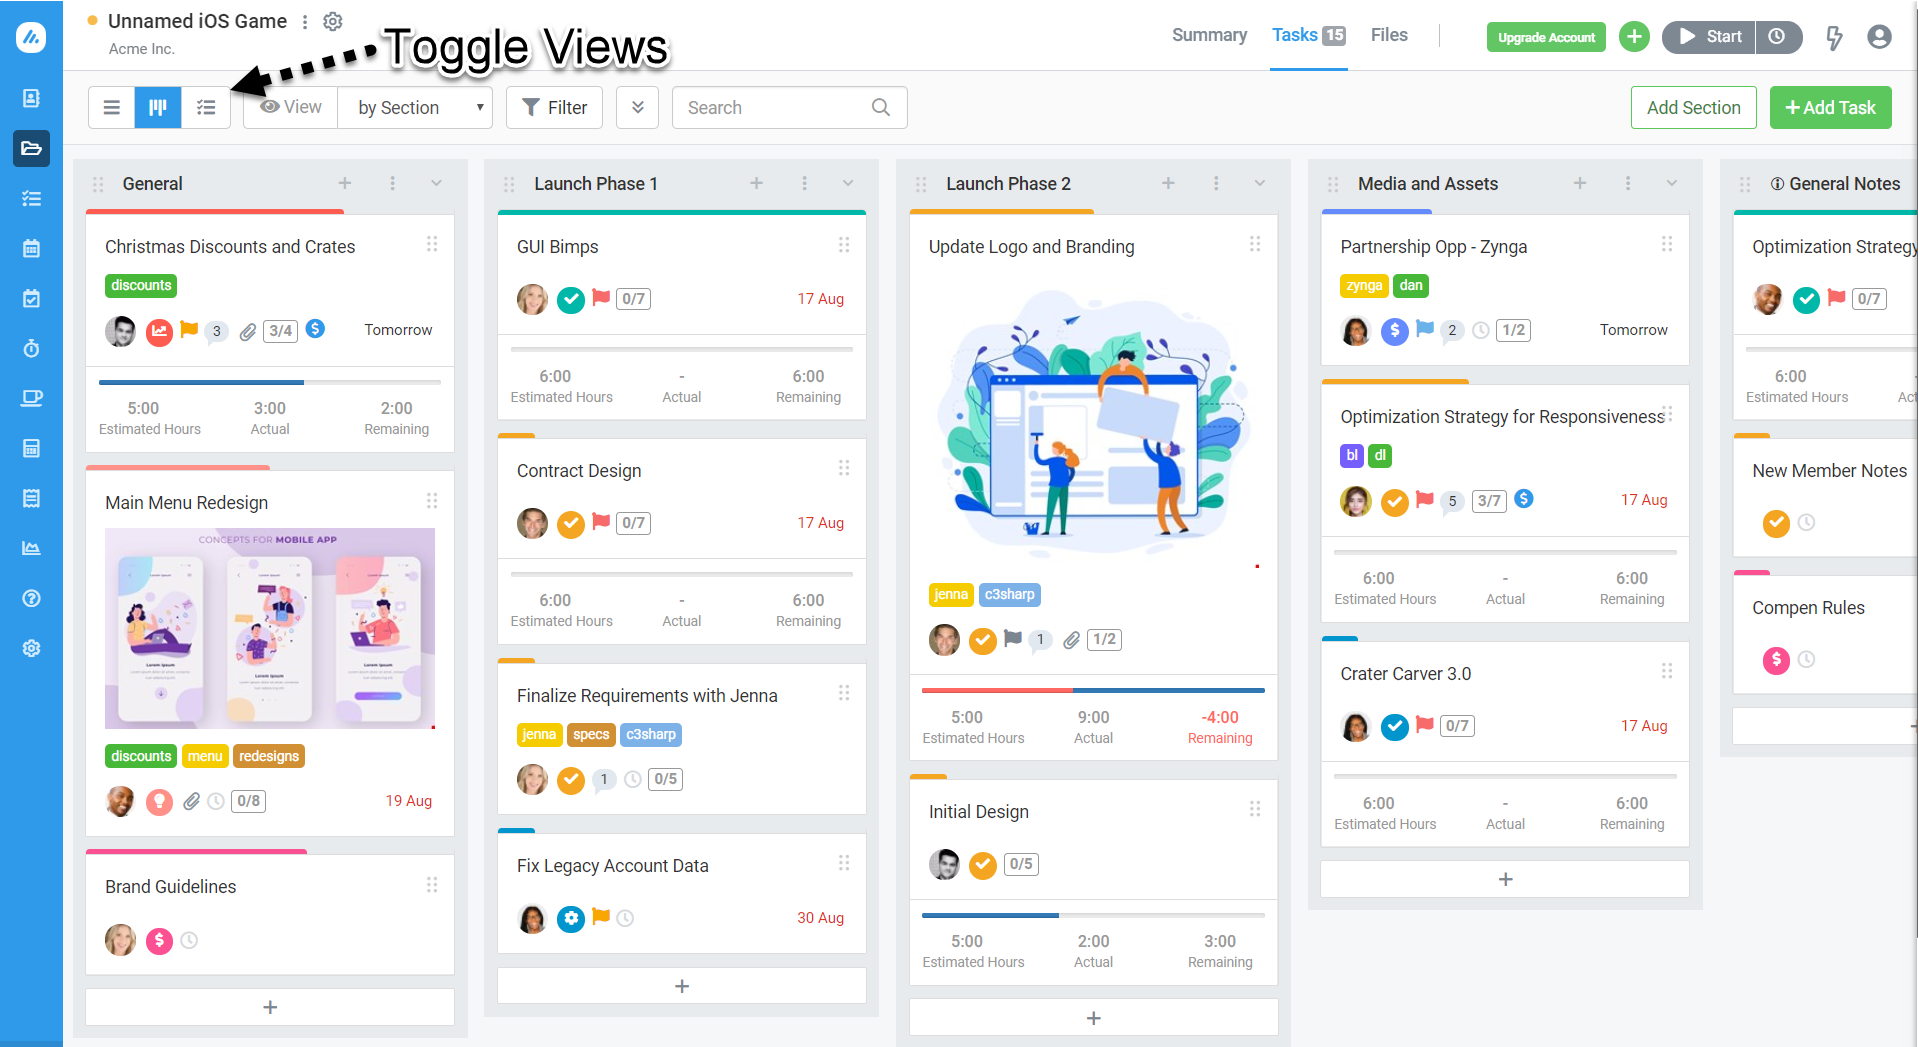 Figure: Toggle Views, and Tasks in Kanban View
Grouping Tasks
When there are a lot of tasks in a project, it helps to be able to break them down into useful groups. Tasks can be grouped by Section (default), Due Date, Priority, the person they are Assigned to and Status.
You can sort tasks in Project, task list view, by Due Date, Date Created or Date Modified etc. By default, Manual Sorting allows drag-and-drop. Selecting any other option will automatically sort tasks and disable drag-and-drop.
Sorting is applied within the selected grouping. For example, if tasks are grouped by Project, they will be sorted within each project accordingly.
Please note that the Sort By option is disabled when tasks are grouped by Due Date.
In many of these grouped views, you can drag-drop tasks to update them. E.g, drag-drop to reassign the task when grouping by Assigned To.
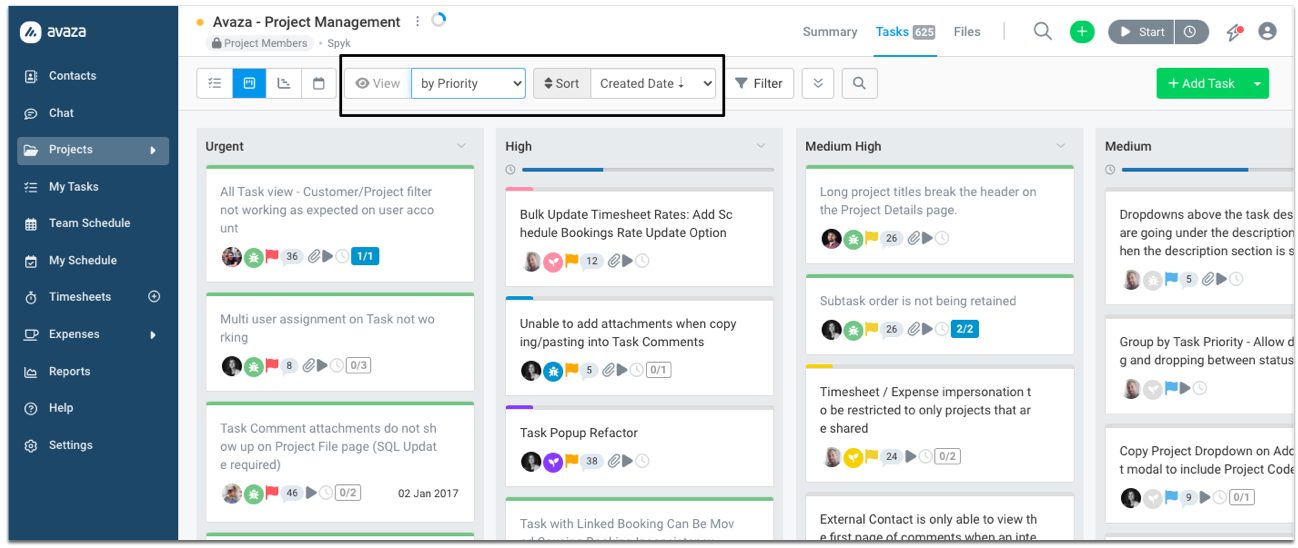
Figure: Change how Tasks are Grouped and Sorted on Project task view
Filter Tasks
You can quickly filter the tasks that are currently displayed. You can filter by Priority, Assigned To, Task Tags, Start and Due Dates, and more depending on the screen you’re viewing tasks on.
By default, you view only those tasks that are outstanding, but you can filter them based on any combination of task statuses. To view all tasks in all statuses, simply uncheck the “all Outstanding” checkbox.
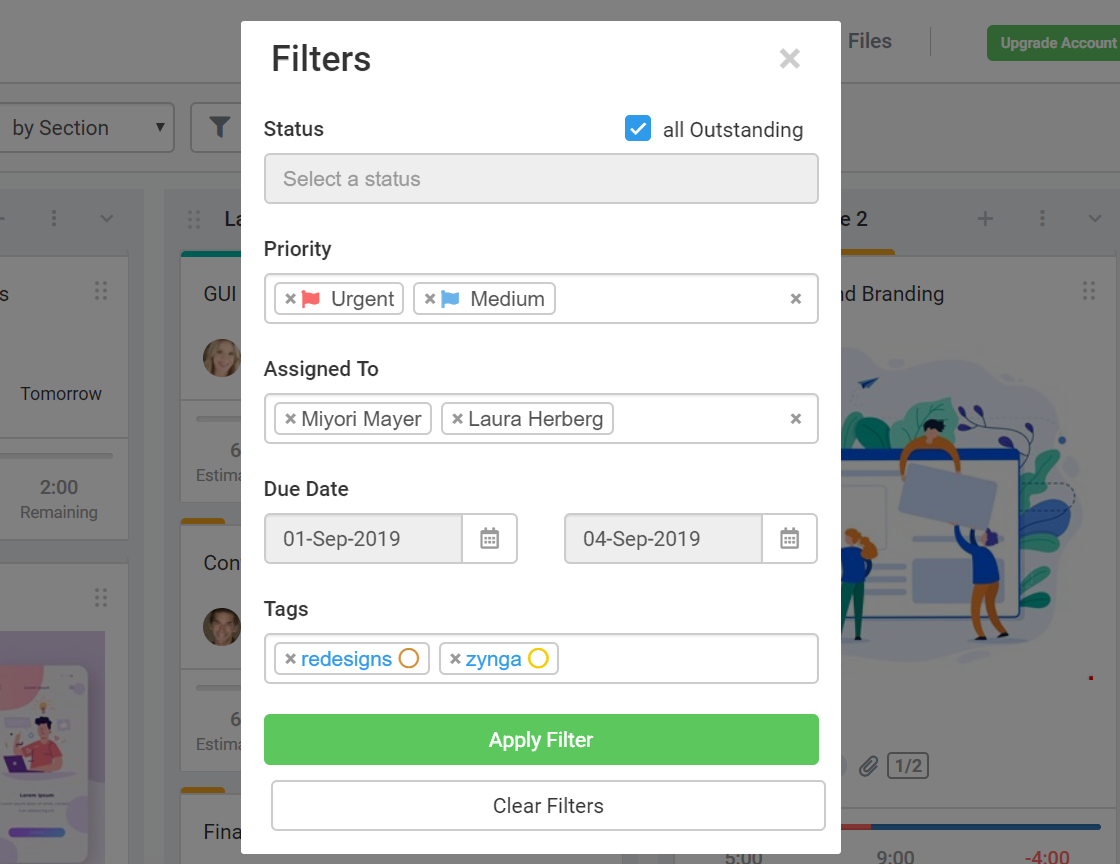 Figure: Apply Filters for Tasks
Task Tags
Tags let you organize and add context to your tasks. Team members will find it easier to track down relevant tasks using either the color-coded tags, or by using the Filter popup to find tasks with a certain tag. You can add multiple tags for the same task, and color-code them as needed. These are visible in List view as well as the Kanban view.
 Figure: Task Tags Help Provide Context
Search Tasks
Search through tasks by task title using the search box. This is the fastest way to find tasks with specific keywords.
 Figure: Search Through Tasks
Copy Tasks
Task options, such as move, copy, or delete, are accessible via a 3-dot control. You can Move and Copy tasks from one section to another or even across projects when viewing tasks in Task List and Kanban views.
To move an independent task, click on the 3-dot control to access the drop-down menu.
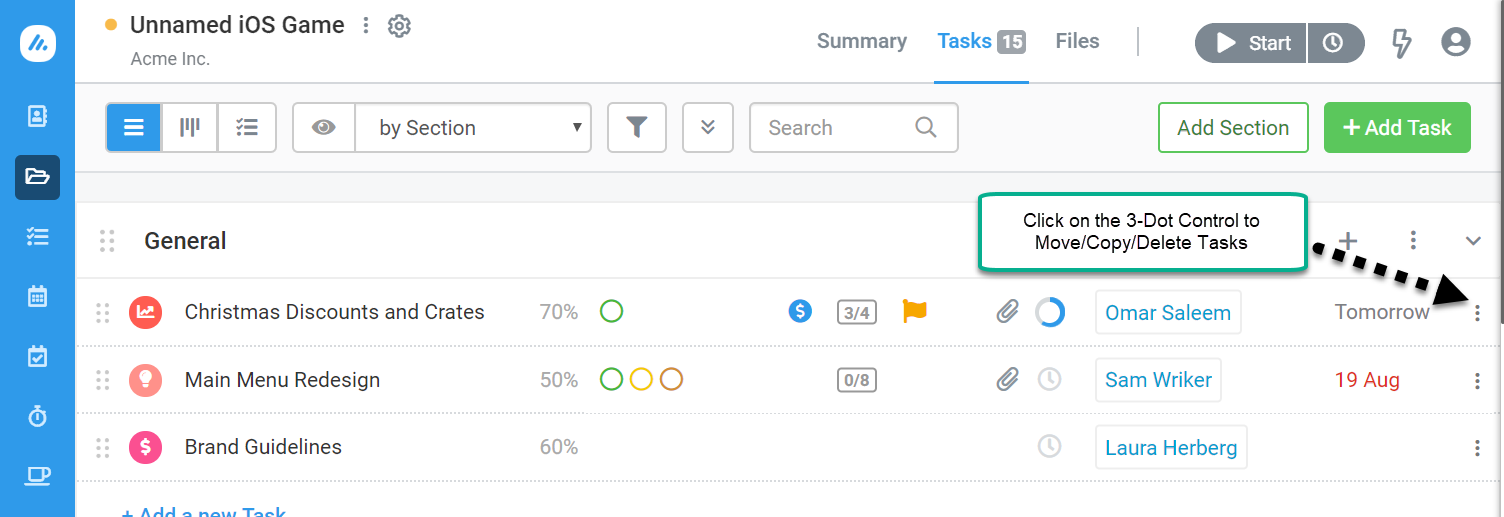 Figure: Copy Independent Tasks to Another Section or Project
You can also copy an entire Section’s tasks from one Project to another by clicking on the 3-dot control at the end of the corresponding Section.
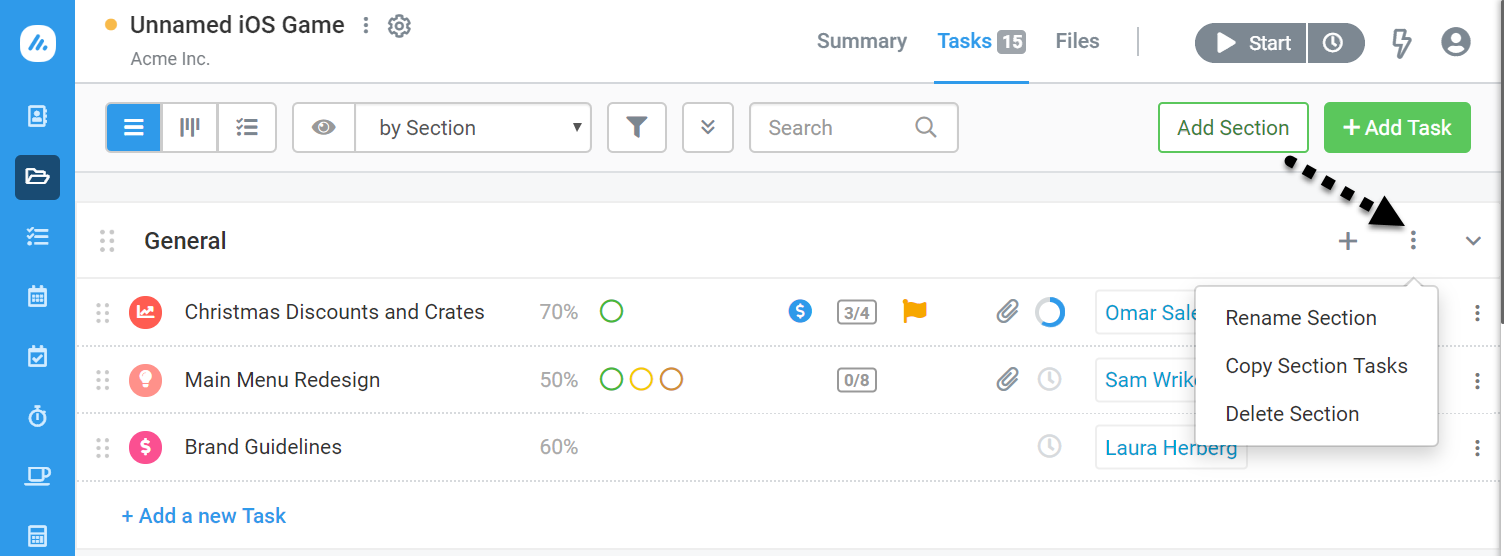 Figure: Copy All Section-Specific Tasks to Another Section or Project
An alternative way to setup tasks is importing them in a CSV format. Admins can bulk-import tasks into your projects by navigating to Settings > Import data > Import tasks. For more information, refer to this guide.
My Tasks
My Tasks is your central command. It shows you all tasks assigned to you (or another team member) across projects. Be more productive by viewing tasks assigned to you in one place without getting distracted by what the remainder of the team is up to.
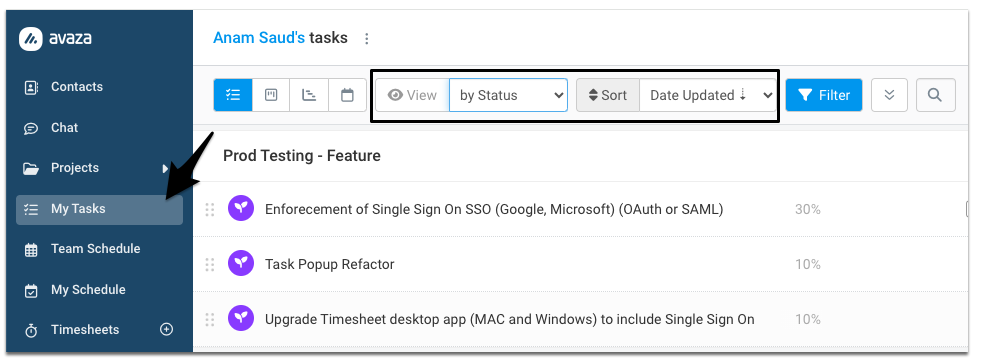
Figure: Access My Tasks to View Tasks Assigned To You
My Tasks can also be organized and filtered or grouped together just like the task list for each project. You can sort tasks in My Tasks view, by Due Date, Date Modified or Date Created etc. By default, Manual Sorting allows drag-and-drop. Selecting any other option will automatically sort tasks and disable drag-and-drop.
Sorting is applied within the selected grouping. For example, if tasks are grouped by Project, they will be sorted within each project accordingly.
Please note that the Sort By option is disabled when tasks are grouped by Due Date.
File attachments relevant to your projects are also accessed from here. You can also export all of your tasks that have due dates to an external calendar app using our iCal integration.
You can quickly view tasks assigned to any one team member using My Tasks as well. Just click on your name at the top of the page, and choose the team member you want to view tasks assigned to. When viewing someone else’s tasks, you will only have access to the tasks that are under projects you are also a member of.
All Tasks
View all tasks across your account (based on projects you are a member of) by going to Projects > All Tasks.
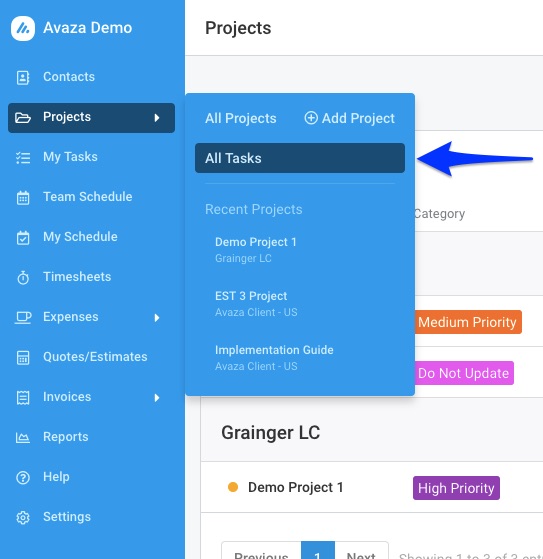 Figure: Access All Tasks View from the Projects Drop-Down on the Side Navigation
The All Tasks view only shows tasks in list-view, and allows you to search, filter, and sort the list as required.
By default, the list of tasks is sorted by the date they were last modified on in ascending order. You have multiple options to choose from to change the order in which tasks are displayed.
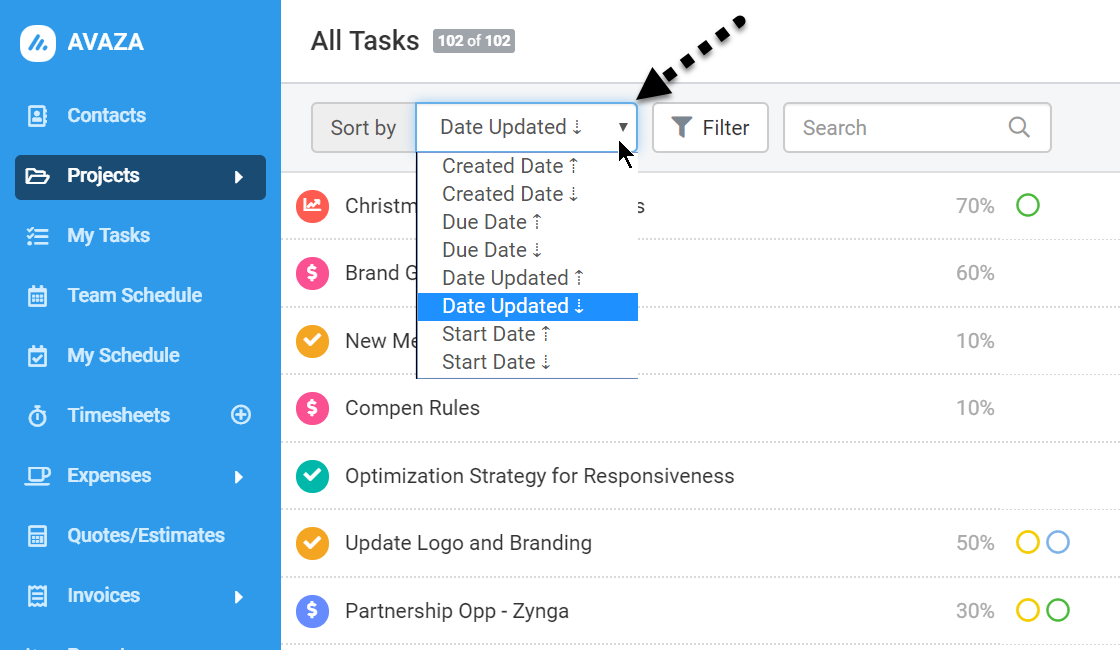 Figure: Click on ‘Sort By’ to Apply a Different Sorting Option
Creating the Perfect Task
The best tasks are comprehensive, providing those collaborating over it with all the details they need to get the job done in one place.
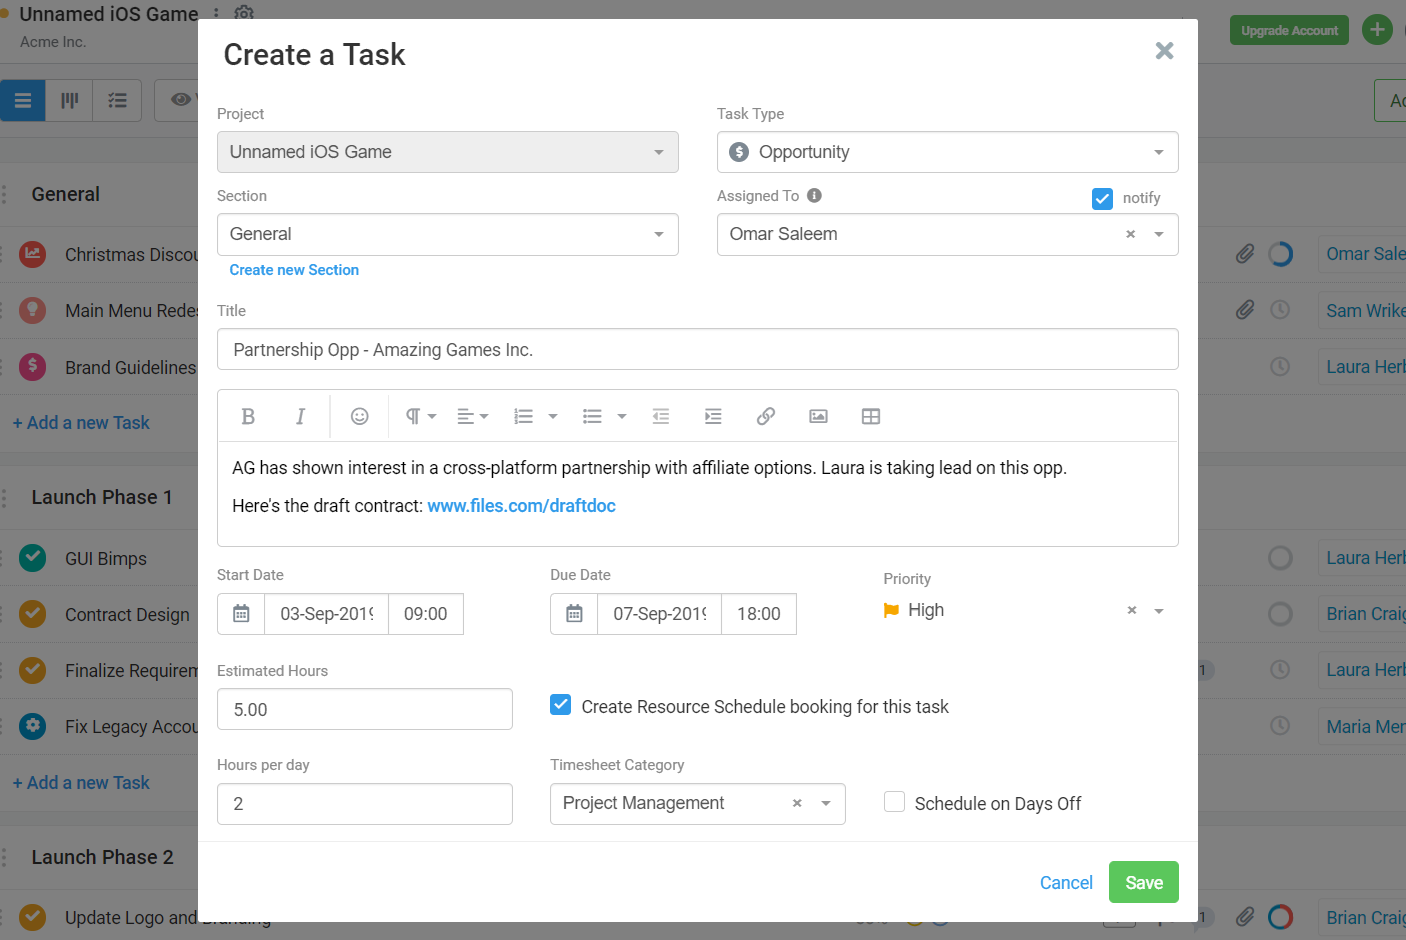 Figure: Fill Out The Task Create Popup
Task Types
Task Types allow your team to differentiate between different types of tasks your team works with. For example, you might create separate Task Types for Issues, Bugs, Change Requests, Campaigns, Leads, Ideas and so forth. Learn more about Task Types in this guide.
Each of these Task Types can have their own workflow of Custom Task Statuses.
For instance, if you have two types of tasks (Features & Bugs) that follow a different status workflow then simply create two task types with the list of specific statuses for each type and you are good to go.
Project Sections
Tasks need to be assigned to project sections. Sections are a convenient way of arranging tasks by stage/phase.
Every business may have their own preferred workflow for projects, whether it is dividing projects into phases or another method, and each task you create has to go into one of these sections.
Assigned To
You can assign the task to one or more team members and hold them accountable for its completion. Avaza allows you to assign tasks to multiple project members, but you can also add followers if more people need to stay informed about comments on the task.
When tasks are assigned to someone a notification is sent out to the task assignee/assignees and other users who are added as followers on the task. They can change the status of the task, collaborate with you on it, and mark it as complete once the work is finished.
Task Title
Each task begins with a task title. Enter a descriptive title that clearly conveys to the reader what that task pertains to. The more specific your task title can be, the easier it is for team members to understand how it fits into the overall project.
Task Description
Enter task-specific details into the rich text description box. These can include links to relevant URLs, inline images, bullets to break longer descriptions down, tables and much more. We even let you use emojis!
Start and Due Dates
Adding a start and due date to a task provides team members with a deadline to finish the work by and helps arrange the task list. Tasks that are due sooner will be shown above those that are due at a later date when sorted by Due Date. However, project managers can manually order the task list using ‘drag & drop’ function in other task groupings (by Section, Status or Assigned To).
Adding both start and due dates to the tasks will also allow you to add them to the Gantt timeline in order to visualize the project timeline and plan accordingly. By default, all tasks are set to start at 9:00 am and end at 6:00 pm, though you can override this and set custom start/end times as required.
Tasks with start/end dates and time can also be synced with an external calendar of your choice using the iCal link at the project level or just for individual tasks on the My Tasks page. Learn more about syncing your tasks with an external calendar here.
 Figure: Sync Project Tasks with an External Calendar
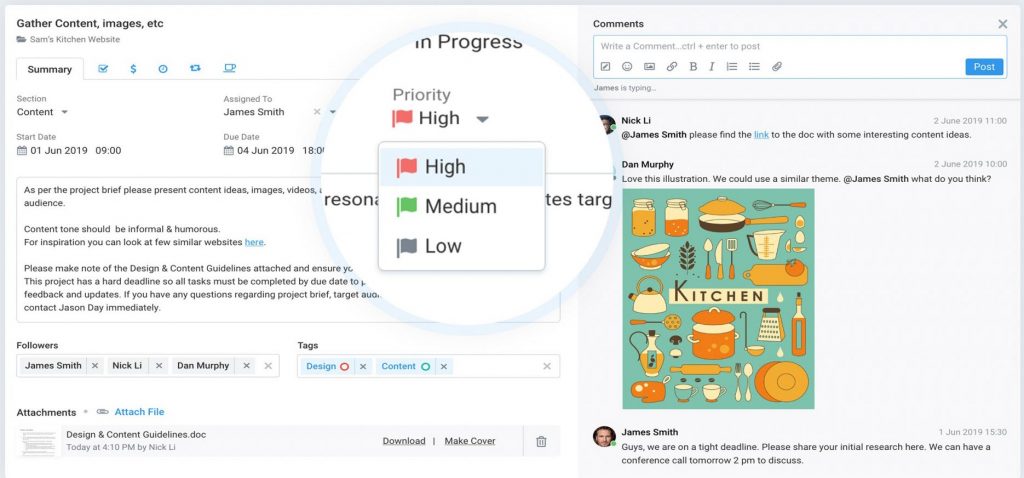
Task Priority
Task priorities allow you to easily prioritize your tasks to clearly plan what to do next.
Your account starts with a few predefined priorities. However, your account Administrator can configure a custom set of Priority options to suit your organization’s needs by navigating to the Settings > Project Management Settings page.
Learn more in this guide.
Estimated Effort
The Estimated Effort helps you define the target for the task in terms of the number of hours. This helps visualize how much time has actually been logged against the estimated hours in List view as well as the Kanban view. You can also run reports to compare estimated effort against actual hours across the entire project.
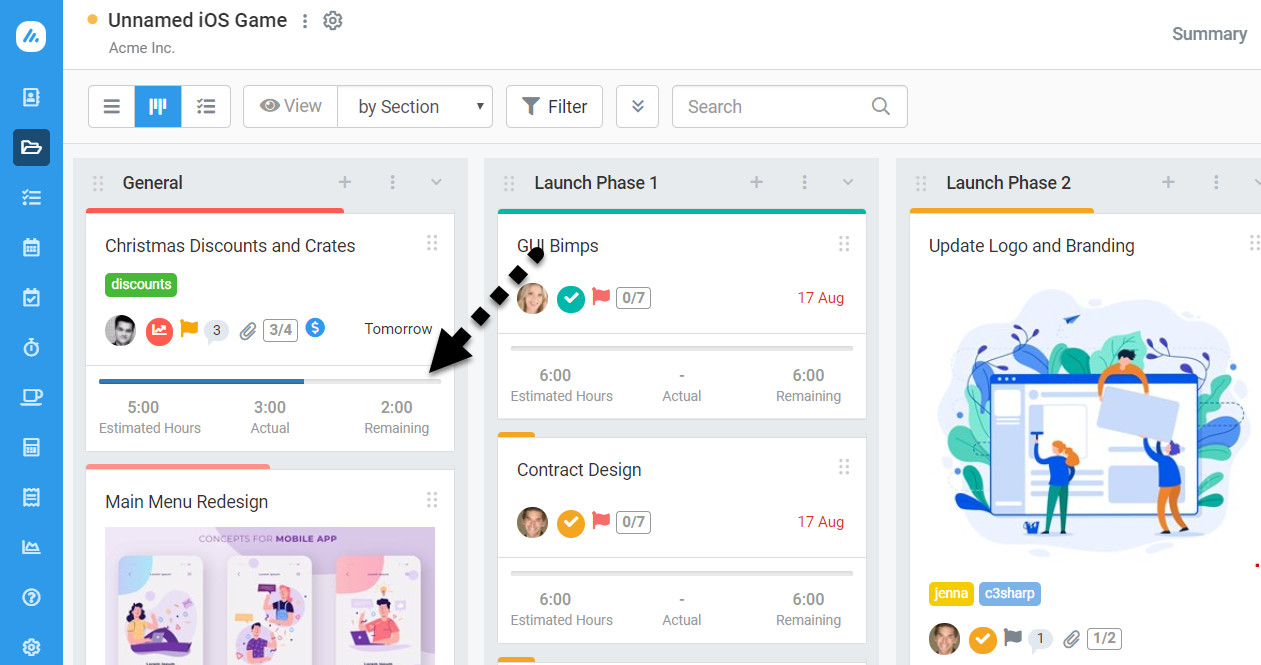 Figure: Task Remaining Hours as Shown in Kanban View
Followers
While tasks can only be assigned to one person, they can have multiple followers to keep more team members in the loop. Followers receive notifications about new comments to the task and can collaborate on the task using email or the task popup. While they may not be responsible for completing the task, they can certainly make their voice heard.
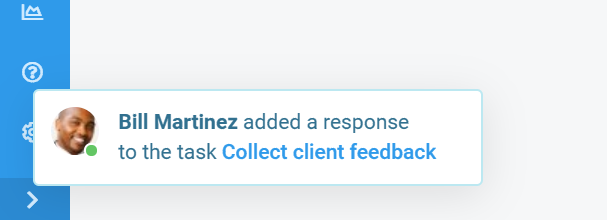 Figure: An In-app notification delivered to a Task Follower
Attachments
Documents, and images or other files, for each task, can easily be stored in the task itself. You can attach files from your computer, Dropbox or Google Drive. Team members can also email in attachments, or drag & drop screenshots into comments to provide context for their words. Every task follower will be able to keep track of all the attachments on a deliverable, which makes collaboration so much easier.
Our File Management Guide goes into this in more detail.
Task Comments
Avaza makes it easy for your team to collaborate across tasks. You can make decisions faster as all files, comments and information about each task are stored in the task itself.
 Figure: Task Discussions in Avaza
Team members can comment directly on a task itself, or email in comments by replying to task notifications. Users added as followers get notifications about comments and task assignments, so everyone can be kept in the loop.
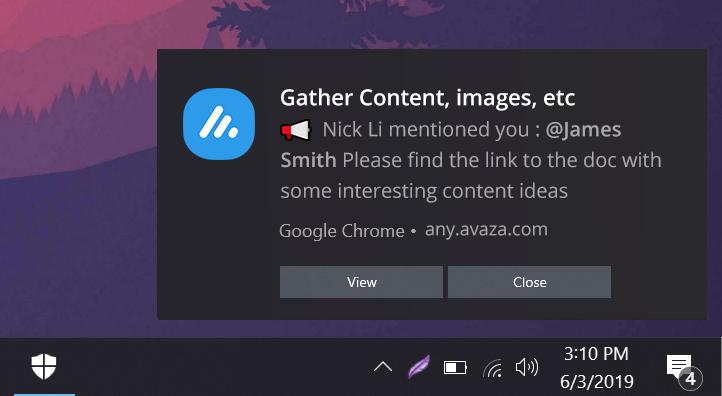 Figure: Push Notification displayed to @mentioned User (Windows 10)
@Mentions
You can tag team members using @mentions to ensure no one misses out on an important task comment. This automatically generates a notification for the @mentioned user as well as any users added to the task as a Follower. To tag a user in a comment, simply enter the @ symbol to display a list of project members.
If a user is not visible in the @mention dropdown, please check that they were added to the project by going to the Project Settings page > Project Members. All project members must have the ‘Project Collaborator’ role assigned to them at the Contacts level.
Internal Notes
“Post as Internal Note” is an additional checkbox available in the comment section that allows team members to post an internal note that is not visible to any external contacts on the project.
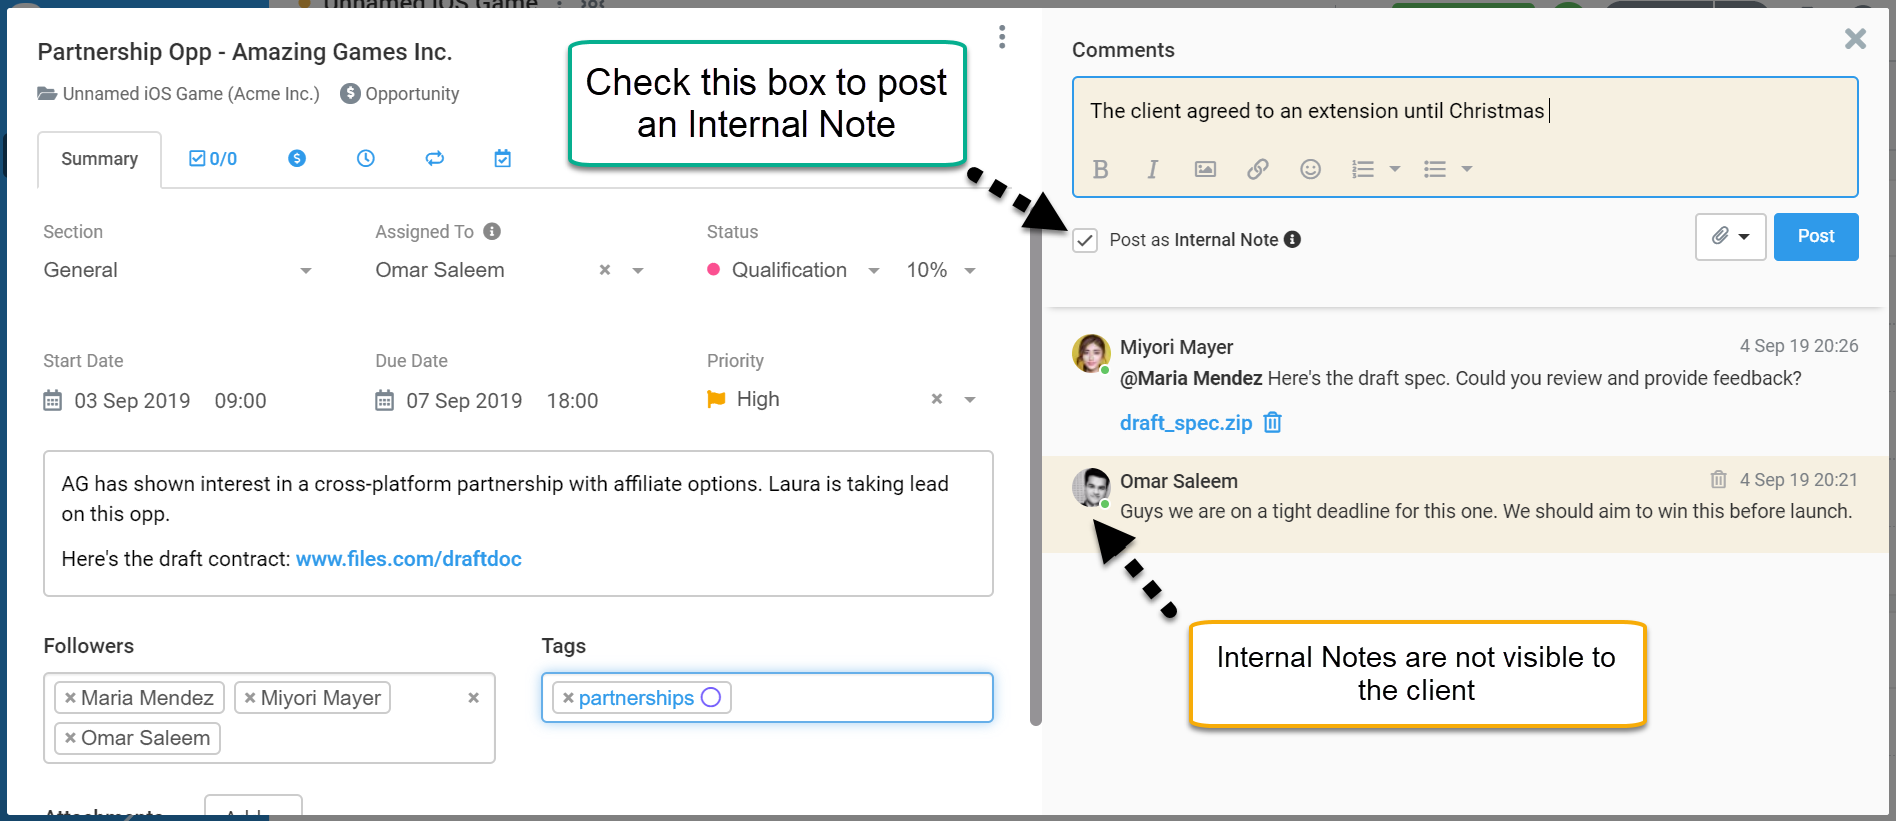 Figure: Internal Notes in Avaza Discussions
Only the followers or @mentioned users will receive notifications of internal comments. Any replies sent via email will become public comments on the task. External contacts will not be able to view the Internal Notes checkbox, nor does the comment count on Tasks include Internal Notes.
Real-time discussion updates
When someone posts a new comment on a task you will instantly see it appear.
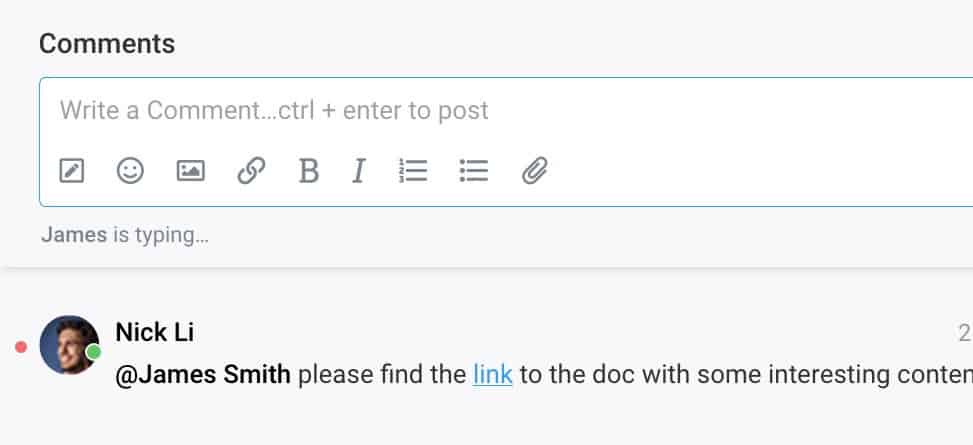
Typing Indicators
If someone is typing a comment on a task you have open, you will see the typing indicator under the comment box. So you know to stick around and converse.
Keyboard Shortcuts
Press “Ctrl + Enter” or “⌘ + Enter” to quickly post a new comment without having to click the Post button.
User Presence Status colors:
You will see a little green dot indicator for users that are actively using Avaza. Inactive users will be displayed with a grey dot.
As soon as someone opens an Avaza screen, their presence indicator will turn Active. If all browsers are currently closed or minimized or out-of-focus, then within a few minutes their status will turn inactive.

Unread Comments Indicators
An unread indicator is displayed on the comment count speech bubble for tasks you are following with unread comments.
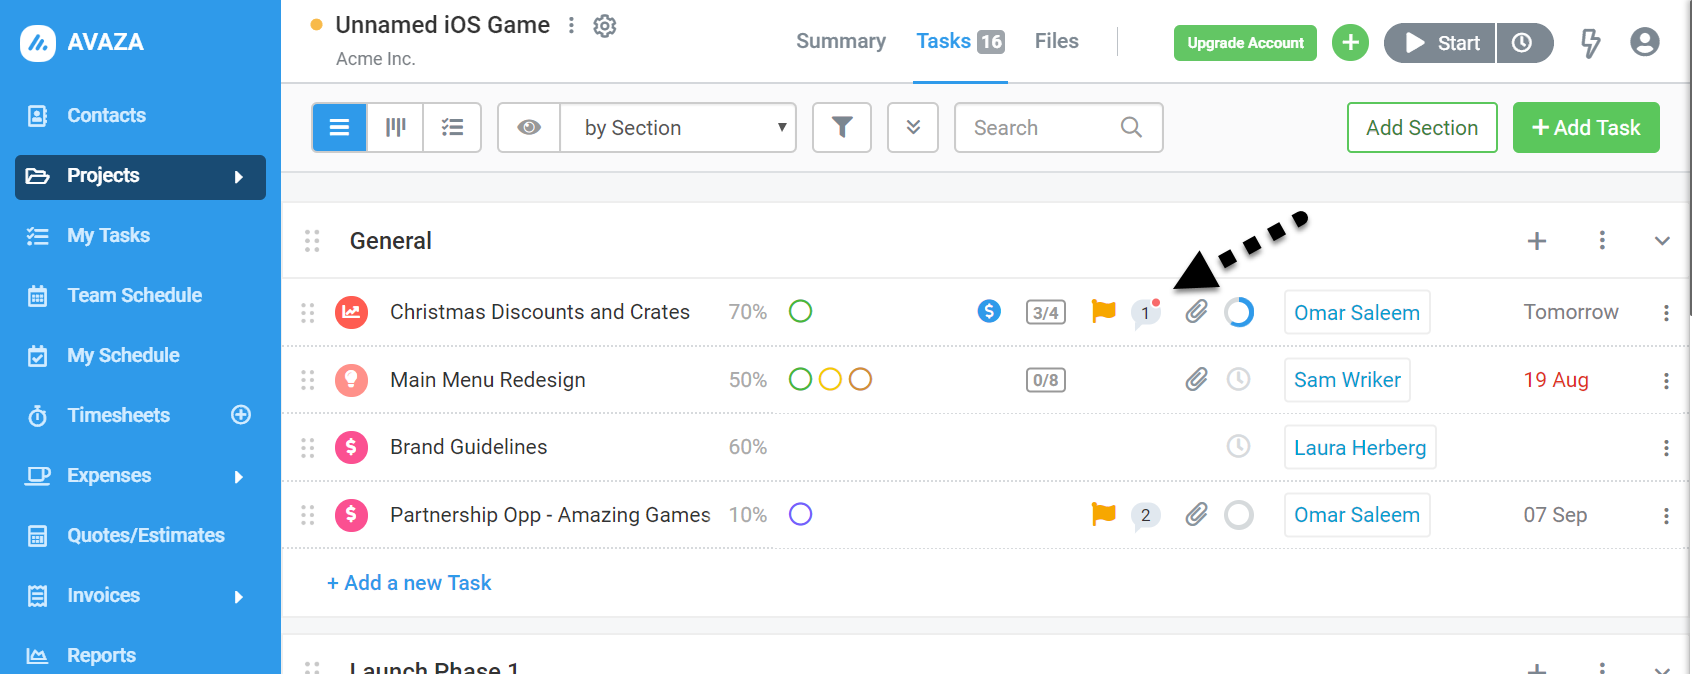 Figure: Unread Comment Indicator in List View
Subtasks
The Subtasks tab lets you create a list of all the smaller steps that are part of a larger task. You and your team can see the progress as you mark these subtasks complete. The number of Subtasks is also displayed via a subtasks icon in the main task view, so you can keep track of the number of completed versus total subtasks easily.
 Figure: Add/Reorder Subtasks on the Subtask Tab
Add Tasks Via Email
The project email address allows you to collaborate using email. The Project email address is available via the 3-dot control next to the Project Title. You can add tasks, attachments and reply to comments by sending emails to this email address.
- Emails will only be accepted from Project Members
- Email Subject will become the Task Title
- Email Body will become the Task Description
- Email Attachments will become Task Attachments
- The task will be assigned initially to the user sending the email
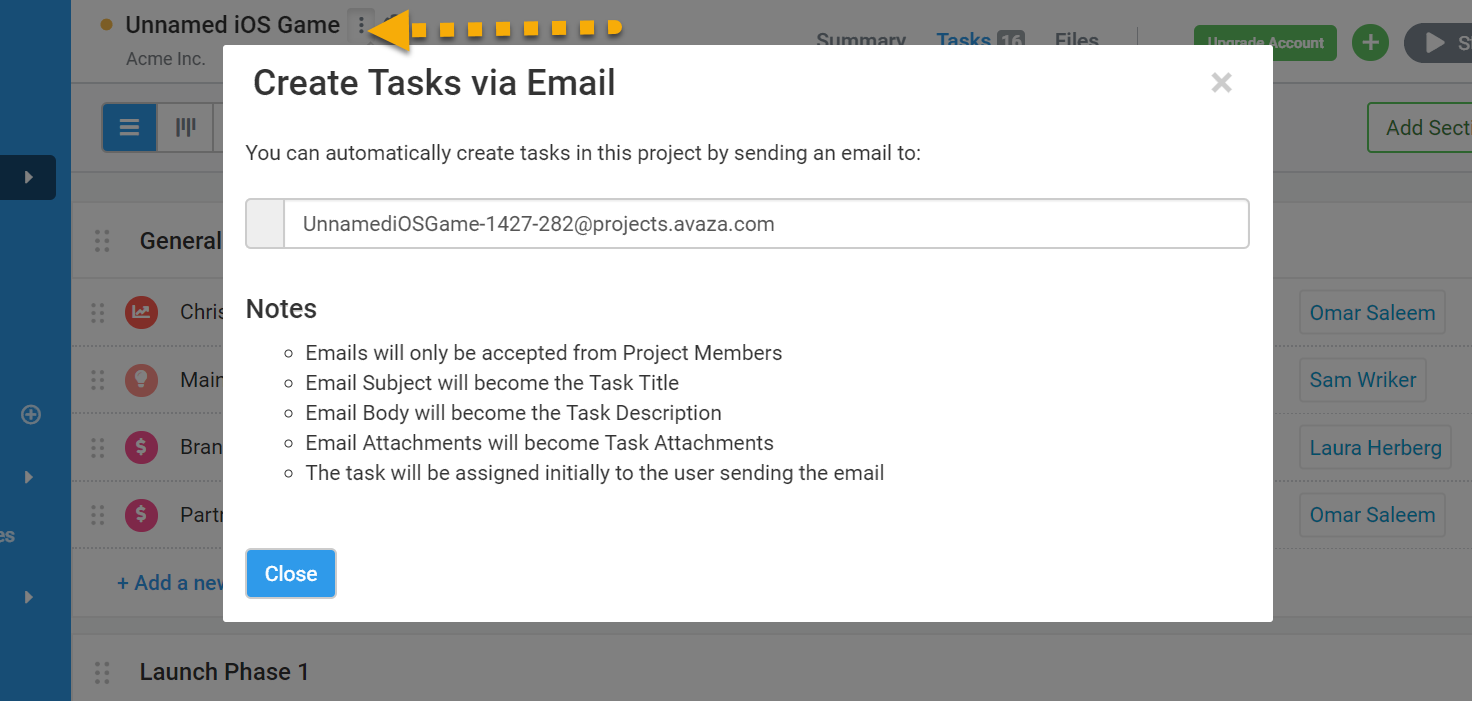 Figure: Access Project Email Address via 3-dot Control
Fixed Amounts Payments
Do you need to bill based on time as well as fixed amount? The Fixed Amounts Payment tab allows you to invoice for work as it is completed. With this tab, you can add individual billable items to your tasks that can later be pulled into invoices. This can also be used for milestone payments.
The Billable Fixed Amounts tab within the task pop-up is visible only to users with Admin, Portfolio Manager and conditionally Project Manager role.
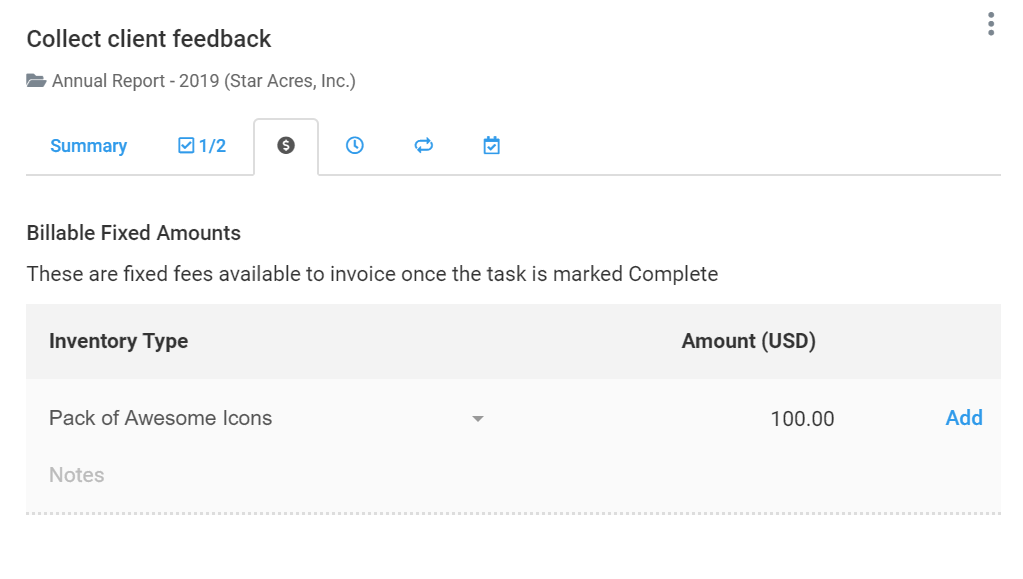 Figure: Fixed Amount Tab on Task Popup
Tracking Task Progress
Project success depends on completing tasks as quickly and efficiently as possible. It is also important for project managers to be able to track how far each task is to being completed without having to ask each responsible team member to provide an update.
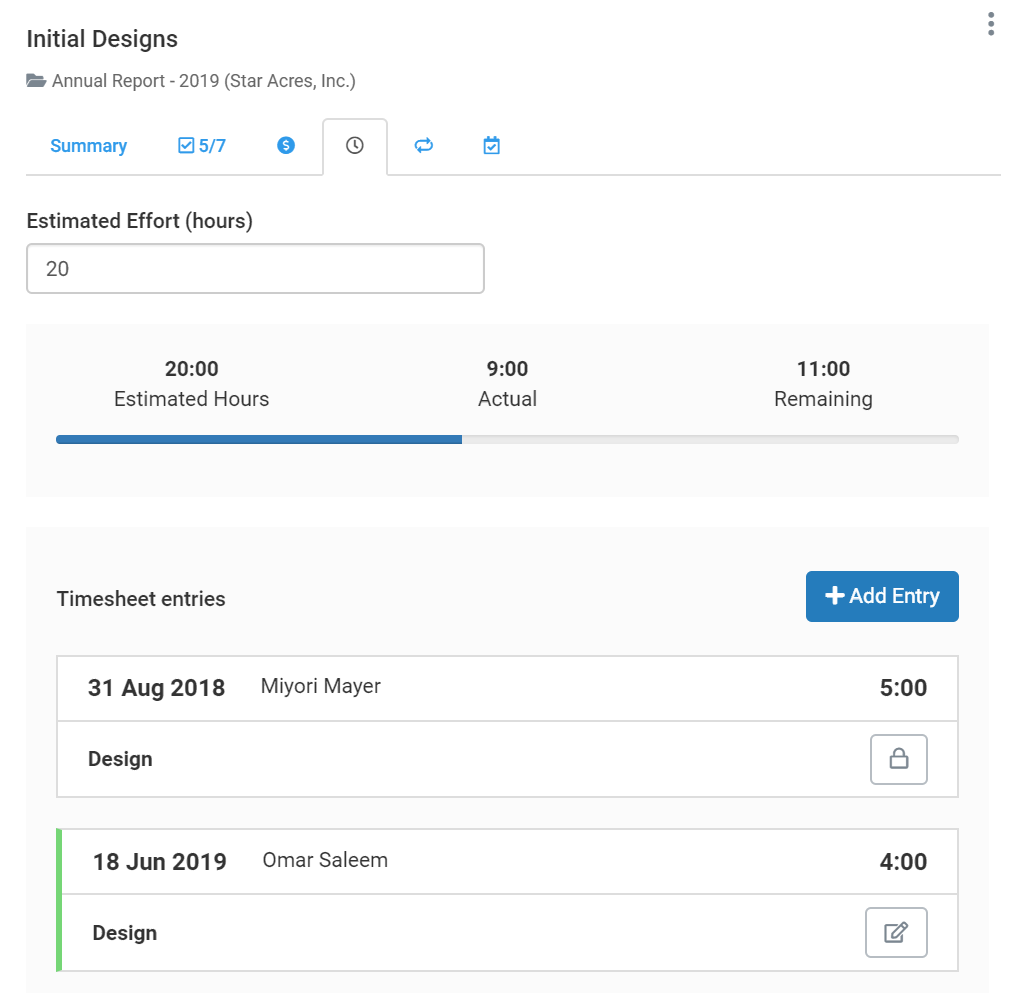 Figure: Time Tab on Task Popup
Several features in Avaza Projects help you keep track of task progress using visual aids.
Task Status
Avaza allows you to create custom workflows for task statuses. Initially your account starts with one Task Type called “Task” created with three statuses “Not Started”, “In Progress”, “Complete” that reflect a basic status lifecycle. However, your account Administrator can create new Task Types and configure custom task statuses to suit your business.
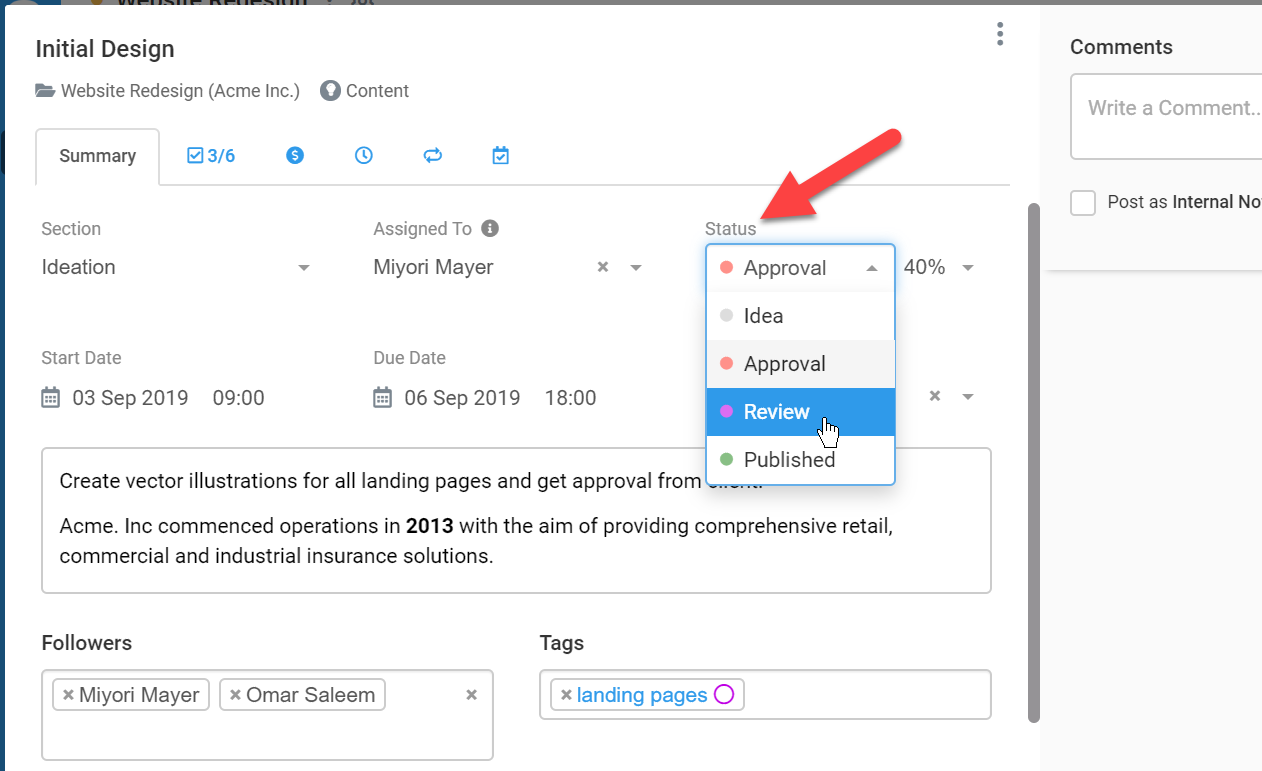 Figure: A Custom Status List tied to a custom Task Type
Learn more about configuring task statuses in this guide.
Time Spent
It’s valuable to be able to quickly see the amount of time spent on tasks, and how that compares to your budgeted time estimate.
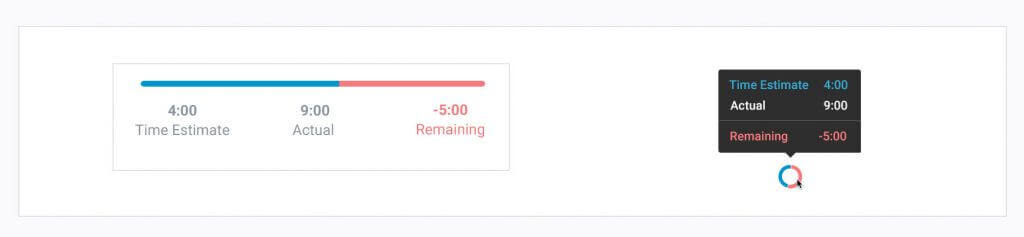 Figure: Track Time Spent on Tasks
Avaza lets you add the estimated amount of time you think it should take to complete a task into the Task Time tab. At any time you can view all Avaza timesheet entries created against that task as well as a progress bar that shows time estimated versus time spent.
You can read more about this feature on our blog: Track Estimated Time vs Actual Time Spent on Tasks.
Recurring Tasks
When working with common tasks that need to be performed on a recurring basis, for example, weekly catchups, monthly status reports, checking in on your social media performance, annual contract reviews, etc., you can set up recurring tasks.
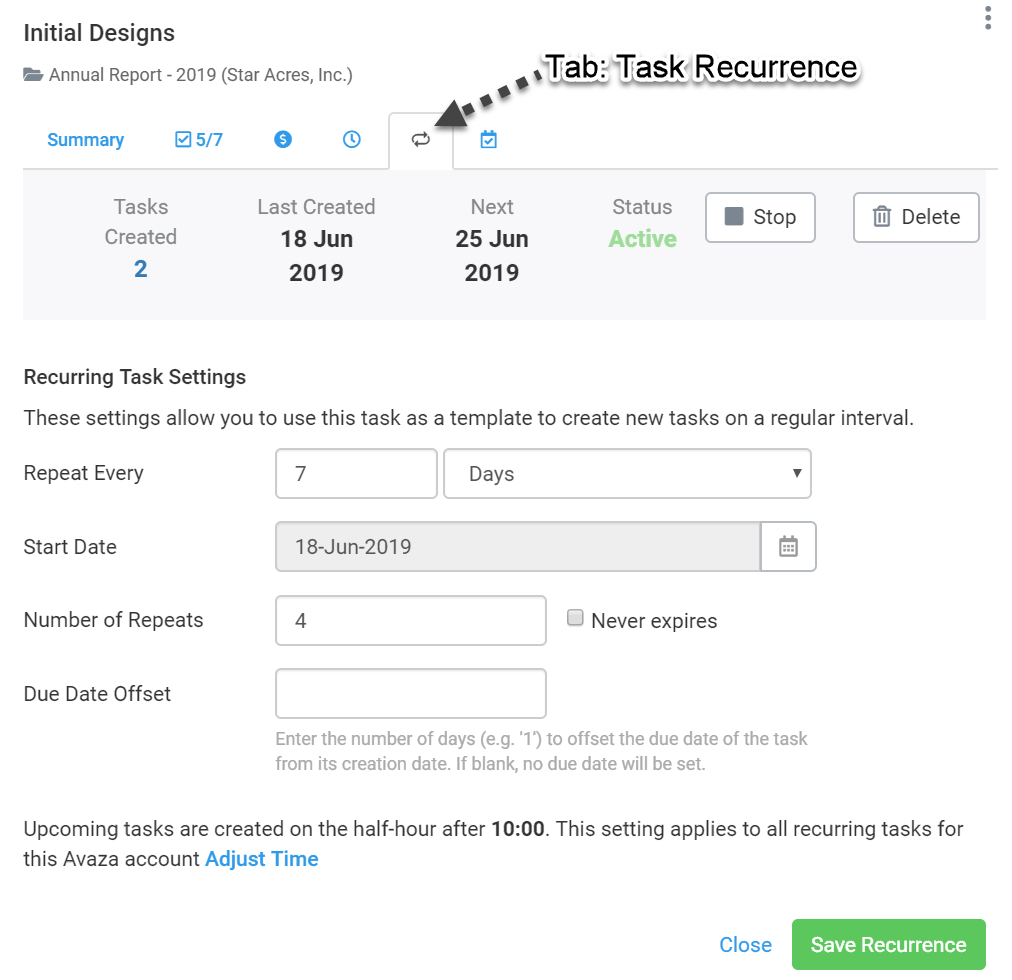 Figure: Recurrence tab in a Task
To be able to easily differentiate the tasks created using the recurring task functionality, you can use smart tags, i.e. dynamic variables, that can be inserted in the task title or description in order to indicate the date on which the task was generated, for example.
Please note, the recurring task functionality is not available on the free accounts.
Resource Scheduling Bookings
If you use the Resource Scheduling module for capacity planning and resource allocation, you have the option of creating a new task along with a scheduling booking against it directly from the Task Management area.
Please note, this option is available only if you click the ‘+Add Task’ button (in a project, My Tasks or All Tasks). On the ‘Create a Task’ pop-up, once you select a user under the Assigned to field, you will see the option to create a booking against this new task. A new task will be added to the project and you will see a scheduling booking against it on the Team Schedule page as well.
Please note the user must have the Scheduling User license in order to create a scheduling booking for them. You can learn more about the Project Task and Resource Scheduling integration here.
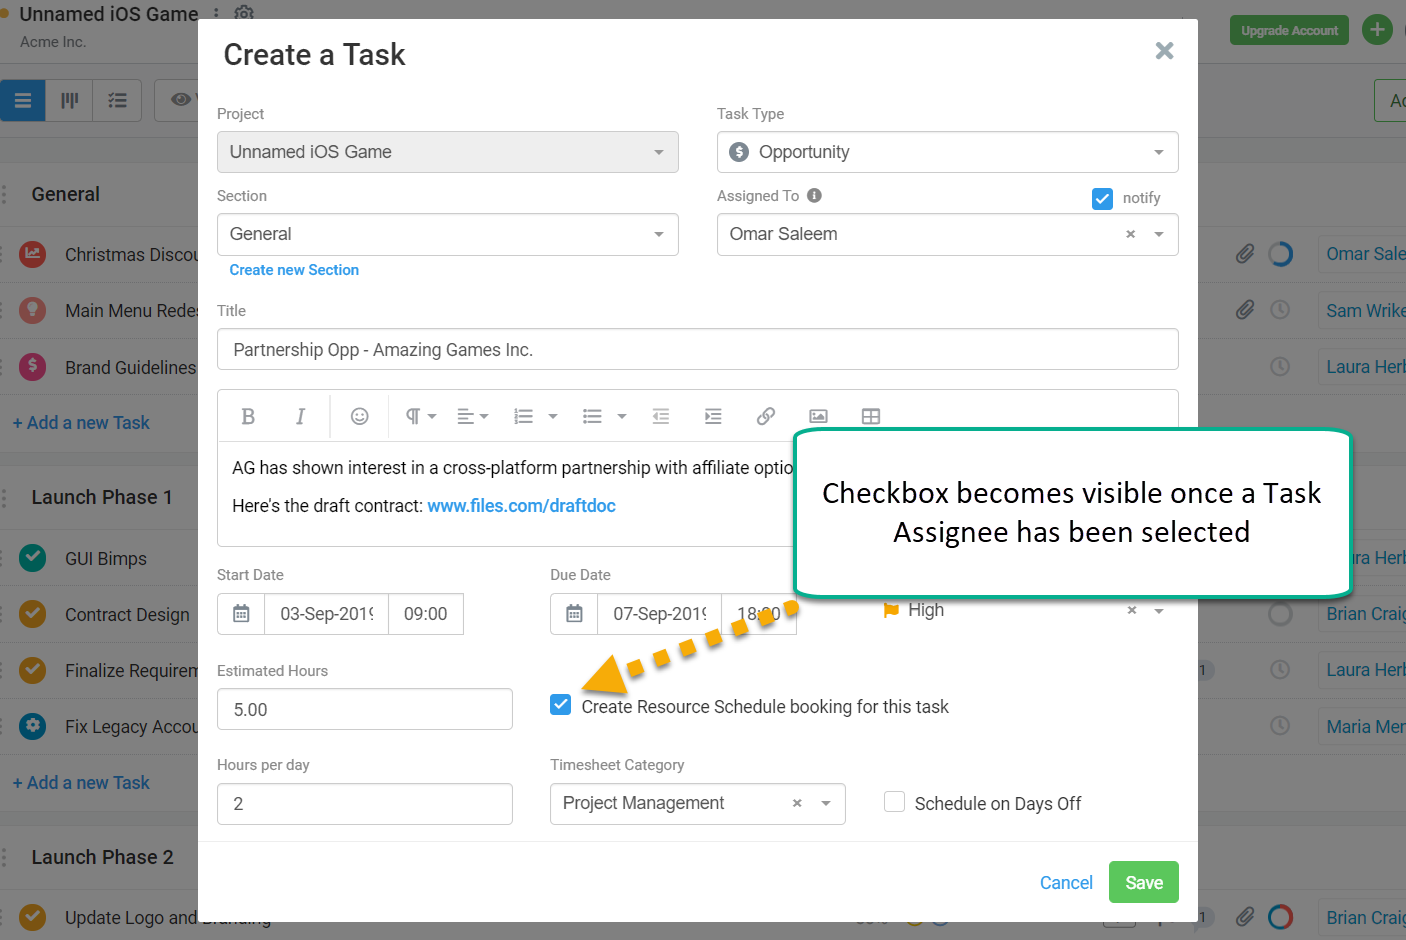 Figure: Assign the Task to a User and Select ‘Create Resource Scheduling Booking for this task’
If a task already exists and you would like to add a new scheduling booking against it via the task management area, you can simply open the task and navigate to the last tab on the task popup. You can click ‘Add a Booking’ to create add one or more scheduling assignments directly from this tab.
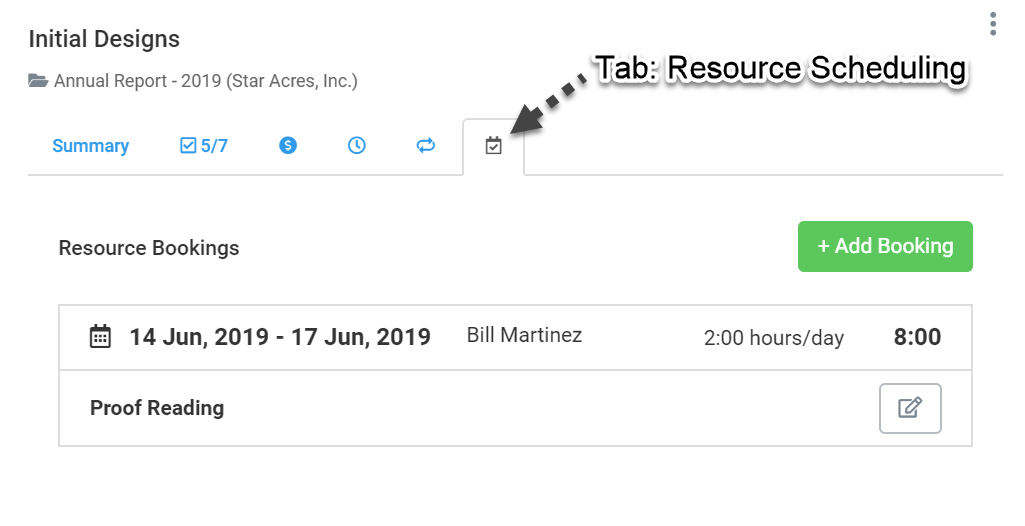 Figure: Create New Booking via the Resource Scheduling Tab on the Task Popup
Next up, we take you through File Management in Avaza. If you need any help with Tasks, feel free to contact our support team via chat or email.