Unlock the power of collaboration by linking your Avaza tasks with GitHub activities. This guide will walk you through connecting your Avaza account to GitHub repositories, enabling your team to attach their GitHub contributions directly to tasks. Whether it’s commits, branches, or Pull Requests, integrating GitHub with Avaza enhances project visibility and streamlines workflows.
Prerequisites
- The GitHub integration feature is accessible across all Avaza subscription plans.
- Only Avaza Administrators have the privilege to add GitHub repositories to the Avaza account.
- Administrators can limit access to any GitHub repository to specific Avaza projects.
- It’s possible to define which team roles can view and interact with the GitHub integration options within task popups.
Integration Steps
To seamlessly integrate GitHub with your Avaza projects, follow these six essential steps:
- Authorization of Avaza: Initiate the integration by granting Avaza permission to access your GitHub information.
- GitHub Authorization: Similarly, authorize GitHub to connect with your Avaza account, ensuring a secure link between the two platforms.
- Repository Addition: Add your desired GitHub repositories to your Avaza account to start linking project tasks.
- Repository Restrictions (Optional): For enhanced project specificity, you can restrict which Avaza projects can be associated with each GitHub repository.
- Custom Branch Naming (Optional): Establish a custom branch naming convention to maintain consistency and clarity across your projects.
- Enable Task Integration Display: Activate the “Display Task Integrations” feature from the Additional Options menu to view GitHub links directly in your Avaza tasks.
By following these steps, you’ll create a productive bridge between Avaza and GitHub, fostering better collaboration and project management within your team.
Authorizing Avaza
To begin the authorization process, follow these steps:
Head over to Settings, then App Marketplace, and select the GitHub app.

Press the green Connect button. This action allows GitHub to request access to your Avaza account.

Confirm by clicking on Grant Access to Avaza. This step officially authorizes the integration between GitHub and your Avaza account. Remember, you must hold an Avaza Admin role to perform this authorization.

GitHub Authorization
To enable GitHub’s integration:
Click on the Connect to GitHub button to start the connection process.

You’ll then be asked to log into your GitHub account.

Grant permission to the GitHub app, allowing it to access either all or specific repositories within your GitHub account.

Adding GitHub Repositories
After granting authorization to your GitHub account, the next step involves adding GitHub repositories. This is crucial for enabling your team to associate Avaza tasks with GitHub activities.
Click on the Add Repository button to display a list of your GitHub repositories.

From this list, select the repository or repositories you wish to add and click Add.

The repositories you’ve added will then appear in the list, ready for integration with your Avaza tasks.

Project Restrictions
Optionally, you may impose restrictions on which Avaza projects can be linked to the GitHub repositories integrated into your account. This control ensures that GitHub activities are only associated with specific Avaza projects.
To set these restrictions, click on Edit next to the Repo name that you would like restricted to specific projects.
Select the project or projects you wish to link to a particular GitHub repository and click Add. This action restricts the repository to the selected projects.

You will then be able to see the number of projects each repository is limited to, ensuring precise control over your integration settings.

Setting a Custom Branch Name Format
For teams with a specific naming convention for branch names, you have the flexibility to define this format within the GitHub integration settings on Avaza. This ensures that any branches created from Avaza tasks will adhere to your organization’s naming standards.
The default naming structure is as follows: :taskId:_:taskName:_:username:
Example: 32039_Website-Redesign_John-Smith
Below is a breakdown of the format options available for customization:
:taskId: – This represents the ID of the Avaza task where the branch originates.
:taskName: – The name of the task, with spaces converted to dashes, indicating the source of the branch.
:username: – Reflects the username of the Avaza account holder who initiated the branch, with spaces also converted to dashes.

To align the branch naming with your organization’s guidelines, adjust these settings as needed and click Save to apply your changes.
Activating Task Integration Feature
To enable your team to utilize the GitHub integration within Avaza, the “Display Task Integrations” option must be activated. Here’s the process to follow:
Navigate to the Marketplace Apps page, then locate and click on the Additional Options menu. This option is exclusively accessible to users with Admin privileges.

There, you will find a toggle switch. Flip this switch to the On position.

After enabling the feature, specify which user roles are permitted to use the GitHub integration feature. With these settings adjusted, users holding the selected roles will now observe an extra “Task Integration” tab within the Task Edit popup, where they can access GitHub integration features.

Managing GitHub Integrations within Avaza
Avaza allows for the direct linking of tasks to GitHub activities, including commits, branches, and pull requests, right from the task’s popup interface.
To initiate this:
Open the desired task and navigate to the “Task Integration” tab. Visibility of this tab depends on your user roles having been granted access to this feature.

Within this tab, click on the GitHub app icon to proceed to the integration page. When accessing the integration for the first time you will be requested to Grant your Avaza account access and also connect your GitHub account.


On the integration page, you’ll find distinct tabs dedicated to each type of GitHub entity: Pull Requests, Branches, and Commits. These tabs list any existing GitHub items already linked to the task at hand, offering functionalities to either dissociate current links or establish new ones.
For additional assistance, a “Help” link is available on the right-hand side of the page, providing access to a selection of helpful resources and guides.
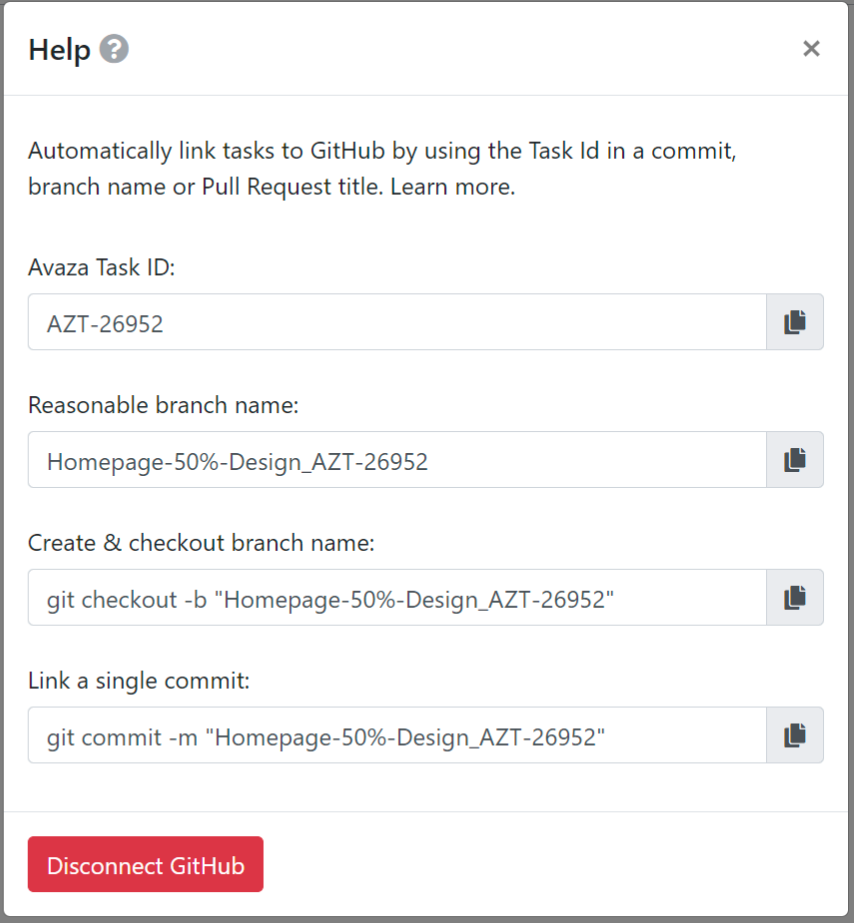
Accessing Help Options
To explore all the help options available, click on the “Help” link. This will give you access to a variety of information, including:
- Avaza Task ID
- Suggested branch naming convention
- GitHub command for creating and checking out the GitHub branch
- GitHub command for linking commit to Avaza Task
- Disconnect button to remove your GitHub account authorization from the integration
Managing Pull Requests
Within the “Pull Request” tab, you’ll find a list of all Pull Requests that have been associated with the task. To navigate directly to a specific Pull Request on GitHub, simply click on its title. This section not only shows the status and creator of the Pull Request but also provides additional pertinent details.
To sever the connection between a listed Pull Request and the task, click on the “Unlink” option.

Linking a Pull Request
To associate an existing Pull Request with an Avaza task, begin by clicking the “Link Pull Request” button. In the ensuing popup, select the relevant repository and Pull Request. Then, by clicking the “Link” button, you will effectively connect the chosen Pull Request with the specific task in Avaza.


Creating Pull Request
Navigate to the “Pull Request” tab and press the “New Pull Request” button to start the process.

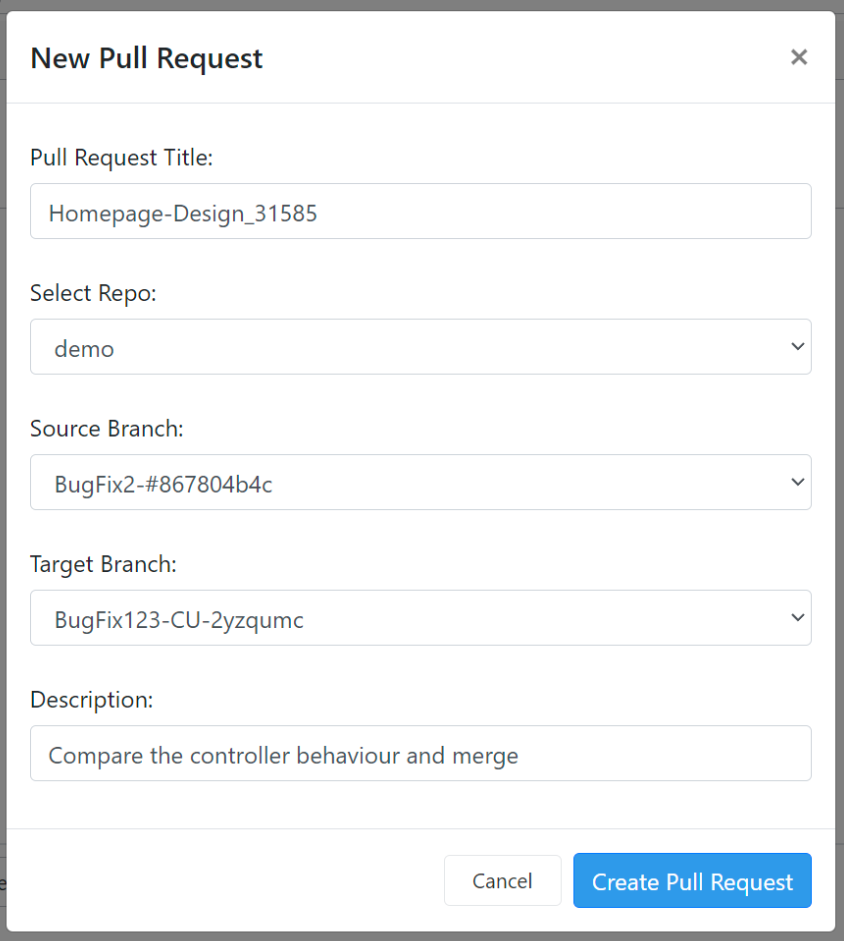
You’ll be prompted to input a title for the Pull Request. While a default title, incorporating the task title and ID, will be auto-filled for your convenience, feel free to customize it as desired. Next, choose the source and target branches for the Pull Request and provide a detailed description. By clicking on “Create Pull Request,” you will not only generate a new Pull Request in GitHub but also automatically link it to the corresponding Avaza task.
Managing Branches
In the “Branches” tab, you’ll find a listing of all branches along with their associated commits that are currently connected to the task. Commits that are tied to the task and belong to a specific branch are conveniently organized under that branch’s heading.

To copy the name of a branch, simply click on the copy icon adjacent to the branch name. If you wish to detach a branch from the task, click on the “Unlink” option.
Associating a Branch with a Task
For connecting an existing branch to your Avaza task, proceed by selecting the “Link Branch” button located within the “Branches” tab.

Choose the appropriate repository and branch from the options presented, then finalize the link by clicking on the “Link” button.

Once linked, both the branch and any associated commits belonging to that branch will be visible under the task.
Creating a New Branch
Initiate the creation of a new branch by clicking on the “Create New Branch” button.

Provide a name for your new branch, select a repository, and choose the source branch from the dropdown menu. After these selections, click on the “Create New Branch” button to proceed.
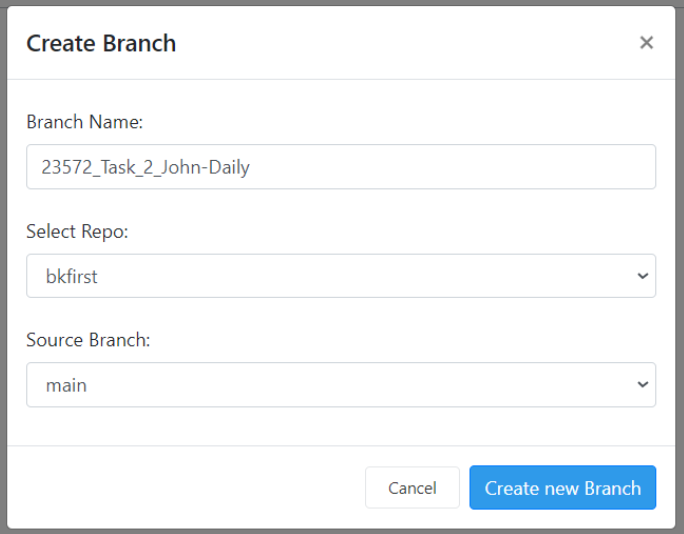
This action will create the new branch and automatically associate it with the task, with all relevant details being displayed in the panel.
Managing Commits
Under the “Commits” tab, you’ll see all the commits that have been linked to the specific task.
To navigate directly to a commit on GitHub, click on the commit title, which serves as a hyperlink.
This section also provides valuable information, including the creation date of the commit and the repository and branch it originates from.
Should you need to dissociate a commit from the task, simply click on the “Unlink” option.
Associating a Commit with a Task
For attaching an existing commit to your task, begin by selecting the “Link Commits” button found within the “Commits” tab.

Choose the relevant repository, branch, and commit from the dropdown menus provided, and then finalize the association by clicking on the “Link” button.
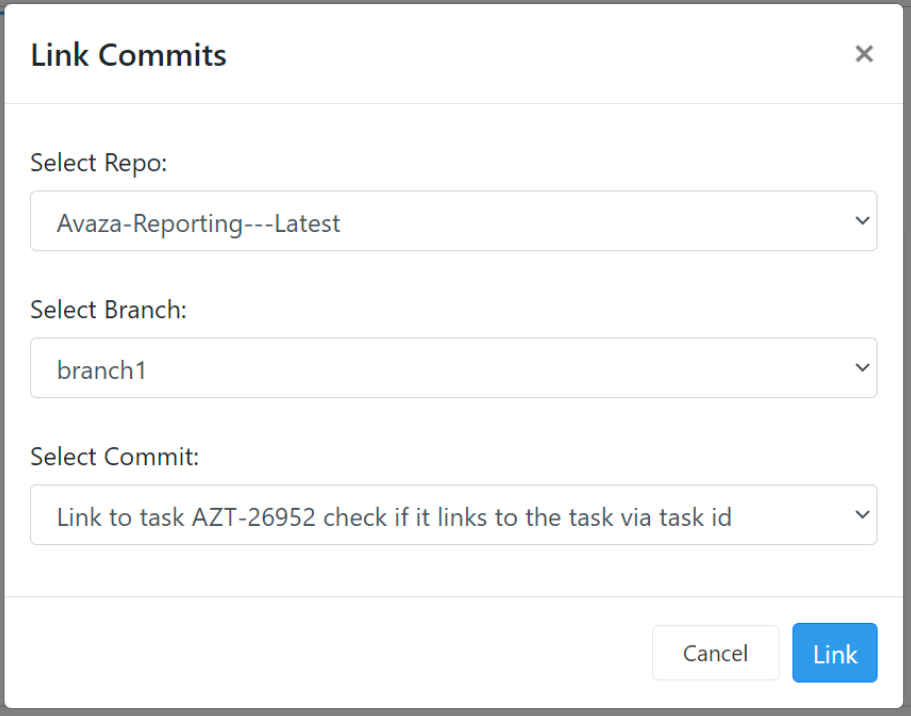
This action will ensure the chosen commit is connected to the task and will be visible within the “Commits” tab.
Connecting GitHub Activity to Avaza Tasks From GitHub
Avaza seamlessly integrates with GitHub, automatically linking new GitHub activities to the corresponding tasks whenever a valid Avaza Task ID is mentioned in the title of a pull request, within the branch name, or in a commit message.

Ensure the Task ID is correctly formatted with the “AZT-” prefix followed by the Task ID number, such as “AZT-26952”. To obtain the properly formatted Task ID, refer to the help modal available on the integration page of any task in Avaza.