Track all your business expenses in Avaza, mark them as reimbursable, link them to Customers and Projects, and add billable Expenses to Invoices in just minutes.
Our Expenses module lets you and your team track both billable and non-billable expenses, mark expenses as reimbursable, set up unit price (for example, mileage), email in receipts to create new expenses and approve or reject expenses on the go. You can pull in billable expenses into an Invoice and send it to your client for a quick online payment.
Expense Settings
To get started with tracking Expenses, head over to Settings > Expense Settings for a few account level settings.
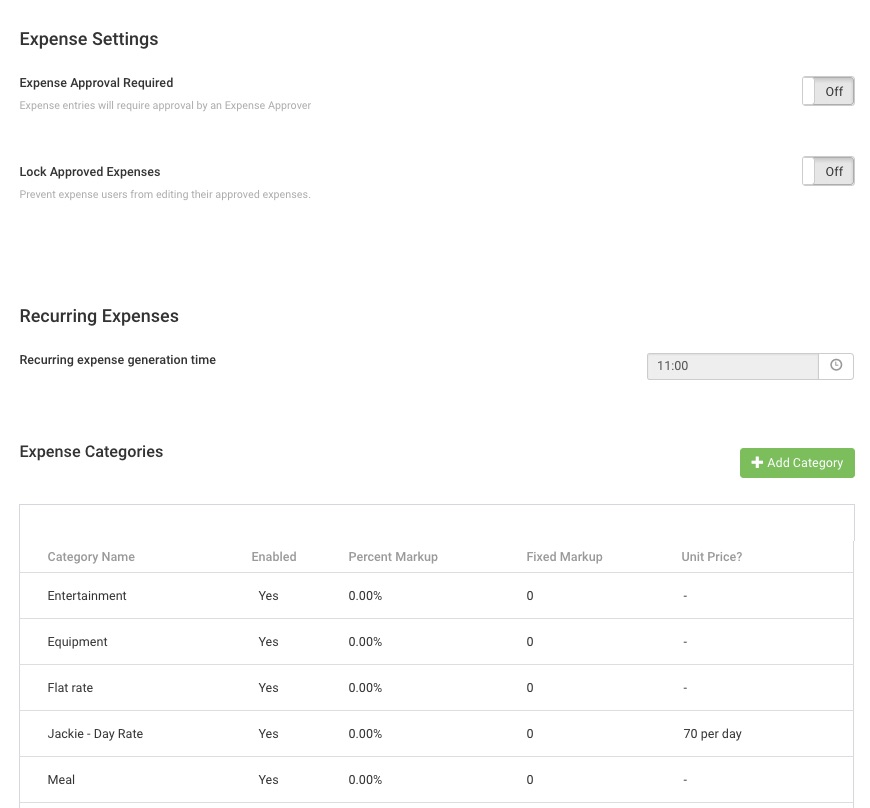 Figure: Settings for Expense Approvals, Recurring Expenses, and Expense Categories
On this page, you can manage the following settings:
- Expense Approval Required: Toggle Expense Approval on or off using this switch. (Read our Expense Approval guide here).
- Lock Approved Expenses: Lock approved Expenses from further editing by toggling this switch on or off.
- Recurring Expense Generation Time: Set the time you want new Recurring Expenses to be created.
- Expense Categories: Add or edit Expense categories to track expenses against. Add percentage and/or fixed Markup to each category or set a unit price.
- Expense Payment Methods: Add or edit Expense Payment Methods your team can choose from while creating an expense.
Expense Overview
Navigate to the Expense Overview screen to create and manage expenses.
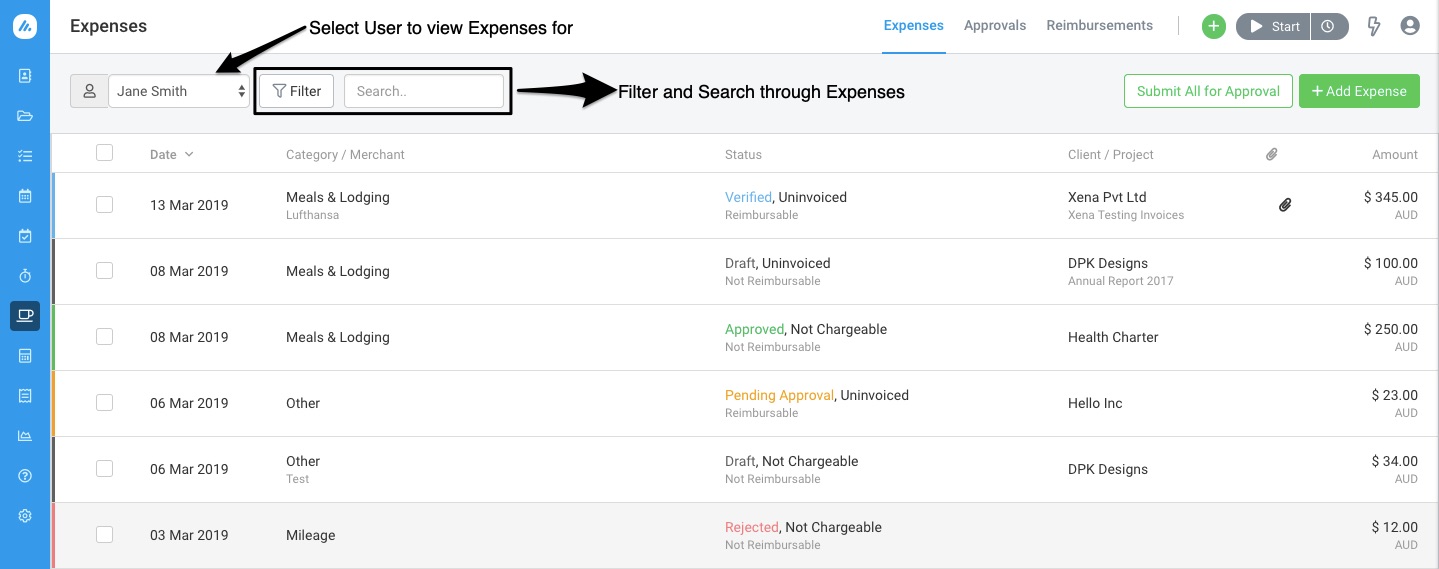
Figure: The Expense Overview screen shows all Expenses and Allows you to Filter and Search through them
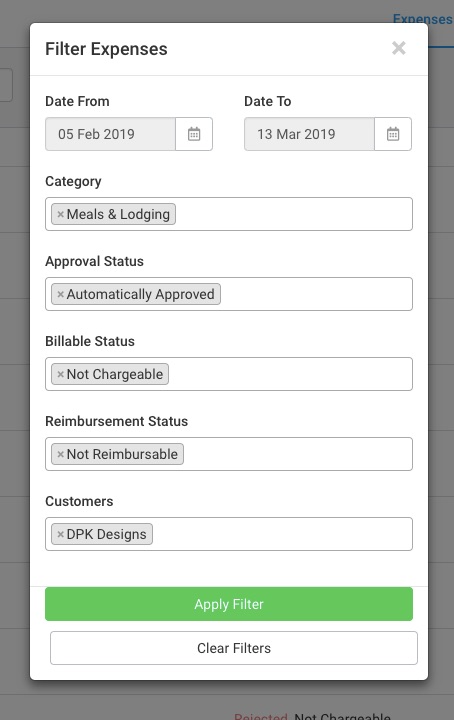
Use the FIlter button to filter expenses based their date, status, category or customer.
Figure: Filter Expenses Based on Status, Customer, and Date.
You can also view expenses for a different user using the impersonation dropdown, or search for an expense using its category, customer or project via the search box.
Create a New Expense Entry
Now you can start creating Expenses.
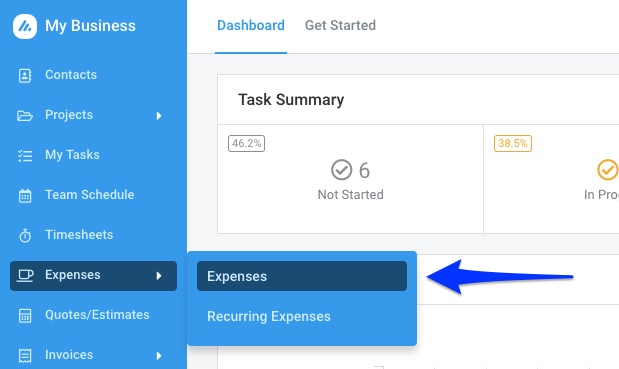 Figure: Click on Expenses in Expense Drop-Down
On the Expense Overview page, click ‘Add Expense’.
 Figure: Click Create Expense Button to Create New Expense
Fill in the required fields to create a new expense. The mandatory fields include:
- Expense Category: Some default categories are already set up, but you can add more on the Expense Settings page. These categories are used for expense reporting, as well as charging clients a markup or setting a unit price.
- Expense Date: The system defaults it to today’s date.
- Currency: Choose the currency the expense was incurred in. System defaults to your account currency. For expenses entered in a different currency than the account default, Avaza will pull a relevant exchange rate. You can change this as needed.
- Amount: Enter expense amount.
- Tax: Enter any applicable sales tax (Read more about Tax Settings here).
- Amount is: Choose whether the entered amount is inclusive or exclusive of tax. This field is visible when a tax rate is selected.
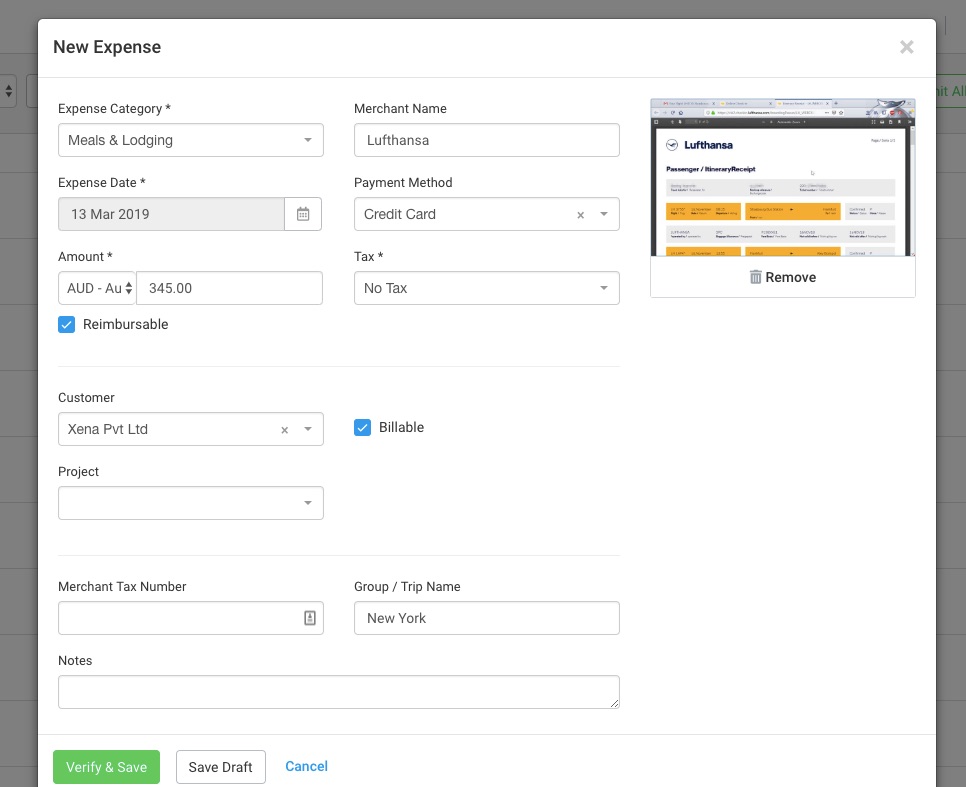 Figure: Create a New Expense Form
At this point, you can click the ‘Verify & Save’ button, or save Expense as a Draft. Use ‘Save Draft’ if you need to make further changes at a later point, or ‘Verify & Save’ if you’re done editing the Expense and, if applicable, are ready to submit it for Approval.
This screen also includes some optional fields. These are:
- Attach File: Attach a soft-copy of a receipt or another relevant document.
- Merchant Name: Enter Merchant Name
- Payment Method: Select the payment method used to pay for the expense.
- Customer: Select an existing customer you want to link this expense to. You can only choose customers whose projects you are a member of.
- Billable/Non-Billable: Check the box if this is an expense you wish to invoice a client for.
- Project: Select an existing project you want to link this expense to. You can only choose Projects you are a Project Member on.
- Task: Select the task the expense was incurred for.
- Merchant Tax Number: Enter Merchant Tax Number.
- Group/Trip Name: This field is useful for reporting total expenses for specific work trips. A drop-down is available when a value already exists for this field (for example, November Team Meetup), or you can enter a new value to create it.
- Notes: Add any relevant notes. These can be imported to your client Invoice as well.
Create an Expense via Email
Expenses can also be created via Email. Expenses created this way are automatically saved as a Draft, and you can add specific details at a later point.
 Figure: Create Expense Via Email Message
To create an expense via email, take a photo of the receipt and email it to “yourdomain@expenses.avaza.com” (replace the “yourdomain” text with your actual domain). Each email sent to this address creates a new draft expense as long as the user has the Admin or Timesheet/Expense permission.
- Expense Date is the date expense is emailed on.
- Currency is populated from your account currency.
- Notes are populated from Email Subject.
- Attachment is saved from email.
You will need to edit the draft expense to add the amount, tax, category and customer information.
Expense Status
The Expense Overview screen shows you all Expenses created by you and their statuses. You can easily filter expenses by status, or use the search box to find specific entries.
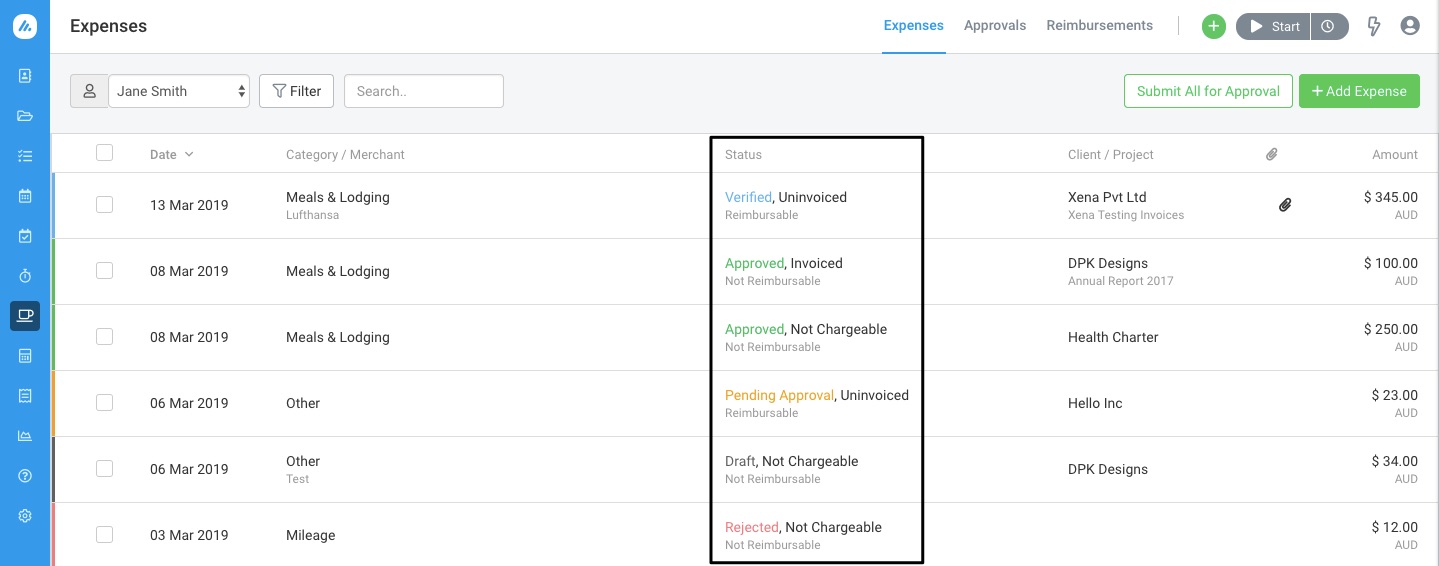 Figure: Expense Overview Page with All Expense Statuses
The different statuses an Expense can have are as follows.
 Figure: Billable/Non-Billable Expenses Workflow
Billable Status:
- Not Billable: Expenses that are not Billable to a client.
- Uninvoiced: Billable Expenses that have not been invoiced yet.
- Invoiced: Billable Expenses that have already been invoiced.
Un-invoiced expenses can be added in bulk to an Invoice using the Add Expense button. You can read more about adding Expenses to an Invoice in the Getting Started with Invoices guide.
Approval Status:
Figure: Expense Approval Workflow
Approval status is visible as a color-code to the left of the Expense Date on the Expense Overview page and shown in the Status column.
- Draft: Grey
- Pending: Yellow
- Automatically Approved: Light Green
- Approved: Dark Green
- Rejected: Red
Read more about setting up Expense Approvals for your business.
Reimbursement Status:
Figure: Expense Reimbursement Workflow
Reimbursement status is visible in the Status column under Approval Status. Here is the list of possible expense reimbursement statuses for an expense.
- Not Reimbursable – Expenses that don’t have the Reimbursable flag checked are in this status.
- Reimbursable – Expenses that have the Reimbursable flag checked but reimbursement has not yet started are in this status.
- Processing Reimbursement – Reimbursable expenses that are part of an expense reimbursement that is still being processed.
- Reimbursed – Reimbursable expenses that are part of expense reimbursement that are paid.
Read more about Expense Reimbursements in Avaza.
Hope this guide helps you understand how to create and manage expenses in Avaza. If you need further help, feel free to contact our support team via chat or by emailing support@avaza.com.

