Record your business costs such as rent, power bills, internet, software subscriptions, hardware, etc in minutes with Avaza Bills. You will now be able to manage your business cash flow by keeping an eye on due bills and paying them on time. The Bills module allows you to create bills, associate them to projects, and record bill Payments in any currency of your choice.
Avaza Bills also allows you to add unpaid time tracked by supplier contacts to bills. This feature delivers huge time savings for both the supplier and your business by eliminating double handling of tracked time. Your suppliers would love you for timely payments of tracked time by their staff on your projects.
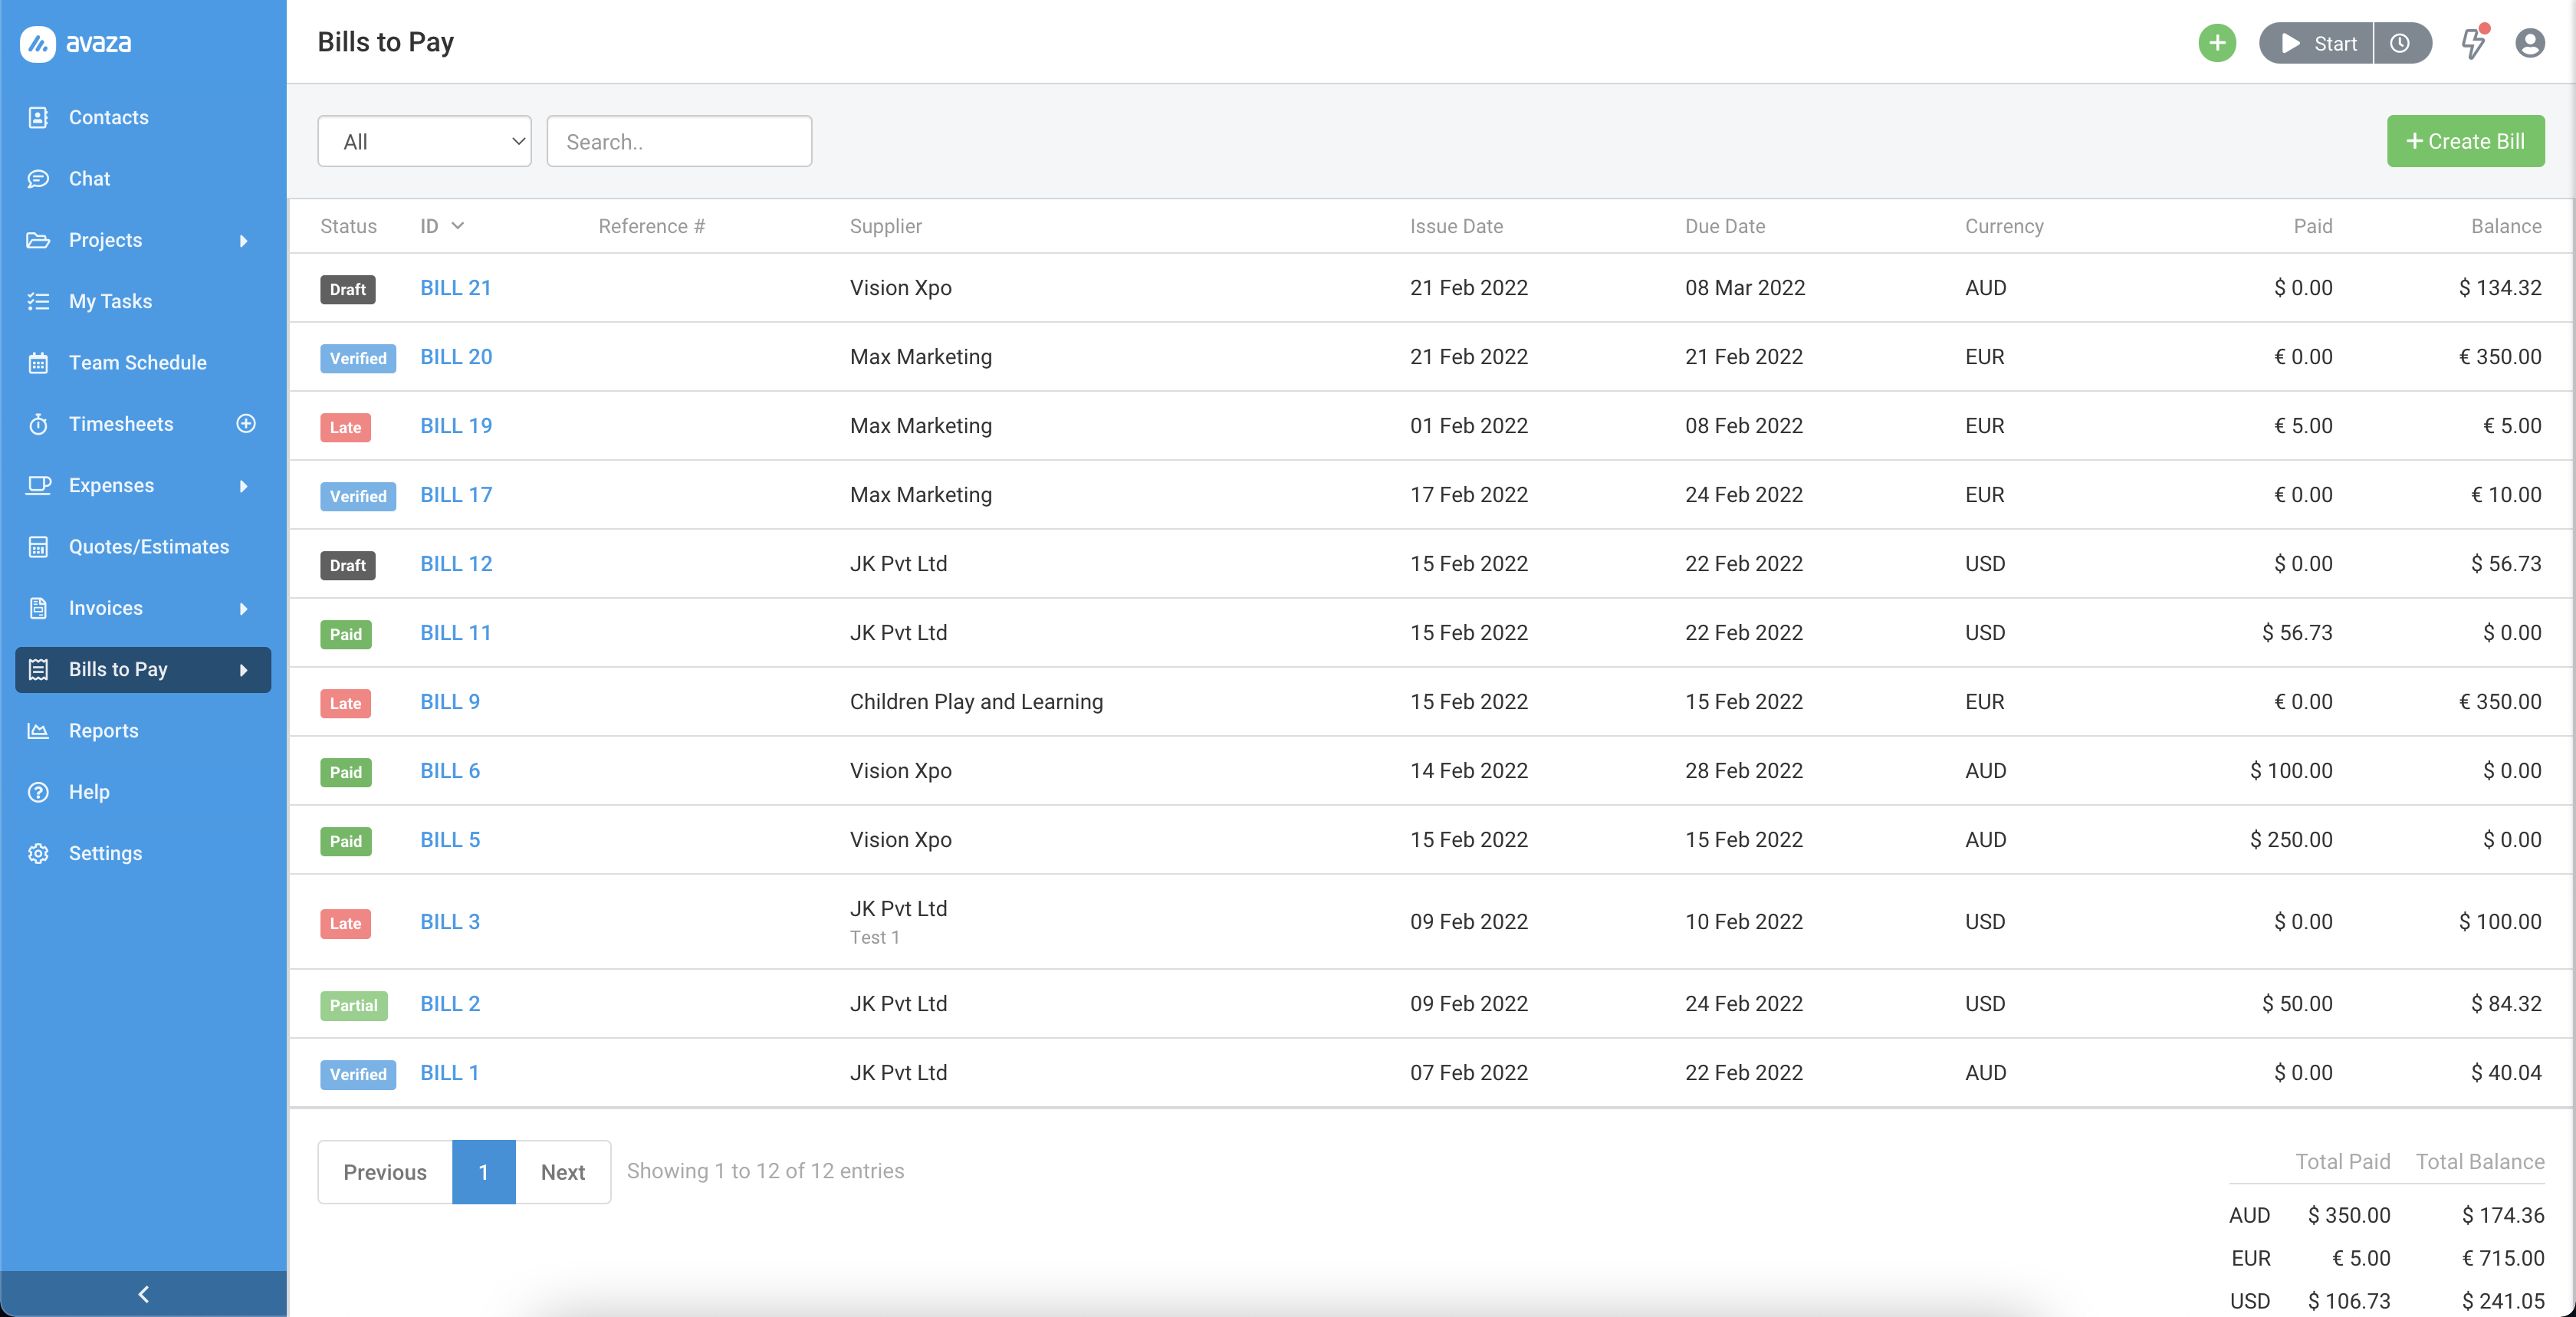
Figure: Bills Overview Page
Setting up Bills
Before you get started with creating bills you should take a look at your account settings. Navigate to Settings to get started.
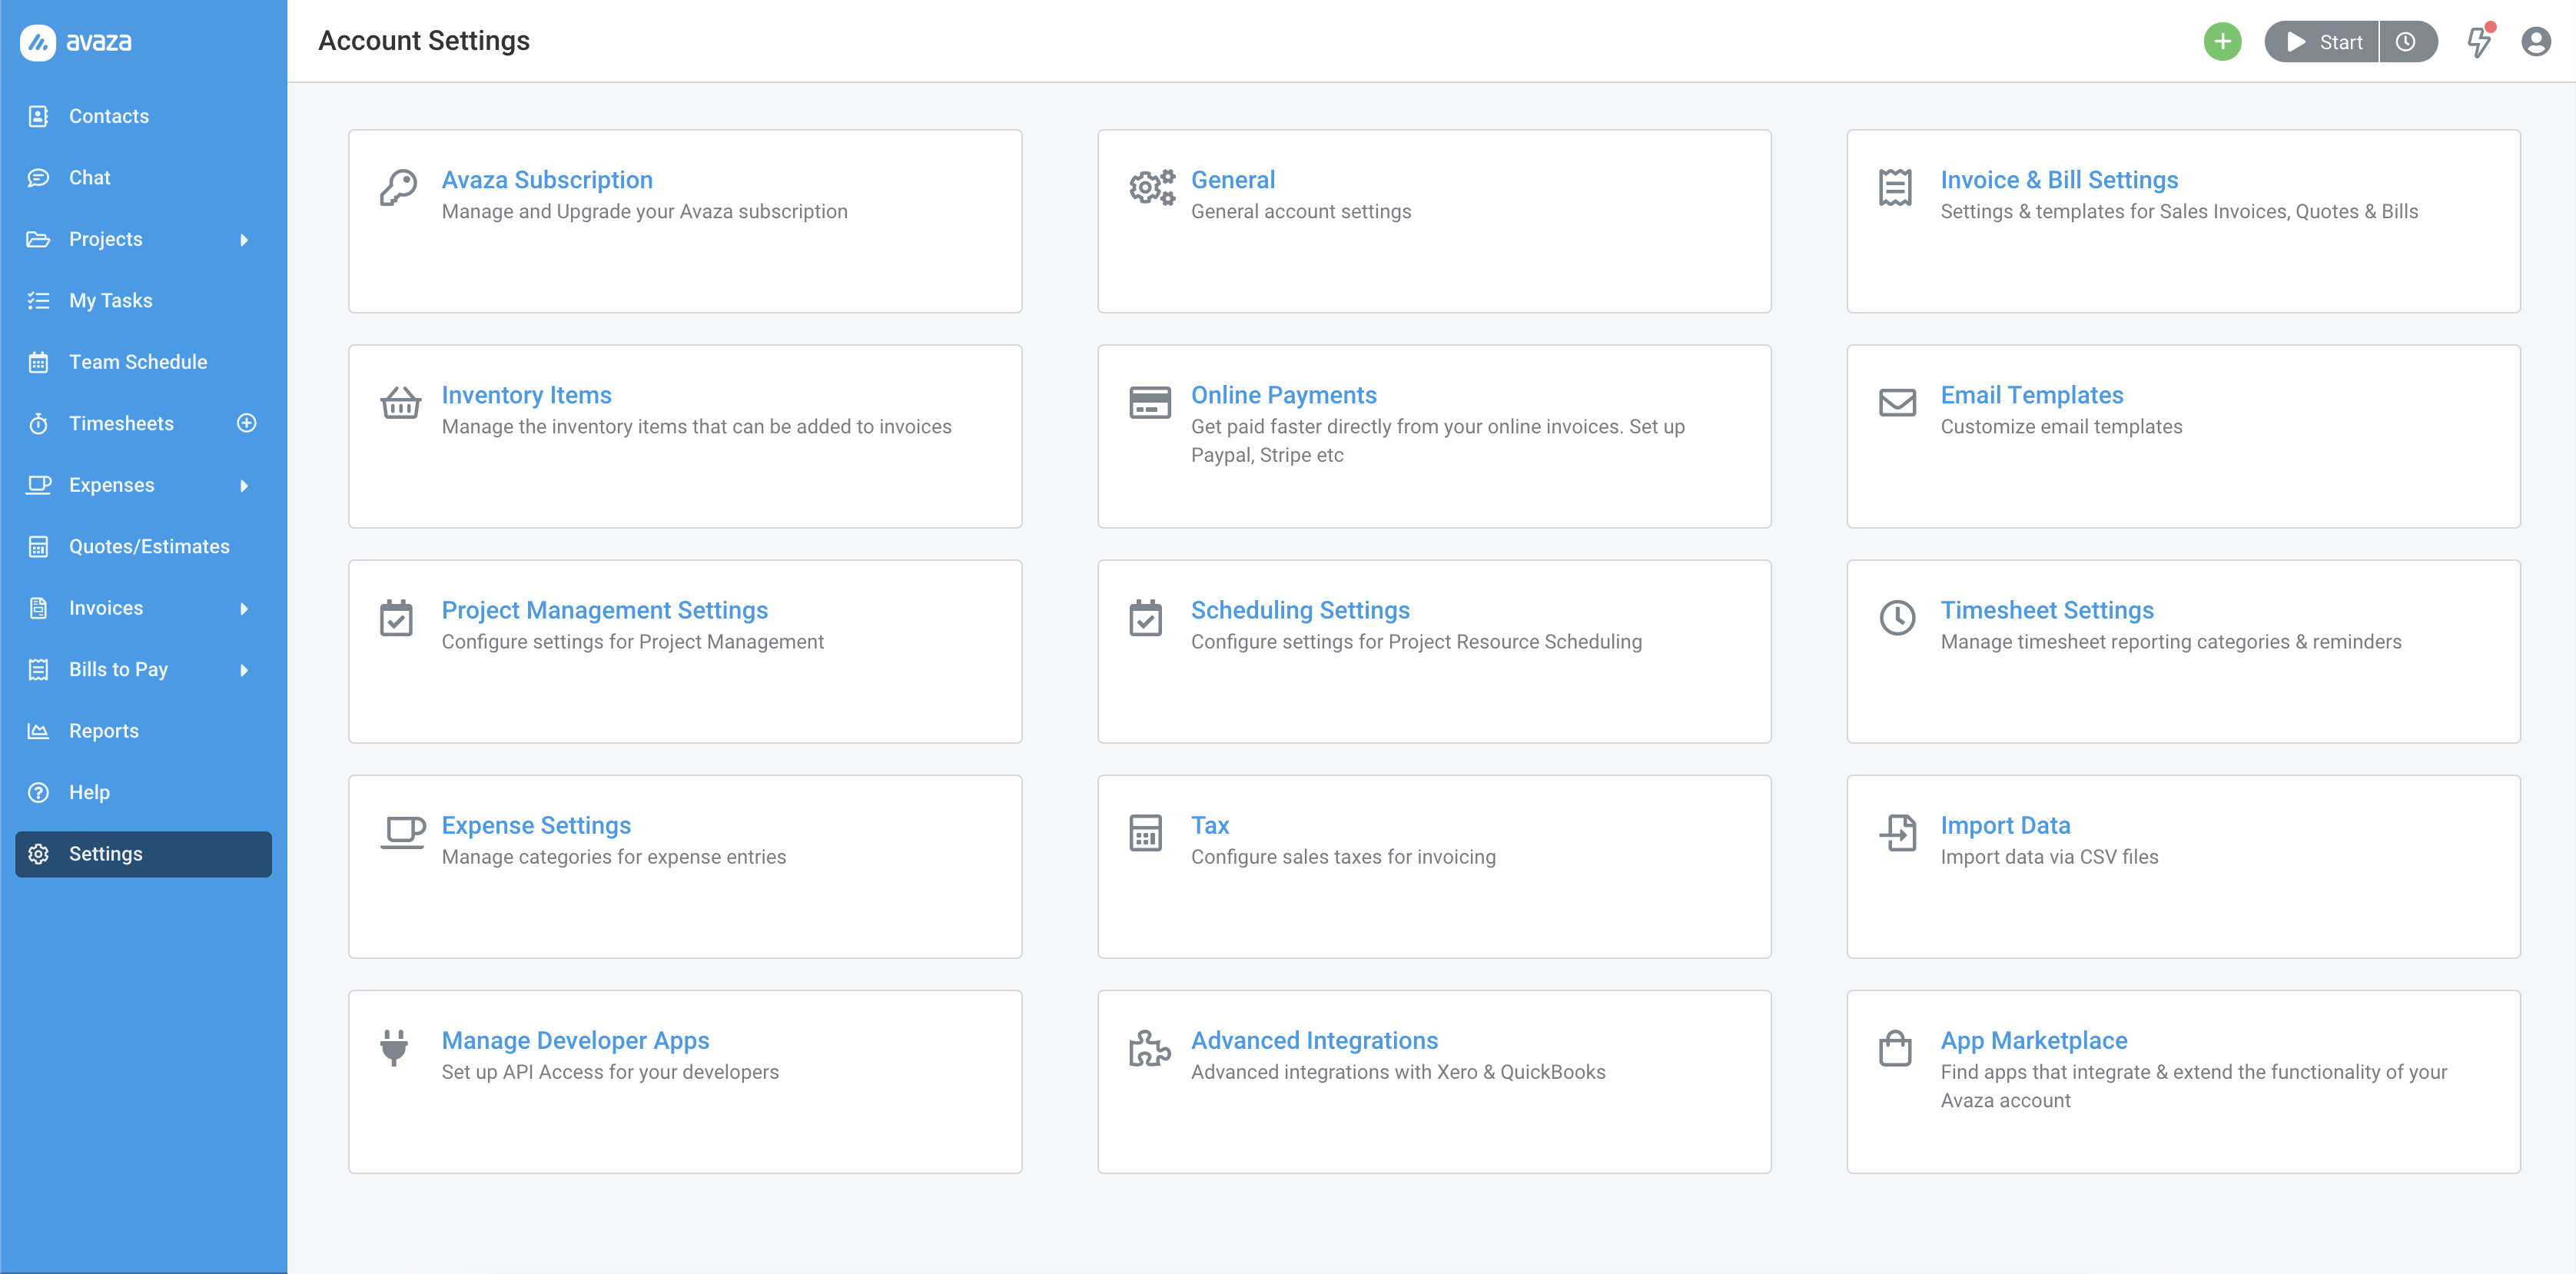
Figure: Navigate to Avaza Settings to Customize Bills
General Settings
Most of your General Settings are pre-filled when you sign up. Your Company Name is displayed on your Bills however this can be overridden on the Bill Template if required. The default currency you provided while signing is used to default the currency when creating a new supplier. Bills are created using the supplier’s currency by default however you can select a different currency if required.
Here are some other settings you can view:
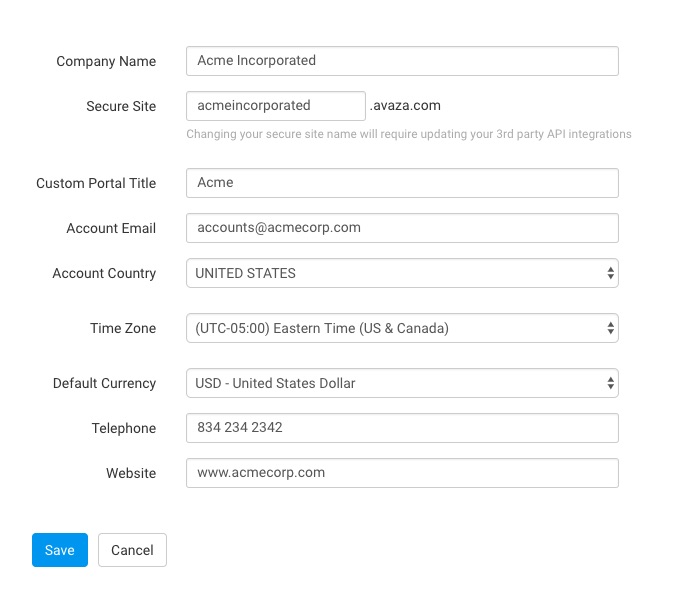
Figure: General Settings
Invoice and Bill Settings
Head over to Invoice and Bills Settings, on the top you will see Default Invoice/Billing Address. Populate the address fields. These are by default displayed on your invoices and bills. If you would like to display a different address on your Invoices and Bills then check the Override Display Address checkbox and enter the alternate address in the Display Address field. This address can further be overridden at the Bill template level if required.
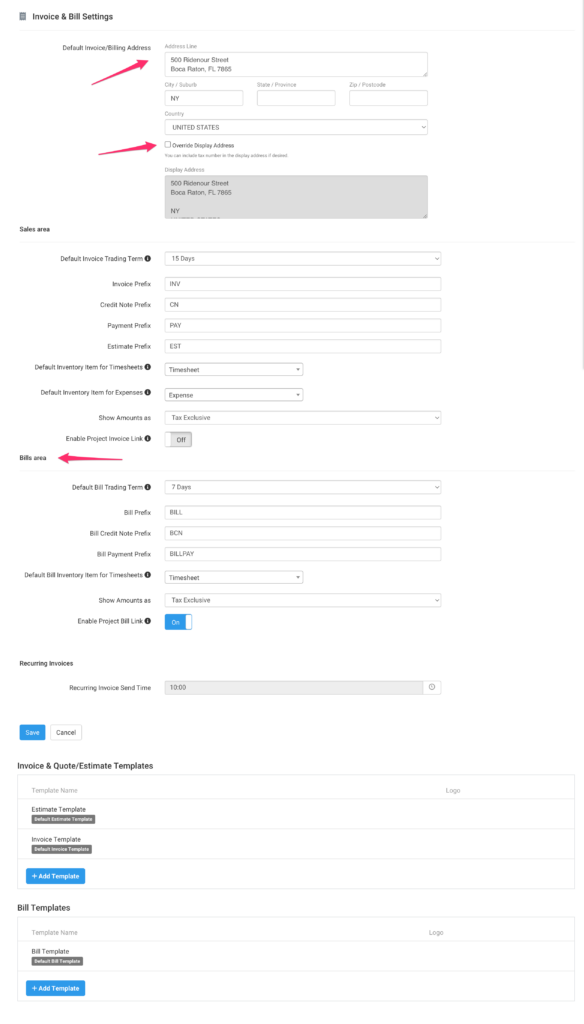
Figure: Invoice and Bill Settings page
You can update Bills module-specific fields by scrolling down to the Bill area panel. Please see the detail per field below.
- Default Bill Trading Terms: This field is used to calculate the Bill due date based on the selected Issue date. You can choose between “Upon receipt” or 7, 15, 30, 45 and 60 days. These Default Bill Trading Terms are added to each External Company in your contacts, but can be changed for each supplier if needed.
- Bill & Payment Prefixes: This prefix is added before the bill or bill payment number. (Bills credit note feature is not yet available)
- Default Bill Inventory Items for Timesheets: This sets the default Inventory Item when adding Timesheets to Bills.
- Show Amounts as: Choose between Tax Exclusive & Tax Inclusive. This is used to pre-fill the Bills header but can be changed when you create the Bill.
- Enable Project Link: This setting allows you to link individual line items on Bills to specific projects for project reporting.
Bills Templates:
The Bills Templates section lets you customize your Bills. You can create multiple Bill templates and brand each one differently by using a different company name, address, logo, colors, and more.
Tax Settings
If your suppliers charge you sales tax then you will need to configure the appropriate taxes under the Tax Settings area. Navigate to Settings > Tax Settings and create or edit Taxes as needed.
Read more about setting up taxes in Avaza here.
Inventory Settings
Inventory items are things your suppliers bill you for. Setting these up initially allows you to save time when creating bills. Navigate to Settings > Inventory Items to set these up.
By default, a few Inventory Items are already set up in your account. Read more about setting up Inventory Items here.
Create New Bills
Ready to create your first Bill? Navigate to Bills to Pay > Bills to Pay, and click the green +Create Bill button.
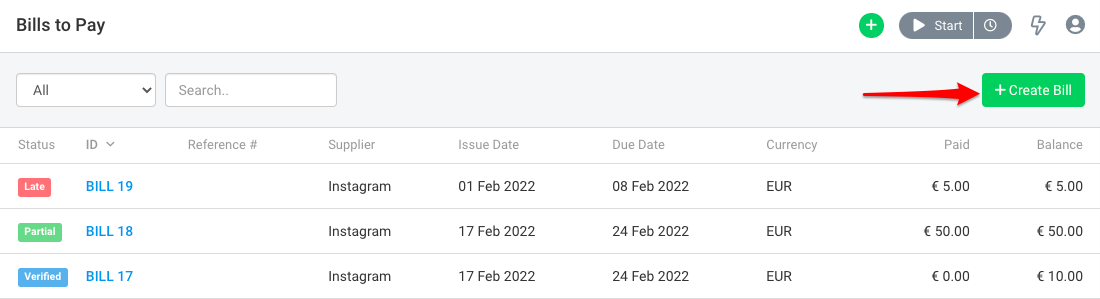
Figure: Click the green “+Create” Bill button to create a new Bill
Choose the supplier you are creating the bill for, or add a new supplier. Adding a new supplier at this stage automatically adds them to your External Contacts list. You can always edit supplier details later.

Figure: Choose Supplier to Create Bill for
With Avaza, you can add free-form line items, or add unpaid timesheets tracked by supplier contacts to a bill.
Add Time
If your supplier’s contacts have been tracking time in Avaza and need to be paid for their tracked time then use the Add Time button to quickly add all unpaid time to the Bill. The Unit Price on each Bill Line Item will be populated by the configured cost rate and Quantity will be populated based on the total hours tracked.
This process allows you to create bills on your supplier’s behalf based on time tracked by the supplier’s contacts. Traditionally this process has been time-consuming and prone to errors given the supplier doesn’t have access to the tracked time details in their system.
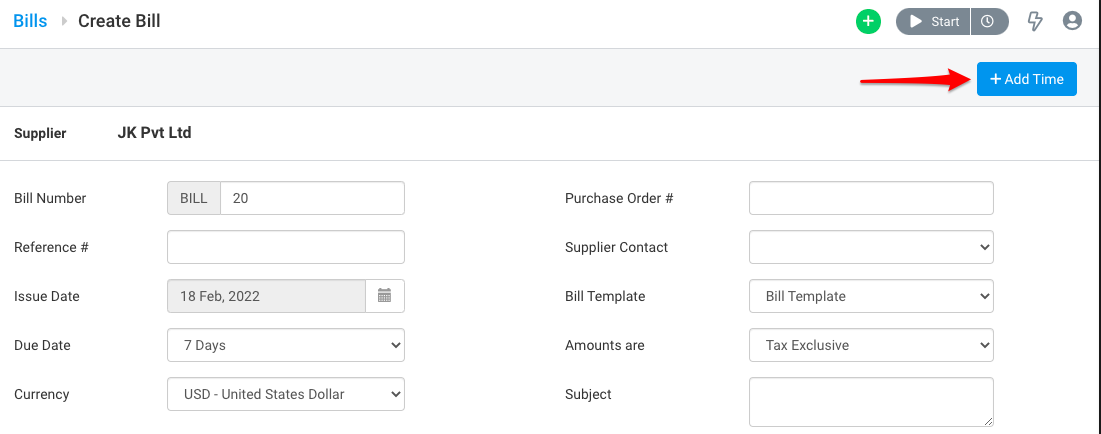
Figure: Add Timesheets to the Bill
Click the Add Time button. This will bring up the Add Time popup. Choose the projects you want to bill for and filter timesheets by user, timesheet category, section & task, and date range. You can also group timesheet entries by:
- Project
- Project & Timesheet Category
- Project & Timesheet User
- Project & Section
- Project & Task
You can also choose what information from the timesheets you wish to add to the line-item description. Your options include project, timesheet category, project task, start & end time, date, people (who logged the timesheet), and notes.
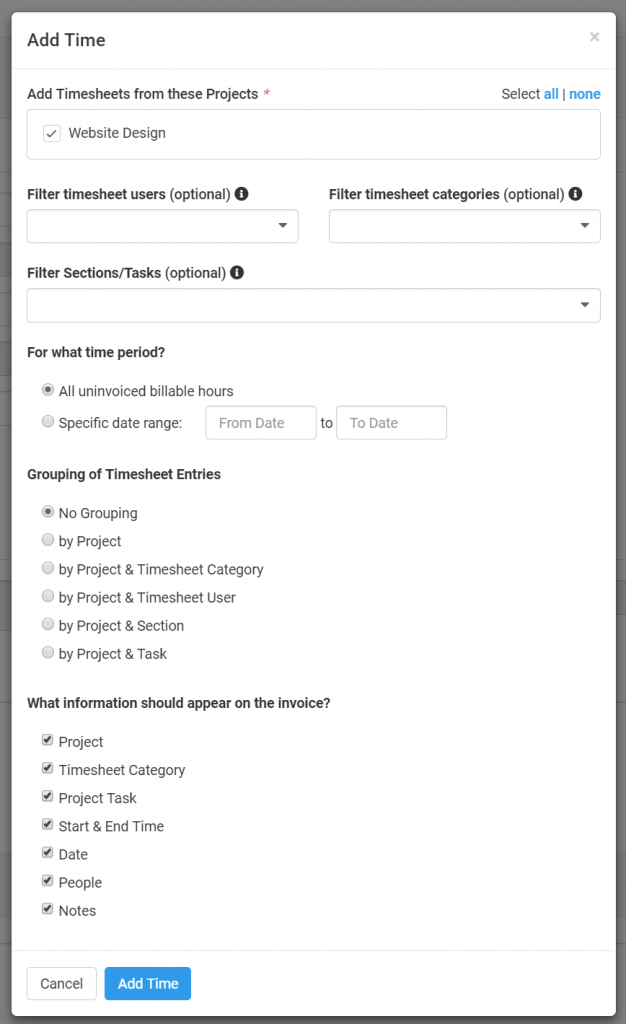
Figure: Add Time Popup Allows you to Filter and Group Timesheets
When you are done adding timesheets or free-form line items, you will see that your Bill has been populated with all of the relevant information.
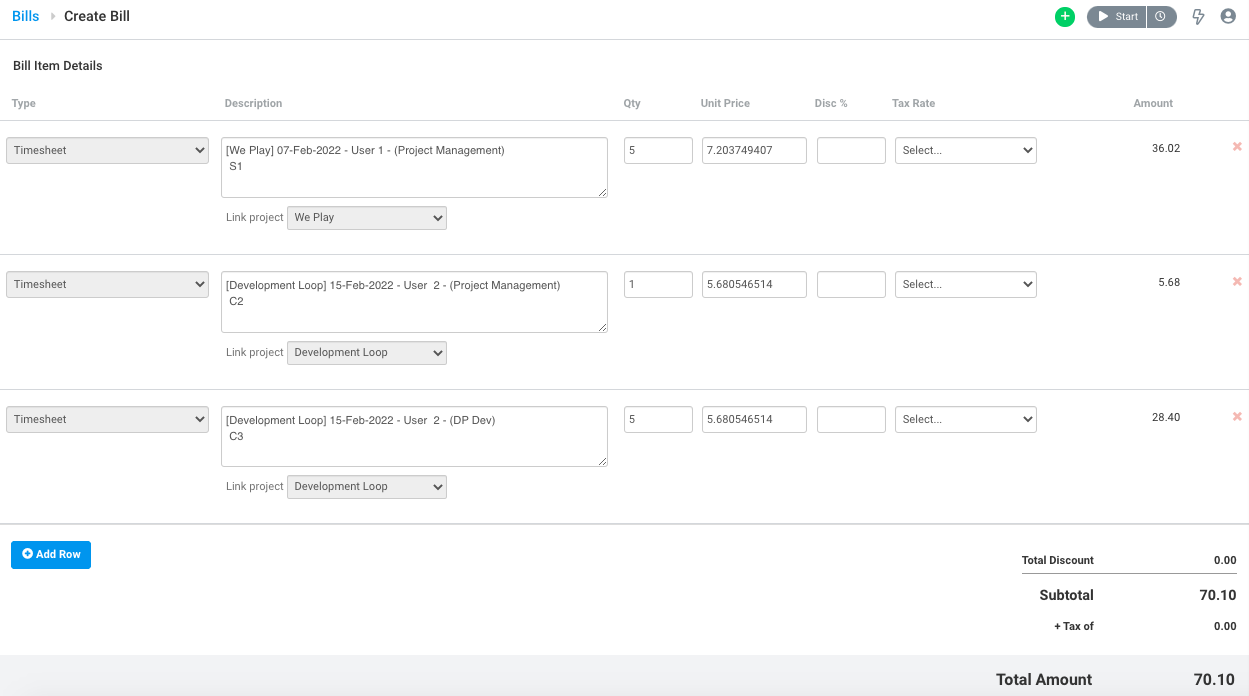
Figure: Bill with Timesheets Added
Once the Bill has been saved, you can add attachments. These can be documents or any other files you wish to include that you require for record-keeping. You can upload these from your computer, Google Drive or Dropbox.
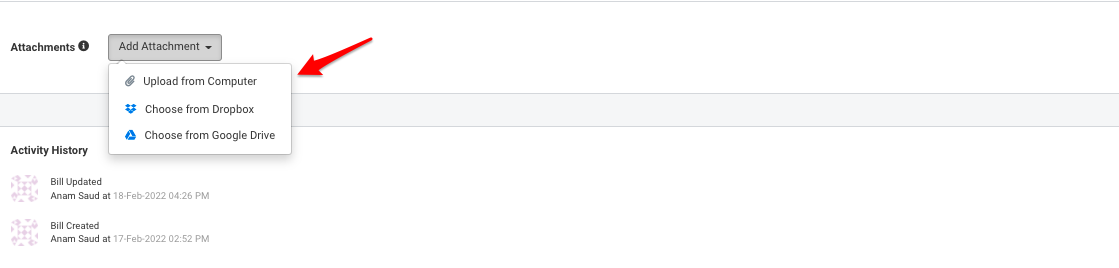
Figure: Add Attachments to your Bill
Bill Details
When viewing the bill details page, you will notice a few buttons. To download a PDF copy of the Bill, click the PDF button. To share the web view of the bill with your supplier, click the Web View button. You can copy the URL and send it to your supplier if required.
Once payment is made for the Bill, click the Record Payment button to create and apply the payment to the Bill.

Figure: Download Bills as PDF or View Online
Using the Actions drop-down, you can mark the bill as verified, revert it to Draft, and apply Existing Payment. You can also copy the bill, Void it or Delete it. At the bottom of the Bill Details page, you will be able to view the Activity History. This shows you a history of actions performed on the bill.

Figure: View Bills with Attachments, Activity History and Payment History
Bills Overview Page
All of your bills can be viewed on the Bills Overview page. This page allows you to Filter Bills based on their Status, Search for a specific bill, and Sort the list in ascending or descending order. The Status filter and the Sort order of the column used to sort the list will be remembered i.e will be saved and remain the same the next time you come to this page.
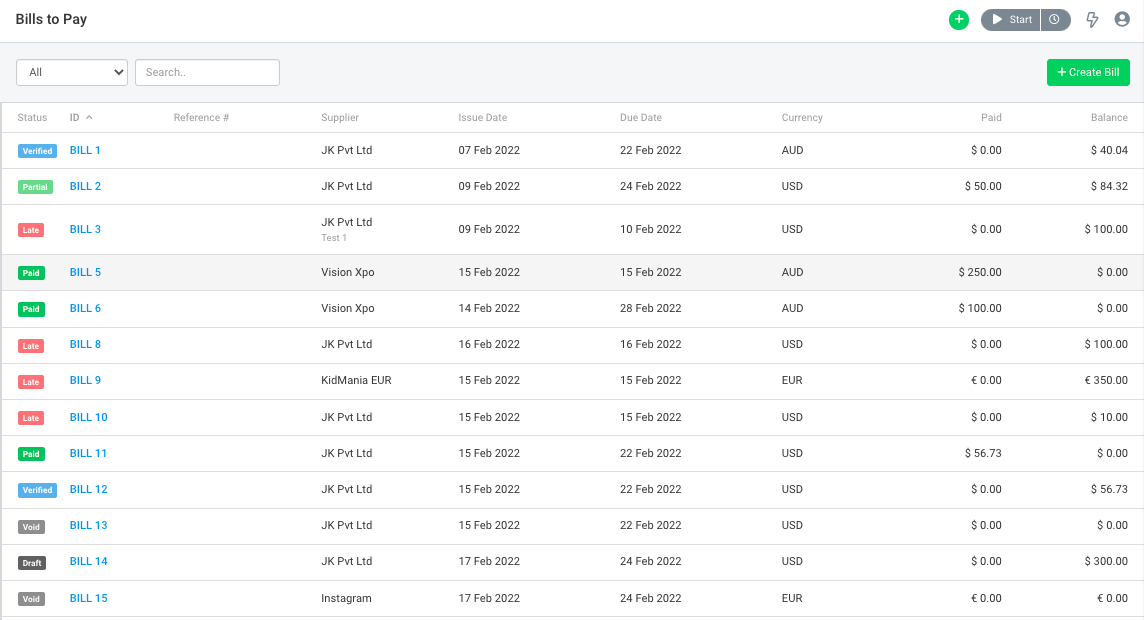
Figure: Bill Overview with All Bill Statuses
Bill Status
All the bills are color-coded depending on their status. The Bills statuses are:
- Draft – Dark Grey
- Verified – Blue
- Partially Paid – Light Green
- Paid – Dark Green
- Late – Red
- Void – Light Grey
The Status dropdown contains the options All, Ope, Draft, Verified, Late, Partially Paid, Paid, and Void. All the Bills can be filtered based on their status or searched using the search box. Choosing the status Open from the dropdown displays the bills in Draft, Verified, Late, and Partially Paid statuses.
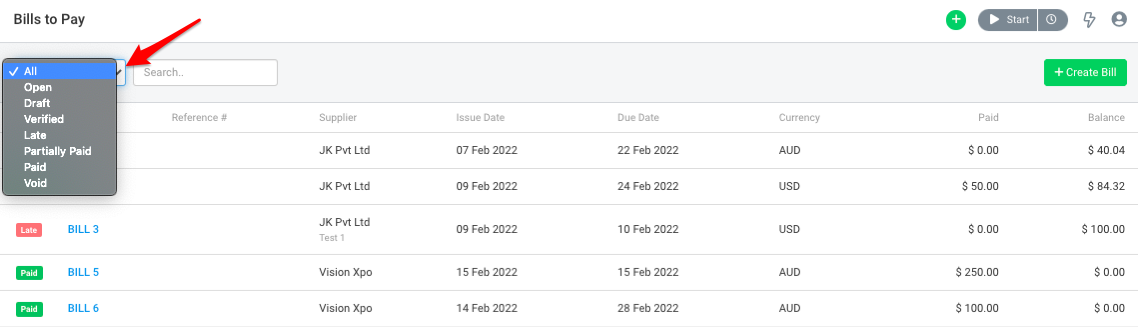
Figure: Filter bills based on their Status
You can also change the bills status labels by updating the Bills Template. Simply navigate to Invoice and Bill Settings > Bill Templates > Layout tab > Bill Statuses.
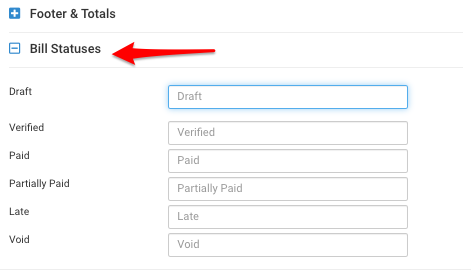
Figure: Open Bill Template to Change Bill Status Labels
List Sorting
The bills listed on this page can be sorted in ascending or descending order by any column. Click on any column header in the list to quickly sort the list by that column. The column used to sort the list will display a sort indicator: Up for ascending order, and Down for descending order.
Hope this guide helps you understand how to create and manage Bills in Avaza. If you need further help, feel free to contact our support team via chat or email.
Bill Reports
Bill Aging
To see how long bills have gone unpaid use the Bills Aging or Bills Aging Details Report. The Bills Aging report lists all the suppliers with unpaid bills, including the total amount due grouped by the aging bucket. Use this report to keep an eye on which suppliers are owed how much money age of the payables. Drill down to bill level details by clicking the supplier name.
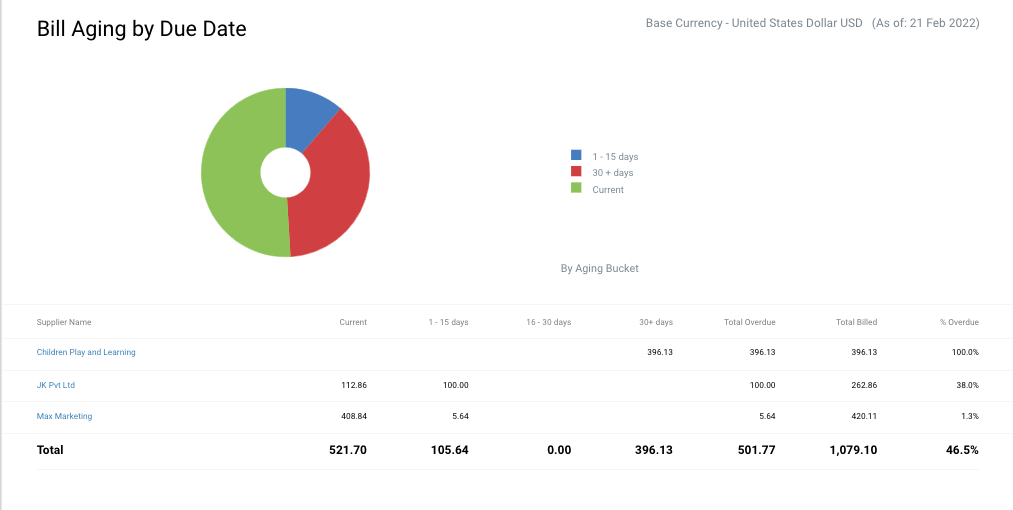
Figure: Bill Aging Report in Base Currency
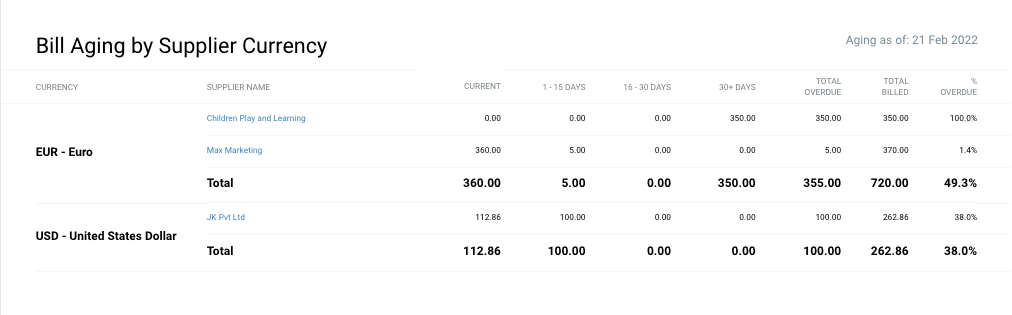
Figure: Bill Aging Report in Customer Currency
Timesheet Details
To filter timesheets based on Payable status run the Timesheet Details report. The Payable Status parameter includes the following three options.
- Is Payable – all timesheet entries that are linked to timesheet categories where Is Payable flag is true
- Is Not Payable – all timesheet entries that are linked to timesheet categories where Is Payable flag is false
- Is Paid – all timesheet entires that are already added to a Bill.
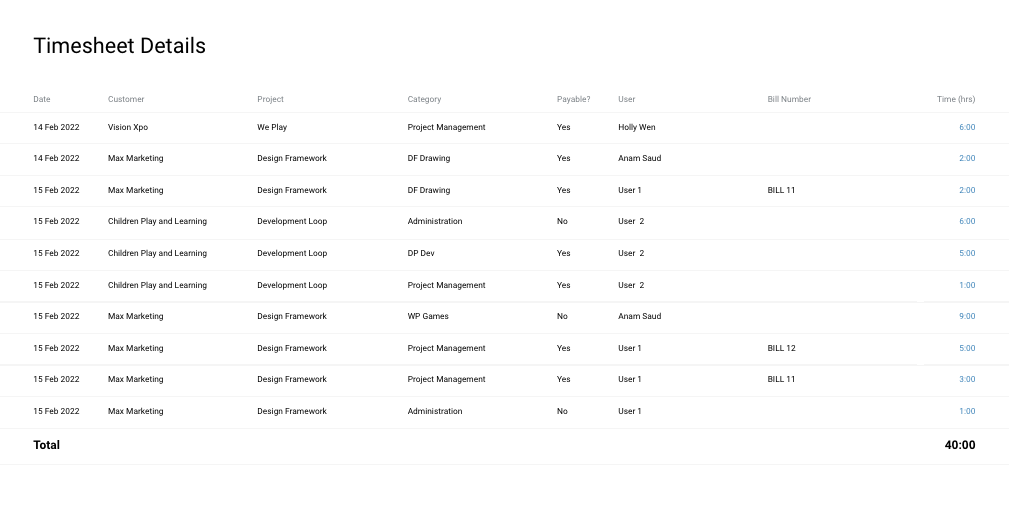
Figure: Timesheet Details report with two new columns Payable and Bill Number
Two additional fields are included in the Show Columns parameter.
- Payable? – displays a Yes or No value based on the saved value on timesheet entry
- Bill Number – displays the Bill number the timesheet entry has been added to
We plan to incorporate the Bills module in many more reports. Details will be included in this article as soon as they become available.