The more detailed your Estimate, the more likely it is to be approved in the first go. Here is a field-by-field guide on how you can fill out an Estimate for your client.
Here are all the fields that can be filled out on the Estimate.
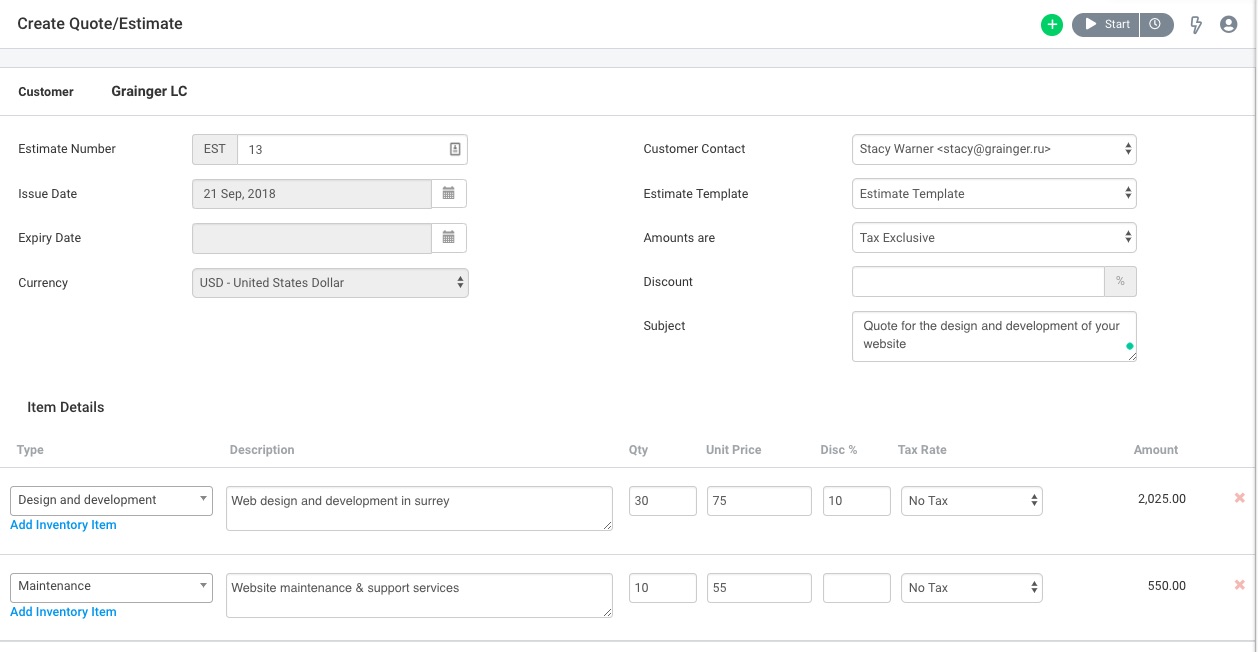 Figure: A Guide to Filling An Avaza Estimate
- Estimate Number: By default, Avaza generates sequential numbers for your Estimates, based on the last highest number. You can remove/update the default Estimate Prefix via Settings > Invoice Settings. To reset the Estimate Number back to 1, you can simply assign a new Estimate Prefix. The next estimate number will automatically be set to 1 and then sequentially get higher from there.
- Issue Date: This is set to the date you create the Estimate.
- Expiry Date: If you wish, you can enter an expiry date for the estimate. This provides the customer with a deadline to approve or reject the Estimate by.
- Currency: This is based on the currency of the customer you are creating the Estimate for. This can be changed by going to Contacts > External Contacts > Clicking on Customer Company name but only if no transactions have been created for this customer.
- Customer Contact: You can nominate a contact within the client company to address the estimate to. You can switch this feature on by editing the relevant Invoice Template and enabling the “Show Customer Contact” option on the Layout tab. Learn more here.
- Estimate Template: By default, this is the template selected at the External Company level. Templates allow you to create different layouts and look for Estimates based on your requirements (for example, language or requirement to display taxes or discounts a certain way). This can be changed by navigating to Settings > Invoice Settings > Add Template. Learn more about customizing estimate templates here.
- Amounts Are: If the Unit Price you are charging is exclusive of Tax, then choose Tax Exclusive. If it includes Tax, then choose Tax Inclusive.
- Discount: This is a default discount you can apply across the Estimate, which will pre-populate the line item discount field for you. This needs to be entered before any line items are added to apply it to them by default.
- Subject: This is used as the Email subject and as the Project Title (if you convert the Estimate into a Project).
Add individual line items in the Item Details section.
- Type: This is your Inventory Item List. Inventory items are the things you bill your customers for. These items allow you to quickly bill your customers by pre-filling most of the fields. Read more about Inventory Items here.
- Description: Enter a description that explains to your customer what the line item refers to.
- Qty: Choose a Quantity if needed. By default, this is set to 1.
- Unit Price: Enter a per unit price.
- Discount: If you haven’t applied a default discount rate at the top of the Estimate, you can do so per line item.
- Tax Rate: Select a Tax Rate from the Drop-down. Read more about configuring Taxes.
- Amount: This is calculated based on the Unit Price, Qty and Discount and Tax Rate information entered.
You can also remove line items by clicking the ‘x’ at the end of each row.
The bottom of the estimate displays the Total Discount, followed by Subtotal, Tax Amount, and the Total Amount. You can add Notes as needed. Click Save to save the Estimate as a draft, or Cancel if you wish to start over.
Do you need any further help? Feel free to contact our support team via chat or email (support@avaza.com).