Do you want to automate your booking process in Avaza by capturing booking data from a Google Sheet? With Zapier, you can easily connect Google Sheets to Avaza and auto-schedule bookings without manual entry.
This article walks you through setting up a Zap that takes a new row from Google Sheets and uses it to create a Schedule Booking in Avaza.
Before you start, make sure you have:
- A Zapier account
- An Avaza account with suitable role to create schedule bookings
- A Google Sheet with the required columns (like User Email, Project Title, Timesheet Category Title, Task Title, etc.)
Below is a step by step guide to create a Zap in Zapier that will read data from a Google Sheet and create schedule bookings in Avaza.
This Zap will reads data from a Google Sheet and uses it to:
- Find the matching Avaza project
- Validate that the project and task exist
- Look up the user based on their email
- Create a Schedule booking in Avaza with the correct project, category, task, duration, and notes for that user
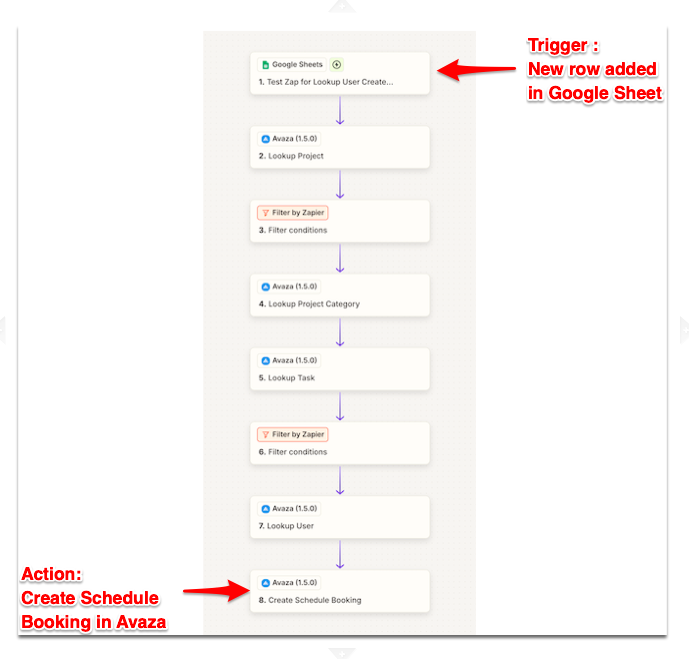
Step 1: Create a New Zap in Zapier
- Log in to your Zapier dashboard.
- Click “Create Zap”.
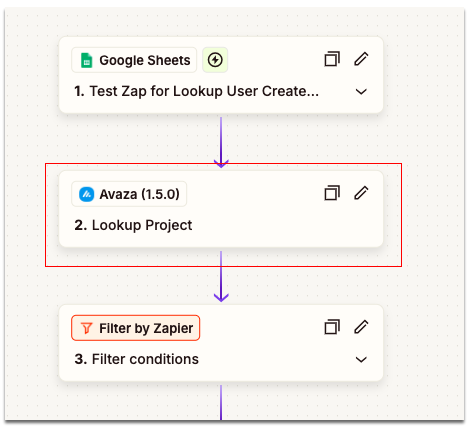
Step 2: Set Up the Trigger (Google Sheets)
- Choose App & Event:
- App: Google Sheets
- Trigger Event: New Spreadsheet Row
- Spreadsheet: Select the sheet that holds your booking data.
- Worksheet: Select the specific tab within the spreadsheet.
- App: Google Sheets
This step starts the Zap whenever a new row is added to the sheet.
Step 2: Search for Avaza Project
- App: Avaza
- Action: Find Project
This looks up the Avaza project name provided in the Google Sheet.
Step 3: Filter – Project Must Exist
- App: Filter
- Search: Project Title from the spreadsheet
Ensures that a matching project was found. If not, Zap stops here.
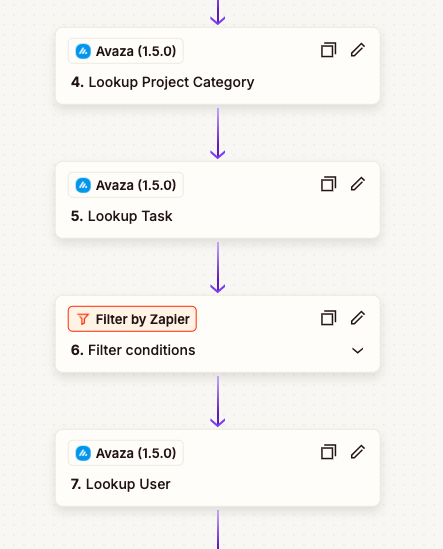
Step 4: Lookup Time Category (Project Category)
- App: Avaza
- Action: Lookup Project Category
- Project ID: From Step 2 will be used here
- Search: Project Timesheet Category from the spreadsheet
Gets the correct timesheet category from the selected project.
Step 5: Lookup Task
- App: Avaza
- Action: Lookup Task
- Project ID: From Step 2
- Search: Task Title from the spreadsheet
Finds the task under the selected project.
Step 6: Filter – Task Must Exist
- App: Filter
Stops the Zap if the task isn’t found.
Step 7: Lookup User by Email
- App: Avaza
- Action: Lookup User
- Email: User email from the spreadsheet
Finds the user based on their email address.
Step 8: Create Schedule Booking
- App: Avaza
- Action: Create Schedule Booking
- Map fields from your Google Sheet to Avaza’s Schedule Booking fields.
- Run a test to confirm a booking is created in Avaza.
- Check Avaza’s Schedule tab to confirm the booking appears as expected.
Step 9: Test Your Zap
- Add a new row in your Google Sheet with valid data.
- Zapier should automatically run and create a booking in Avaza.
- Confirm in Avaza’s Resource Schedule view.
You now have an automated workflow that creates Avaza bookings directly from new Google Sheet rows—no manual data entry required.