
The Expenses page now works the same way as Tasks, Projects and Contacts. Your expenses, approvals and reimbursements sit in tabs on one page, and each tab supports saved views: filters, sorting, grouping, column choices, and views you keep for yourself or share with your team.
This article covers what has changed and how to use it.
What has changed
- One page, three tabs. Expenses, Approvals and Reimbursements are now tabs on the Expenses page, so you no longer need to move between separate screens.
- Saved views on every tab. Filter, sort, group and choose columns, then save the result as a personal or shared view.
- Built for large volumes. Lists load a page at a time, and group counts and subtotals are worked out across all matching expenses, not just the rows on screen.
- Totals by currency. A totals bar at the bottom of each list shows the total and the number of expenses in each currency.
- Faster approvals and reimbursements. Approve, reject or reimburse one expense, a selection, or everything for one person in a single click.
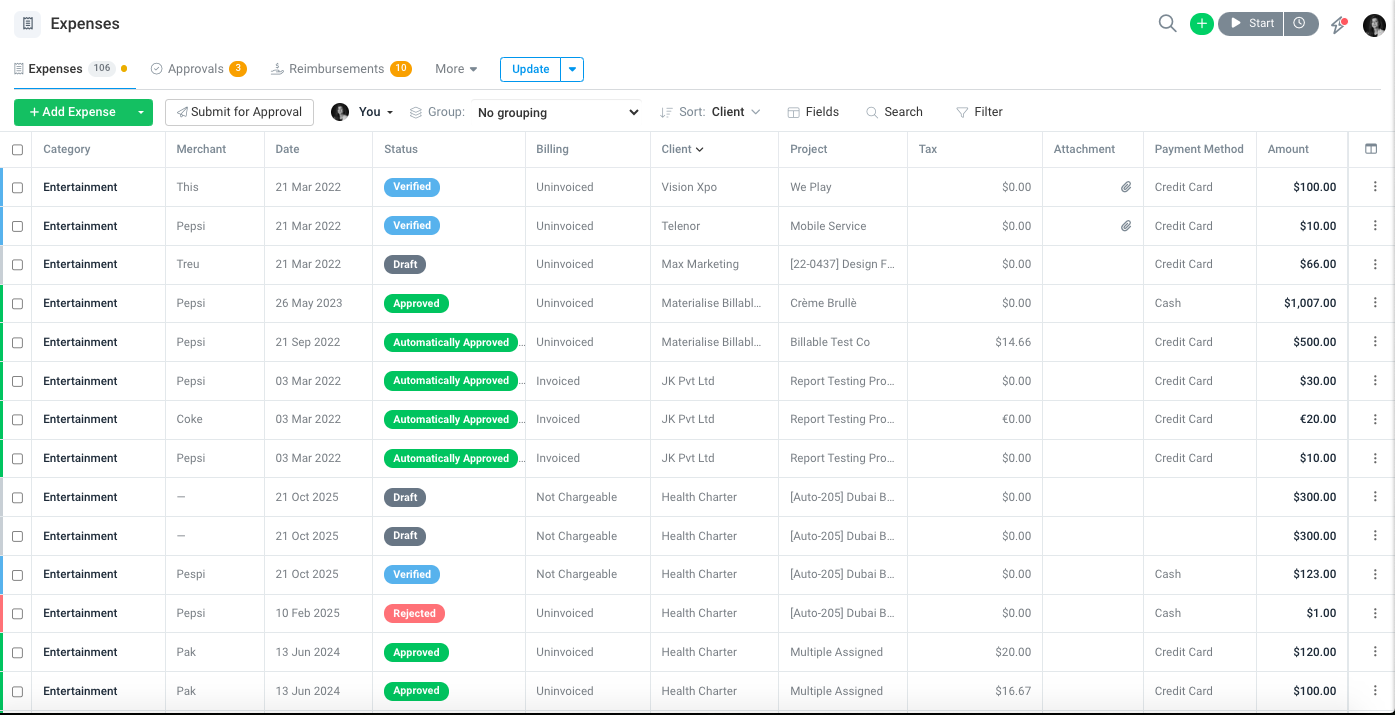
Figure 1: The Expenses page with its tabs across the top and the toolbar below them.
Who sees which tab
- Expenses is available to everyone who can record expenses.
- Approvals appears if you have permission to approve expenses.
- Reimbursements appears if you have permission to manage reimbursements.
- People who cannot view other people’s expenses only ever see their own, whatever a view’s settings say.
The Approvals and Reimbursements tabs show a badge with the number of expenses waiting for action, so you can see at a glance when something needs attention.
The Expenses tab
The Expenses tab lists expenses with a coloured status label (Draft, Verified, Pending, Approved, Automatically Approved or Rejected) and a matching coloured strip at the left of each row. Draft expenses that are missing required details, such as an amount or category, show a warning icon.
From the toolbar you can:
- Add Expense to record a new expense.
- Submit for Approval to submit your verified expenses. Select rows first to submit only those.
- Tick rows to Submit or Delete several expenses at once.
- Click any row to open the expense.
Choose whose expenses you see
If you can view other people’s expenses, use the person picker in the toolbar to switch between Everyone, You, or a specific person. Type in the search box to find someone quickly.
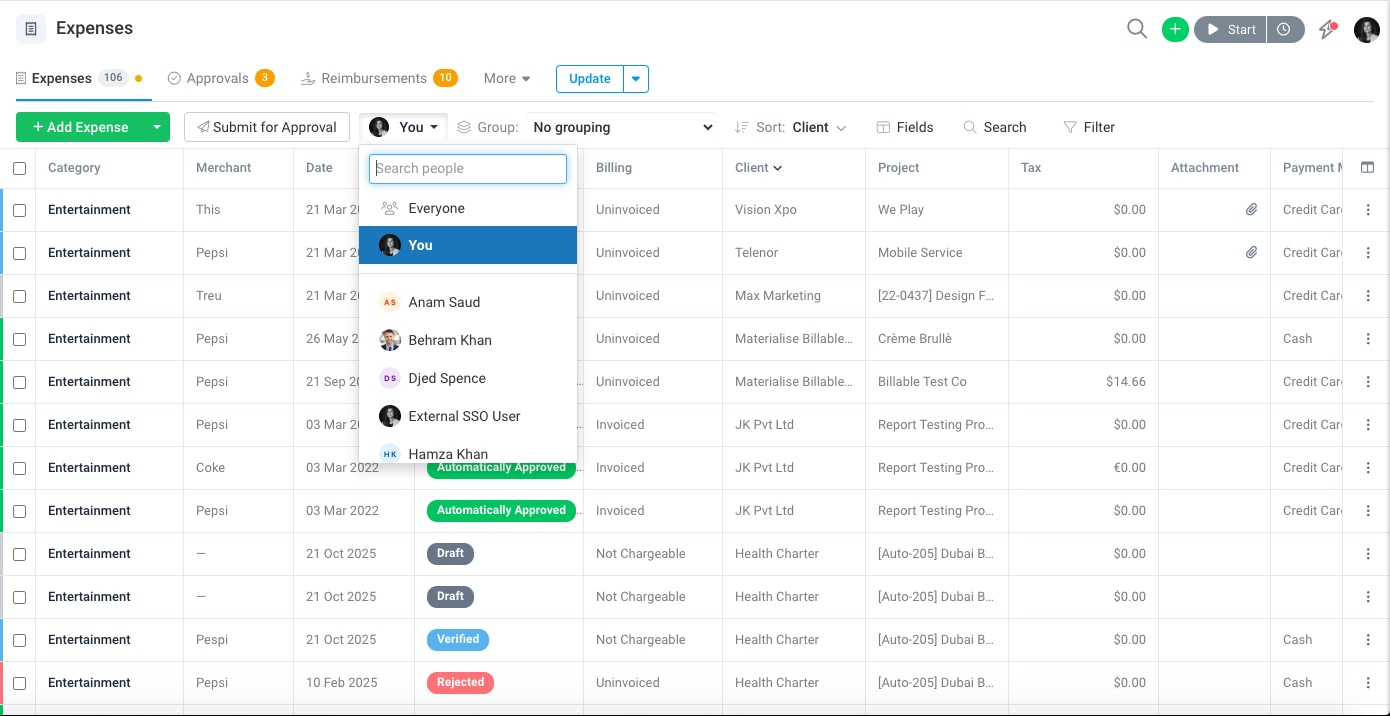
Figure 2: The person picker, with a search box at the top.
Filter expenses
Click Filter to open the filter panel.
- Quick filters apply common filters in one click: Pending approval, Drafts, Reimbursable, Uninvoiced and This month.
- Add filter lets you build your own. Choose a field, an operator and a value. Amount filters support Is, Is not, Is between, Is greater than and Is less than.
- You can add several filters. Click Apply to update the list, or Clear all to start again.
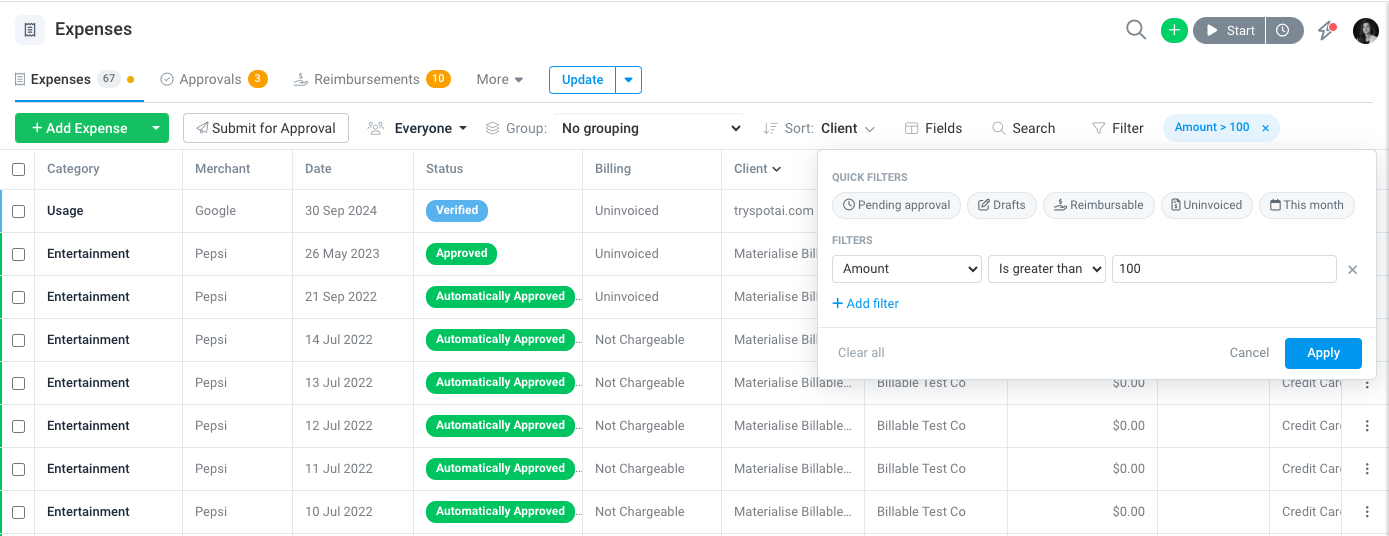
Figure 3: Adding an “Amount is greater than 100” filter.
Active filters appear as chips next to the Filter button, for example Amount > 100. Click the × on a chip to remove that filter.
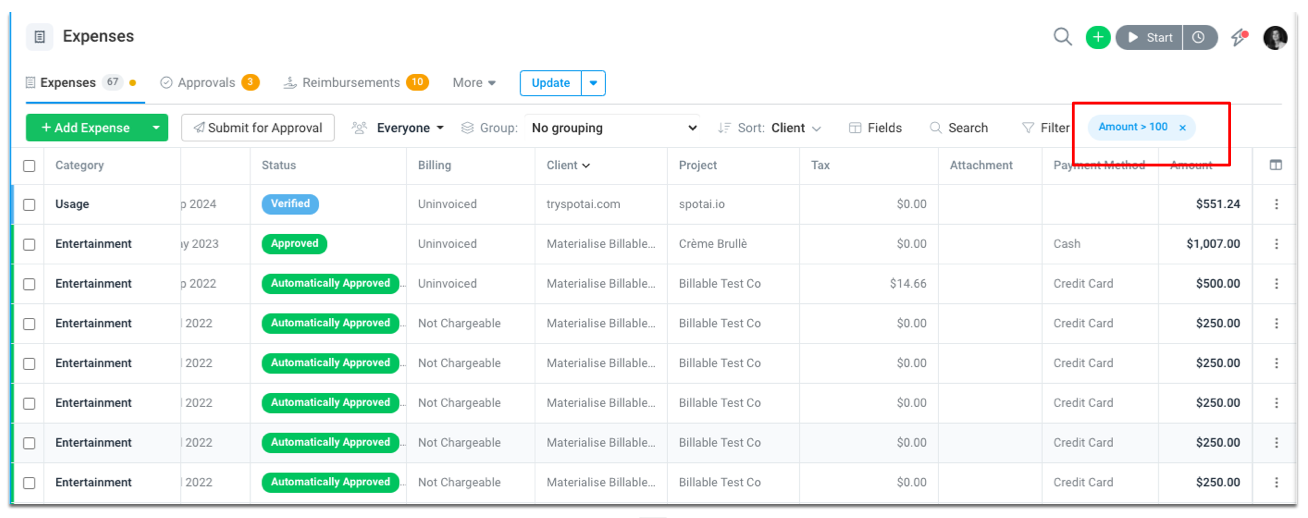
Figure 4: Filtered and grouped by status, with the currency totals bar at the bottom.
Group and sort
Use the Group dropdown to organise the list. You can group by Billing, Category, Client, Currency, Group / Trip, Month, Payment Method, Person, Project, Reimbursable, Reimbursement Status or Status.
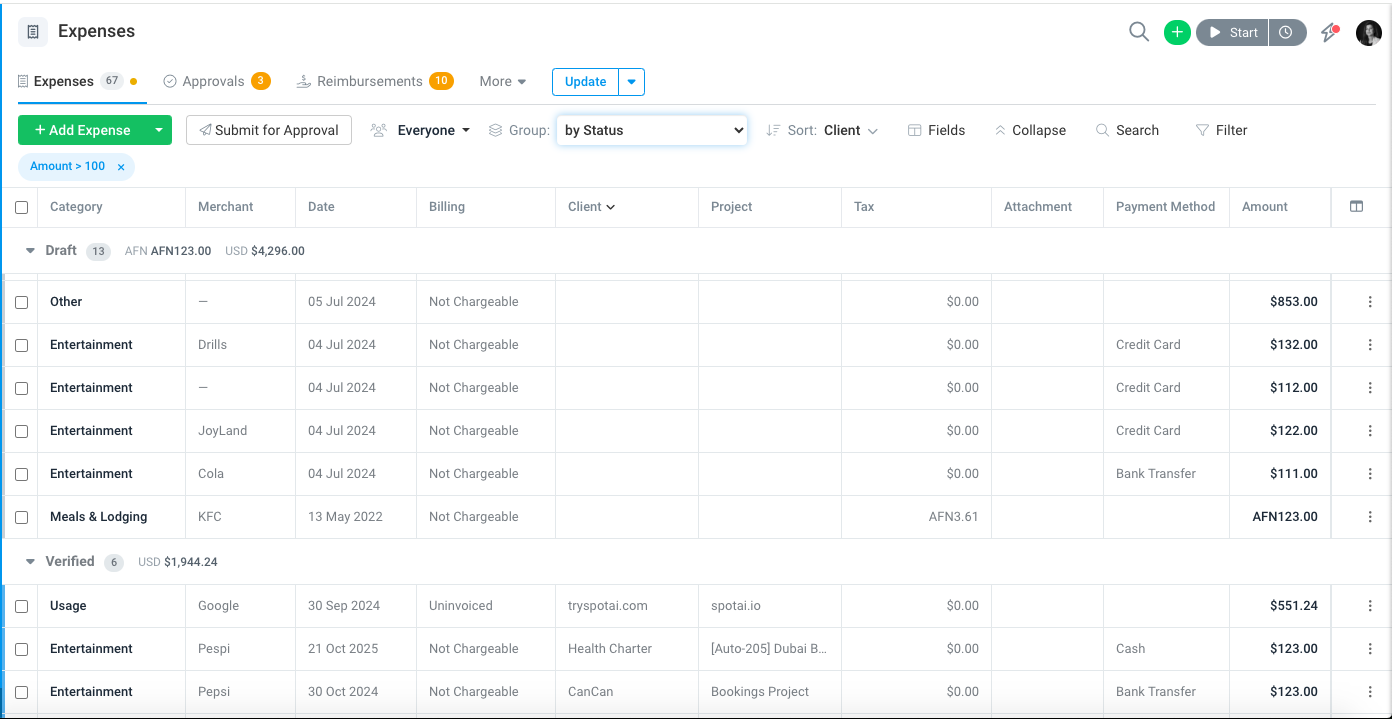
Figure 5: Expenses grouped by status. Each group header shows the number of expenses and a subtotal for each currency.
- • Each group header shows how many expenses are in the group and a subtotal for each currency. These figures cover every matching expense, including ones not yet loaded.
- Click the arrow on a group header to expand or collapse that group, or use Collapse / Expand in the toolbar for all groups at once.
- In large groups, click Load more at the bottom of the group to load the next set of rows for that group only.
- Group headers stay visible at the top of the list as you scroll through a long group.
Use Sort to choose the sort field and direction.
Choose your columns
Click Fields in the toolbar (or the column icon at the right of the column headings) to open Manage Columns.
- Tick the columns you want to see and drag them into the order you want.
- Use the Desktop & tablet and Mobile tabs to set different columns for large and small screens.
- Turn on Freeze first column when scrolling to keep the first column visible as you scroll sideways.
- Click Reset Large screens to defaults to return to the standard layout.
Available columns include Category, Date, Status, Billing, Merchant, Currency, Amount, Reimbursable, Client, Project, Attachment, Payment Method, Group / Trip, Tax, Reimbursement Status, Person, Notes, Date Created and Date Updated.
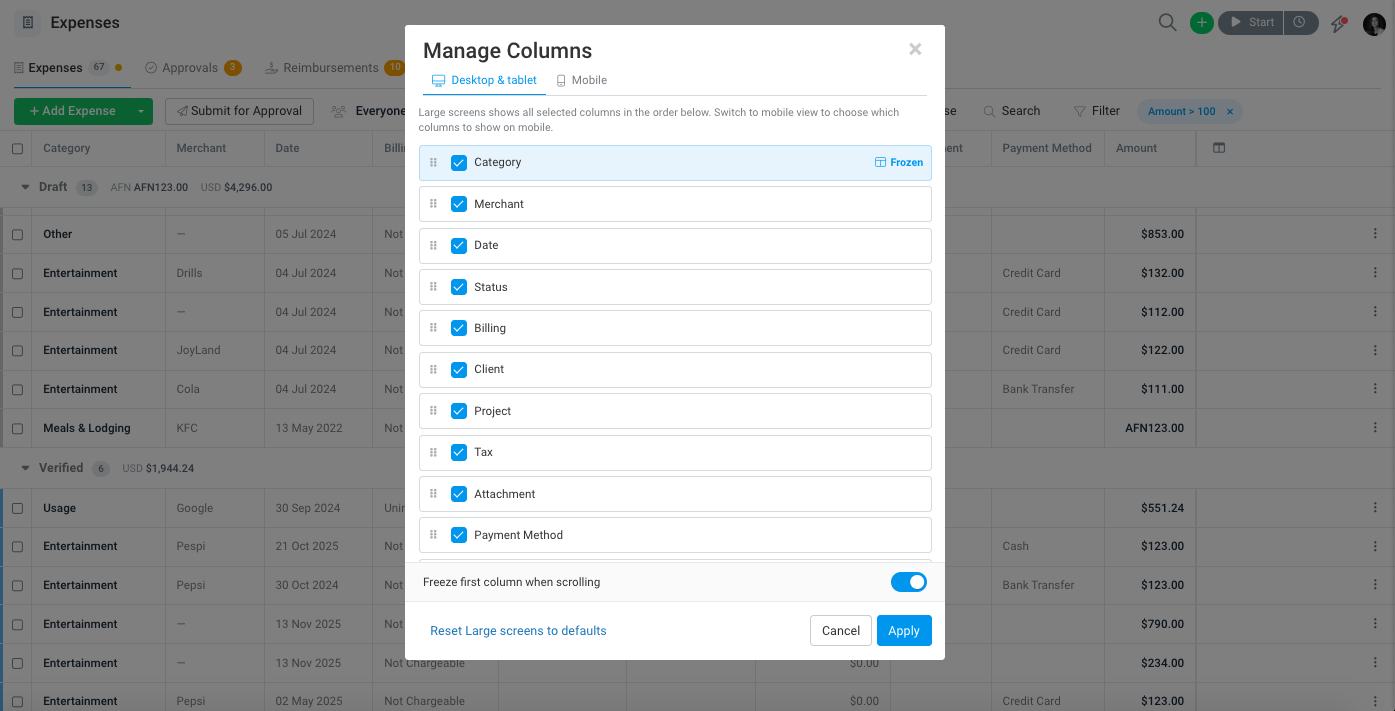
Figure 6: Manage Columns, with the first column frozen.
Save and share views
When you change the filters, grouping, sorting or columns, a dot appears on the view’s tab and an Update button appears next to the tabs.
- Update saves your changes to the current view.
- Discard (from the arrow next to Update) removes your changes and returns to the saved view.
- Save as New keeps the current view as it was and saves your changes as a new view.
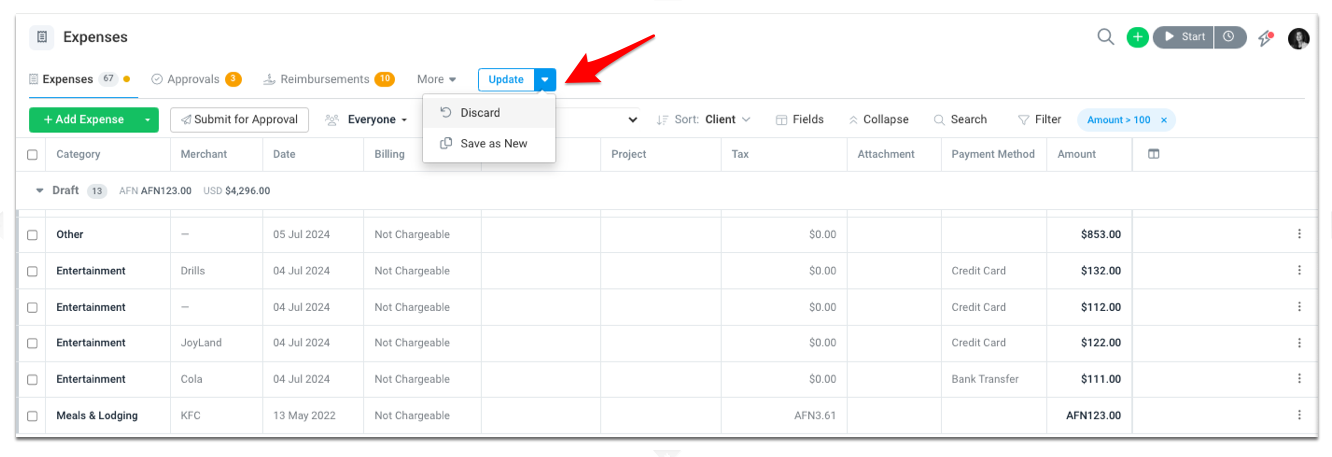
Figure 7: The Update menu, with Discard and Save as New.
When you save a new view, give it a name and choose who can see it:
- Personal views are visible only to you.
- Shared views are visible to everyone on your team who can see that tab.
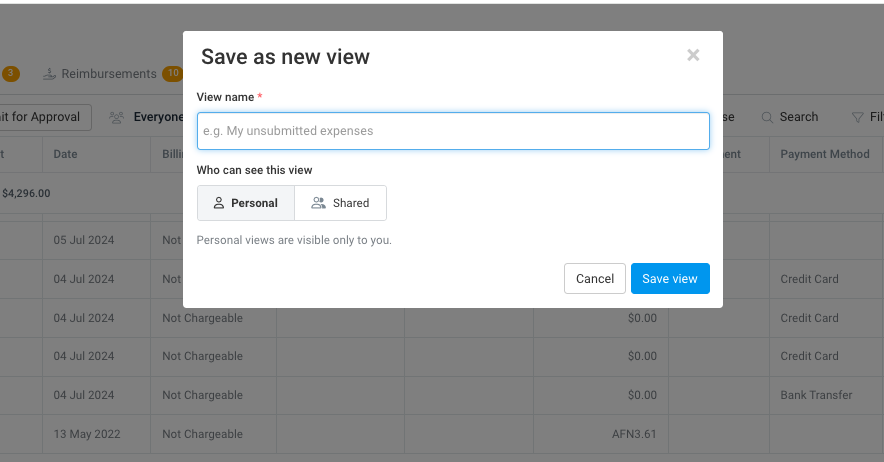
Figure 8: Saving a new personal view.
Add and manage views
Click More at the end of the tabs, then:
- Add view to create a new view. Choose the view type (Expenses, Approvals or Reimbursements), give it a name, and choose Personal or Shared.
- Manage views to organise the views you already have.
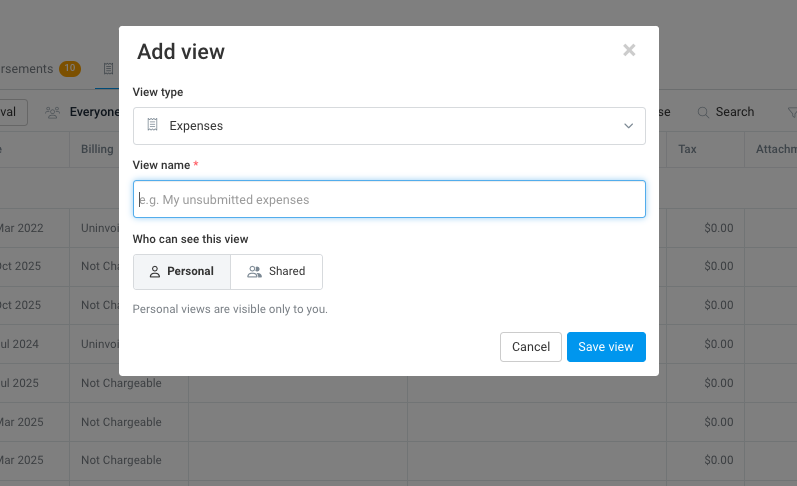
Figure 9: Adding a view and choosing its type.
Approve expenses on the Approvals tab
The Approvals tab has two sub-tabs in the toolbar: Pending and Complete.
Pending
Pending lists everyone’s expenses that are waiting for approval, grouped by person by default.
- Approve or reject a single expense from its row menu (⋮).
- Tick several expenses and use the bar that appears to approve or reject them together.
- Use the buttons in a person’s group header to Approve all of that person’s expenses, or approve or reject just the ones you have ticked.
- When you reject an expense, you must give a reason. The reason is emailed to the person who submitted it.
The Approvals tab also offers Approved By and Date Approved as columns and filters. If the approval workflow is switched off for your account, a banner at the top of the tab tells you.
Complete
Complete lists approved, automatically approved and rejected expenses.
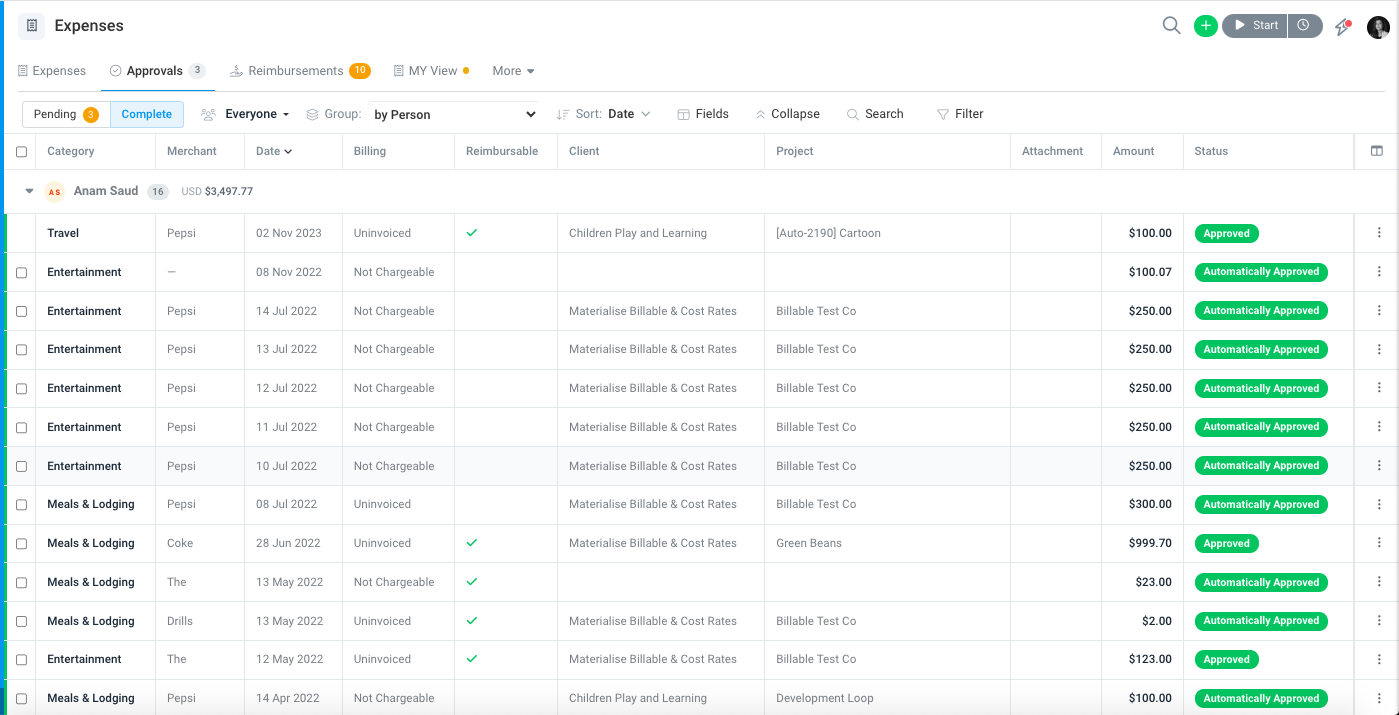
Figure 10: The Complete sub-tab, grouped by person, with subtotals and a totals bar.
If an approved expense needs another look, open its row menu and choose Return to Pending.
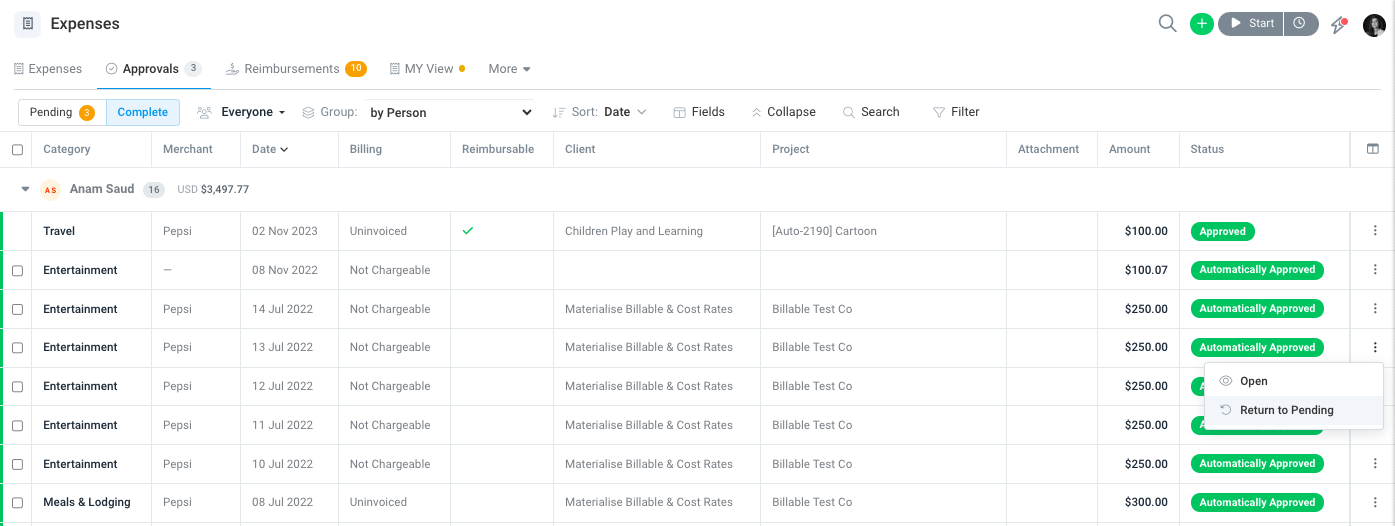
Figure 11: Returning an approved expense to Pending
Some approved expenses cannot be returned to Pending. In these cases the row menu shows a greyed-out Locked message explaining why:
- the expense has been invoiced,
- the expense is part of a reimbursement, or
- Lock approved expenses is turned on in Expense Settings.
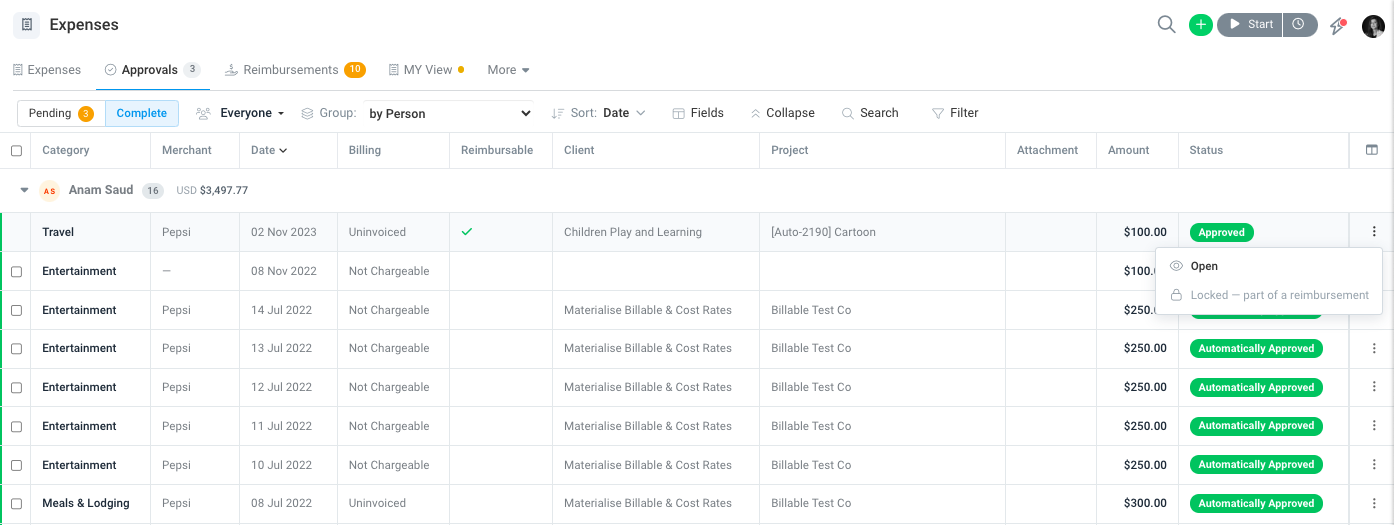
Figure 12: An invoiced expense shows “Locked — invoiced”.
Pay people back on the Reimbursements tab
The Reimbursements tab has three sub-tabs: Pending, Processing and Paid.
Pending
Pending lists approved, reimbursable expenses that have not been paid back yet, grouped by person. The Amount (Base Currency) column and the Total in figure at the bottom show the amounts converted to your account’s base currency.
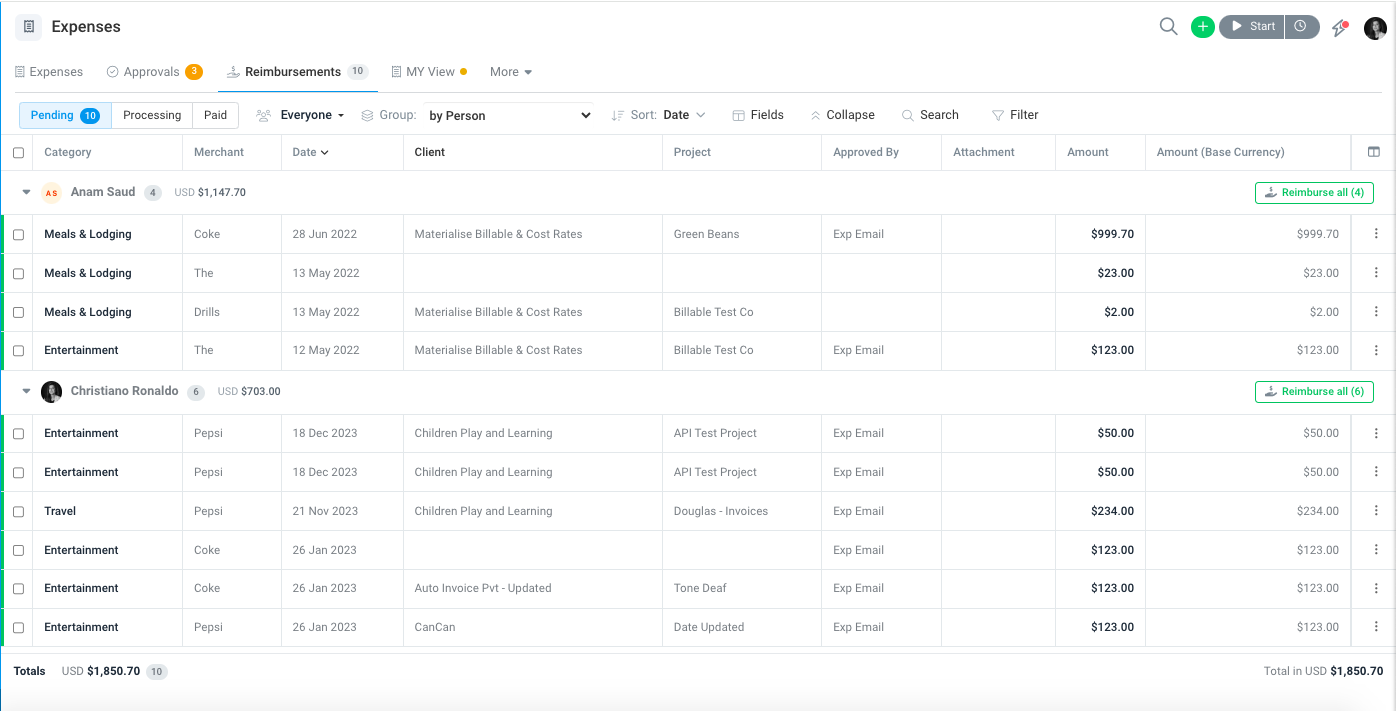
Figure 13: Approved reimbursable expenses waiting to be paid back.
To create a reimbursement, do one of the following:
- Click Reimburse all in a person’s group header.
- Tick expenses and use the bar that appears.
- Choose the option from an expense’s row menu.
The Create Reimbursement Payment window shows the totals by currency and in your base currency. Enter the amount and date, choose whether the payment is Processing or Paid, and add any notes for the person being paid back. The amount must be more than zero and no more than the total of the selected expenses.
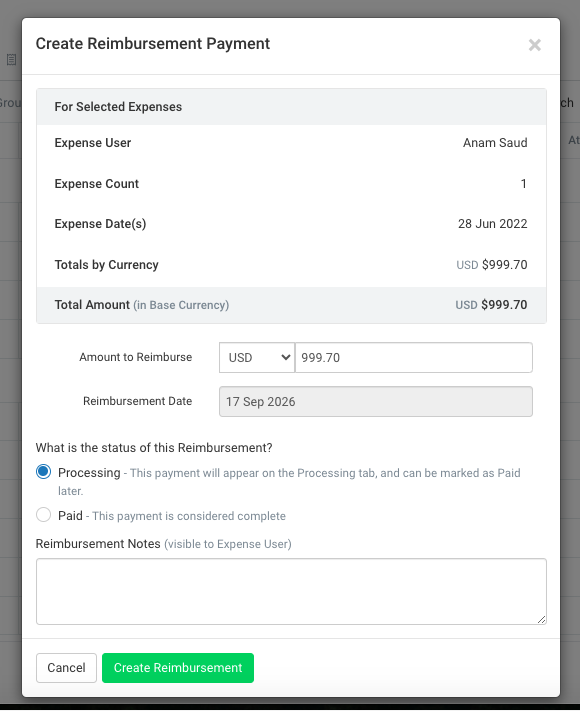
Figure 14: Creating a reimbursement payment.
Note: A reimbursement can only cover one person’s expenses. To pay several people, create one reimbursement for each person.
If an expense should not be paid back, mark it Not Reimbursable. You must give a reason, and you can choose to email it to the person.
Processing and Paid
Processing and Paid list reimbursement payments rather than individual expenses, grouped by person. Each row shows the date, the number of expenses, who made the payment, the amount and any notes, and Paid also shows the payment reference. Processing is sorted by Reimbursement Date and Paid by Payment Date.
Click a row to see the payment details and the expenses it covers. From the row menu you can:
- View details
- Mark as Paid to move a Processing payment to Paid.
- Delete the payment. Its expenses return to the Pending sub-tab.
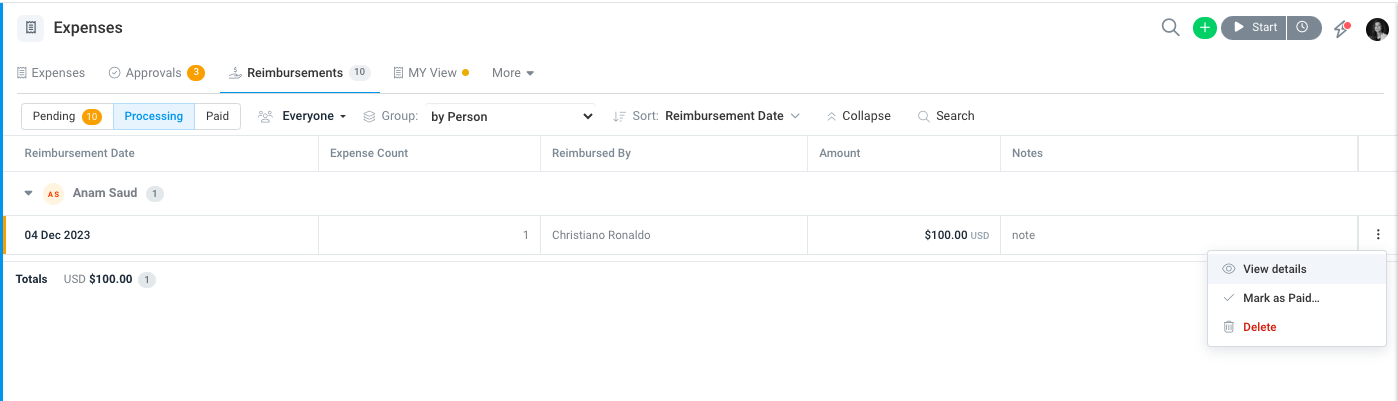
Figure 15: The row menu for a payment on the Processing sub-tab.
Reimbursement emails, history and webhooks work the same way as before.
Link straight to a tab
You can bookmark or share a link to a specific tab and sub-tab. For example:
- /expense#!tab=approvals&sub=complete opens Approvals › Complete.
- /expense#!tab=reimbursements&sub=paid opens Reimbursements › Paid.
On a phone, the Approvals and Reimbursements entries in the menu open the matching tab.
Frequently asked questions
Why does an Update button appear on my view?
You have changed the view’s filters, grouping, sorting or columns. Click Update to keep the changes, or use the arrow next to it and choose Discard.
Can I share a view with my team?
Yes. Choose Shared when you save the view. Team members only see the expenses they are allowed to see, even in a shared view.
Why are the group totals different from what I can see on screen?
Group counts and subtotals include every expense that matches the view, including rows that have not loaded yet. Click Load more in a group to see more of its rows.
Why can’t I return an approved expense to Pending?
The expense is locked because it has been invoiced, is part of a reimbursement, or your account has Lock approved expenses turned on. The row menu tells you which.
Can I add custom fields to the expense lists?
Not yet. Custom fields are not currently available on the Expenses tabs.