
Data can be imported into Avaza via CSV files.
Please note, only users with Admin permissions have access to the Import section under Settings.
1. Contacts
You can import External Contacts or a CSV file.
Go to Contacts > External Contacts > Import and choose “Import Google Contacts”.
Import Contacts Via CSV
Organize your contacts data in a CSV (Comma-separated values) file. (Tip: You can save an Excel file to a CSV). We recommend you use this sample file to get started. You can edit and re-save it with excel, however, avoid deleting any existing columns. You may leave optional fields empty.
To upload the file and import data, go to Settings > Import Data.
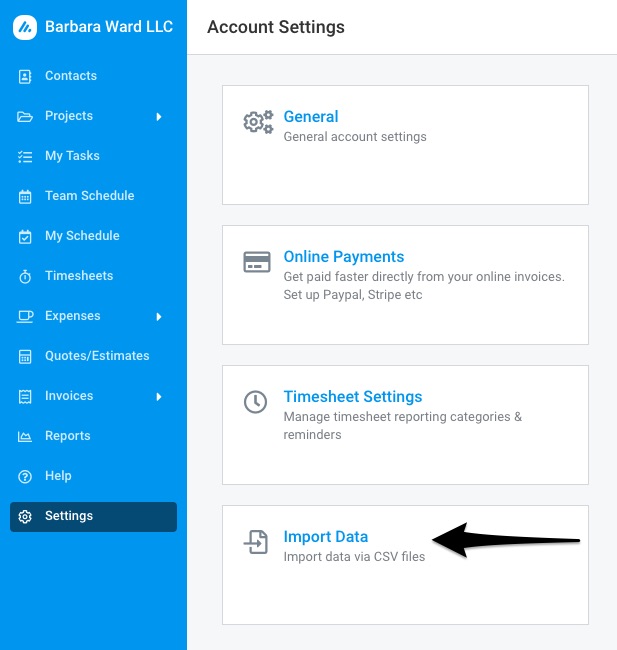 Figure: Use Import Data Feature to Import Data to Avaza
Click on “Import Contacts”.
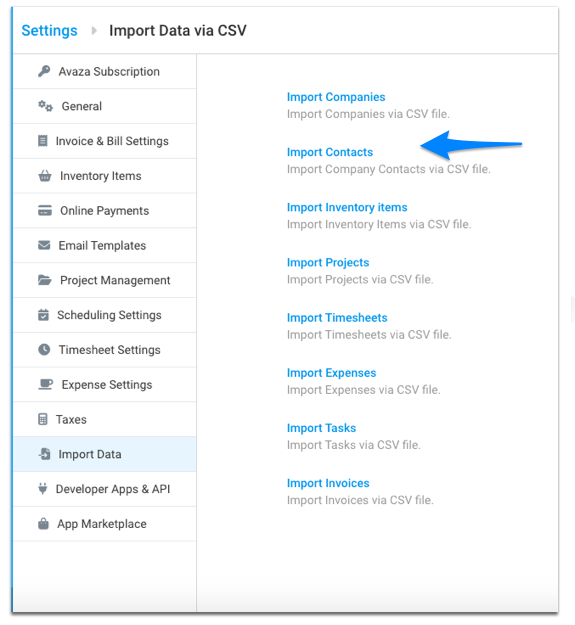 Figure: Click Import Contacts
Choose between updating or existing records or skipping existing records. Click on the “Choose File” option, and select the file from your computer hard drive.
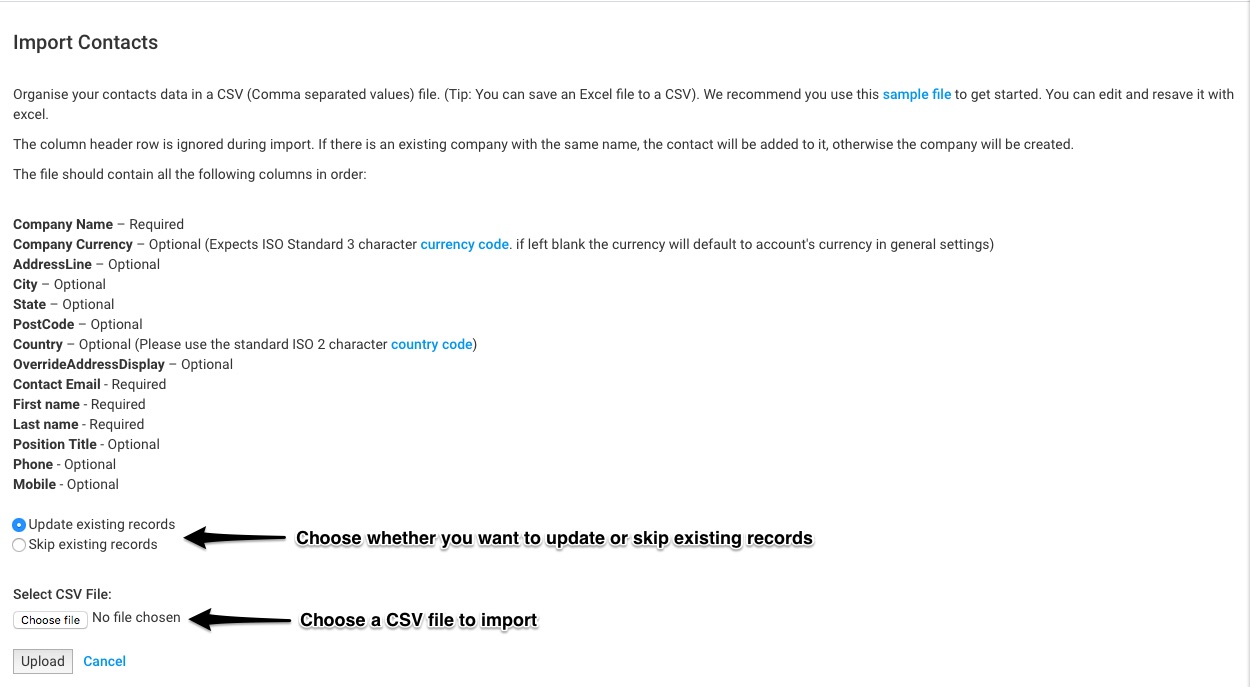 Figure: Upload the CSV File to Import Contacts
Notes for CSV import:
The column header row is ignored during import. If there is an existing company with the same name, the contact will be added to it, otherwise, the company will be created.
The file should contain all the following columns in order:
- Company Name – Required
- Company Currency – Optional (Expects ISO Standard 3 character currency code. if left blank the currency will default to account’s currency in general settings)
- Address Line – Optional
- City – Optional
- State – Optional
- PostCode – Optional
- Country – Optional (Please use the standard ISO 2 character country code)
- Override Display Address – Optional
- Contact Email – Required
- First name – Required
- Last name – Required
- Position Title – Optional
- Phone – Optional
- Mobile – Optional
**The same screen can also be accessed via Contacts > External Contacts > Import.
2. Import Companies
Organize your customer/vendor company data in a CSV (Comma-separated values) file. (Tip: You can save an Excel file to a CSV). We recommend you use this sample file to get started. You can edit and re-save it with excel.
To upload the file and import data, go to Settings > Import Data > Import Companies.
Choose between updating or skipping existing records. Click on the “Choose File” option, and select the file from your computer hard drive.
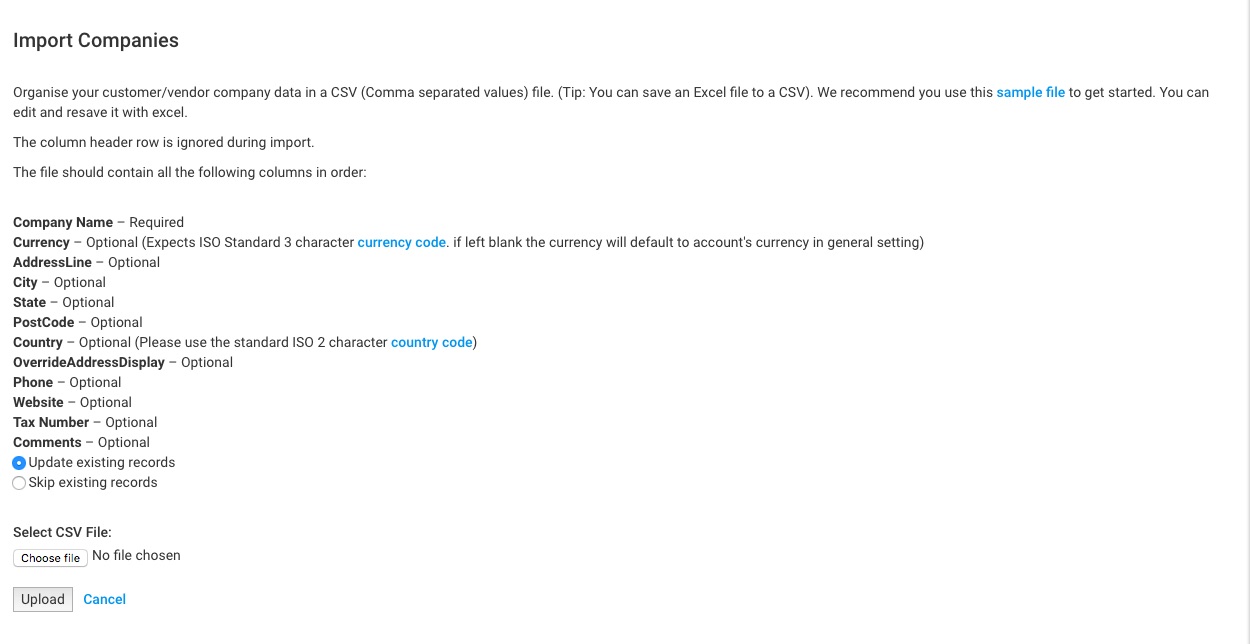 Figure: Upload the CSV File to Import Companies
Notes for CSV import:
The column header row is ignored during import.
The file should contain all the following columns in order:
- Company Name – Required
- Currency – Optional (Expects ISO Standard 3 character currency code. if left blank the currency will default to account’s currency in general setting)
- AddressLine – Optional
- City – Optional
- State – Optional
- PostCode – Optional
- Country – Optional (Please use the standard ISO 2 character country code)
- OverrideAddressDisplay – Optional
- Phone – Optional
- Website – Optional
- Tax Number – Optional
- Comments – Optional
**The same screen can also be accessed via Contacts > External Contacts > Import.
3. Import Projects
Organize your project data in a CSV (Comma-separated values) file. (Tip: You can save an Excel file to a CSV). We recommend you use this sample file to get started. You can edit and re-save it with excel.
Please note: You should add all team members with appropriate roles before you import projects. When adding a team member, you can choose to add them to all new projects by default. This allows the import file to automatically add all team members to new projects, saving you some time 🙂
To upload the file and import data, go to Settings cog > Import Data > Import Projects.
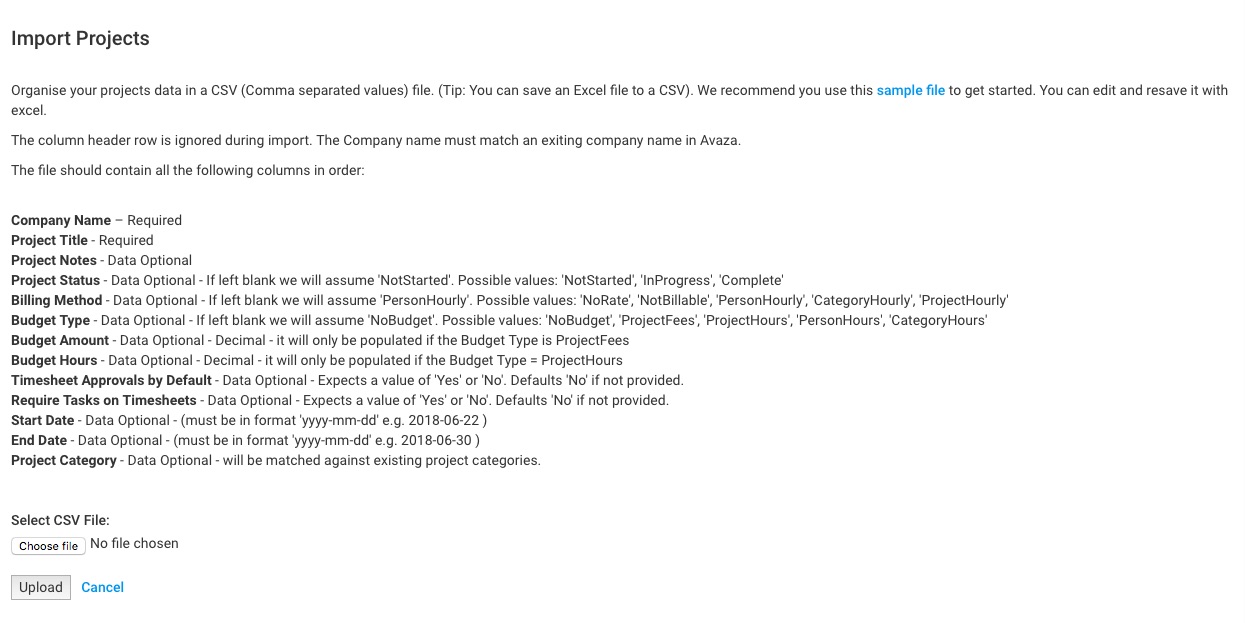 Figure: Upload the CSV File to Import Projects
Choose between updating or skipping existing records. Click on the “Choose File” option, and select the file from your computer hard drive.
Notes for CSV import:
The column header row is ignored during import. If there is an existing company with the same name, the project will be added to it, otherwise, the company will be created.
The file should contain all the following columns in order:
- Company Name – Required
- Project Title – Required
- Project Notes – Data Optional
- Project Status – Data Optional – If left blank we will assume ‘NotStarted’. Possible values: ‘NotStarted’, ‘InProgress’, ‘Complete’
- Billing Method – Data Optional – If left blank we will assume ‘PersonHourly’. Possible values: ‘NoRate’, ‘NotBillable’, ‘PersonHourly’, ‘CategoryHourly’, ‘ProjectHourly’
- Budget Type – Data Optional – If left blank we will assume ‘NoBudget’. Possible values: ‘NoBudget’, ‘ProjectFees’, ‘ProjectHours’, ‘PersonHours’, ‘CategoryHours’
- Budget Amount – Data Optional – Decimal – it will only be populated if the Budget Type is ProjectFees
- Budget Hours – Data Optional – Decimal – it will only be populated if the Budget Type = ProjectHours
- Timesheet Approvals by Default – Data Optional – Expects a value of ‘Yes’ or ‘No’. Defaults ‘No’ if not provided.
- Require Tasks on Timesheets – Data Optional – Expects a value of ‘Yes’ or ‘No’. Defaults ‘No’ if not provided.
- Start Date – Data Optional – (must be in format ‘yyyy-mm-dd’ e.g. 2018-06-22 )
- End Date – Data Optional – (must be in format ‘yyyy-mm-dd’ e.g. 2018-06-30 )
- Project Category – Data Optional – will be matched against existing project categories.
4. Import Timesheets
Organize your timesheet data in a CSV (Comma-separated values) file. (Tip: You can save an Excel file to a CSV). We recommend you use this sample file to get started. You can edit and re-save it with excel.
Please note: You will need to first assign the timesheet/expense user or Admin role to the users for whom timesheets are being created, and also add them to appropriate projects.
To upload the file and import data, go to Settings cog > Import Data > Import Timesheets.
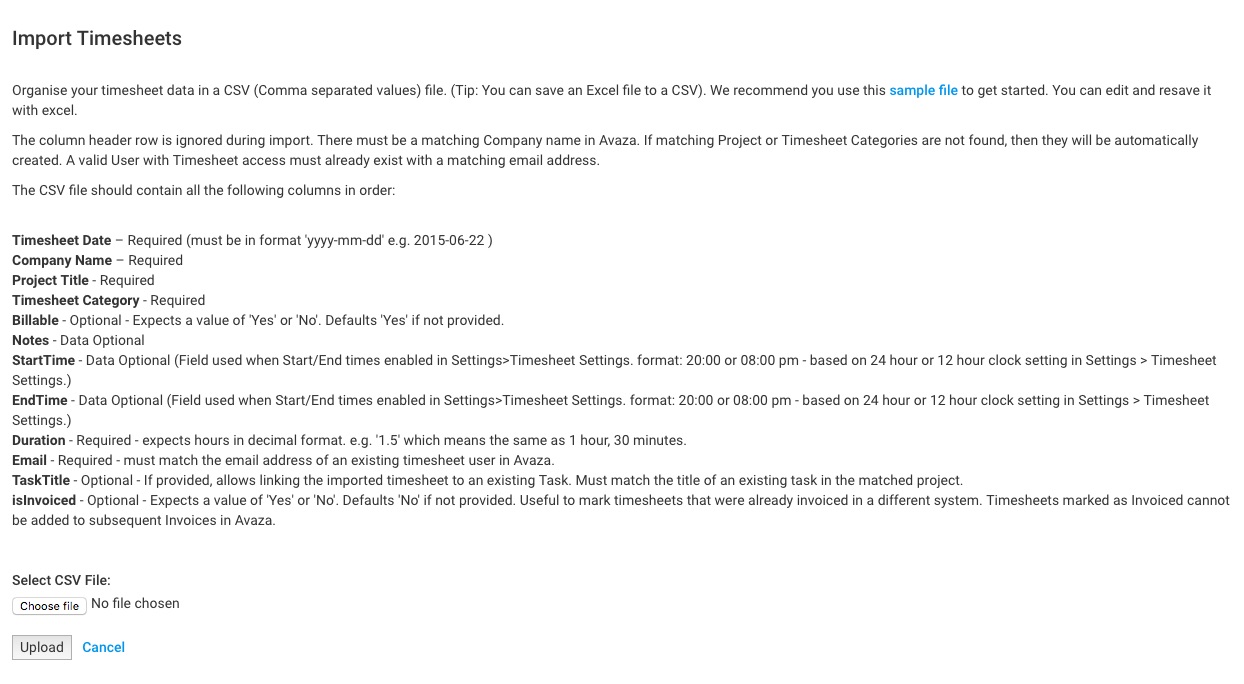 Figure: Upload the CSV File to Import Timesheets
Click on the “Choose File” option, and select the file from your computer hard drive.
Notes for CSV import:
The column header row is ignored during import. If matching Customer, Project or Timesheet Categories are not found, then they will be automatically created. A valid User with Timesheet access must already exist with a matching email address.
The CSV file should contain all the following columns in order:
- Timesheet Date – Required (must be in format ‘yyyy-mm-dd’ e.g. 2015-06-22 )
- Company Name – Required
- Project Title – Required
- Timesheet Category – Required
- Billable – Optional – Expects a value of ‘Yes’ or ‘No’. Defaults ‘Yes’ if not provided.
- Notes – Data Optional
- StartTime – Data Optional (Field used when Start/End times enabled in Settings>Timesheet Settings. format: 20:00 or 08:00 pm – based on 24 hour or 12 hour clock setting in Settings > Timesheet Settings.)
- EndTime – Data Optional (Field used when Start/End times enabled in Settings>Timesheet Settings. format: 20:00 or 08:00 pm – based on 24 hour or 12 hour clock setting in Settings > Timesheet Settings.)
- Duration – Required – expects hours in decimal format. e.g. ‘1.5’ which means the same as 1 hour, 30 minutes.
- Email – Required – must match the email address of an existing timesheet user in Avaza.
- TaskTitle – Optional – If provided, allows linking the imported timesheet to an existing Task. Must match the title of an existing task in the matched project.
- isInvoiced – Optional – Expects a value of ‘Yes’ or ‘No’. Defaults ‘No’ if not provided. Useful to mark timesheets that were already invoiced in a different system. Timesheets marked as Invoiced cannot be added to subsequent Invoices in Avaza.
5. Import Expenses
Organize your expenses data in a CSV (Comma-separated values) file. (Tip: You can save an Excel file to a CSV). We recommend you use this sample file to get started. You can edit and re-save it with excel.
Please note: You will need to first assign the timesheet/expense user role (or Admin role) to the users for whom expenses are being created.
To upload the file and import data, go to Settings > Import Data > Import Expenses.
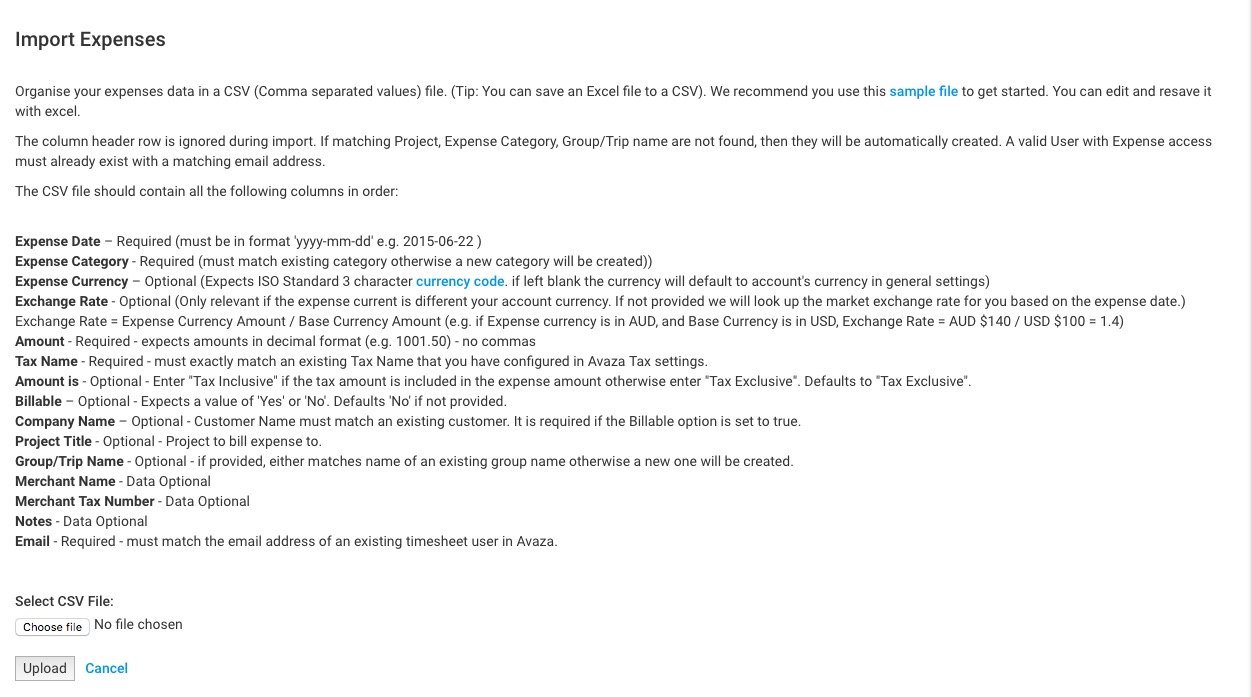 Figure: Upload the CSV File to Import Expenses
Click on the “Choose File” option, and select the file from your computer hard drive.
Notes for CSV import:
The column header row is ignored during import. If matching Customer, Project, Expense Category, Group/Trip name are not found, then they will be automatically created. A valid User with Expense access must already exist with a matching email address.
The CSV file should contain all the following columns in order:
- Expense Date – Required (must be in format ‘yyyy-mm-dd’ e.g. 2015-06-22 )
- Expense Category – Required (must match existing category otherwise a new category will be created))
- Expense Currency – Optional (Expects ISO Standard 3 character currency code. if left blank the currency will default to account’s currency in general settings)
- Exchange Rate – Optional (Only relevant if the expense current is different your account currency. If not provided we will look up the market exchange rate for you based on the expense date.) Exchange Rate = Expense Currency Amount / Base Currency Amount (e.g. if Expense currency is in AUD, and Base Currency is in USD, Exchange Rate = AUD $140 / USD $100 = 1.4)
- Amount – Required – expects amounts in decimal format (e.g. 1001.50) – no commas
- Tax Name – Required – must exactly match an existing Tax Name that you have configured in Avaza Tax settings.
- Amount is – Optional – Enter “Tax Inclusive” if the tax amount is included in the expense amount otherwise enter “Tax Exclusive”. Defaults to “Tax Exclusive”.
- Billable – Optional – Expects a value of ‘Yes’ or ‘No’. Defaults ‘No’ if not provided.
- Company Name – Optional – Customer Name must match an existing customer. It is required if the Billable option is set to true.
- Project Title – Optional – Project to bill expense to.
- Group/Trip Name – Optional – if provided, either matches name of an existing group name otherwise a new one will be created.
- Merchant Name – Data Optional
- Merchant Tax Number – Data Optional
- Notes – Data Optional
- Email – Required – must match the email address of an existing timesheet user in Avaza.
6. Import Inventory Items
Organize your inventory item data in a CSV (Comma-separated values) file. (Tip: You can save an Excel file to a CSV). We recommend you use this sample file to get started. You can edit and re-save it in Excel.
Go to Settings > Import Data > Import Inventory Items to upload the file and import data.
 Figure: Upload the CSV File to Import Inventory Items
Choose between updating or skipping existing records. Click on the “Choose File” option, and select the file from your computer hard drive.
Notes for CSV import:
The column header row is ignored during import.
The file should contain all the following columns in order:
- Item Name – Required
- Description – Data Optional
- SKU – Data Optional
- Sale Price – Data Optional
- Cost Price – Data Optional
- Tax Name – Data Optional. If provided, it must exactly match an existing Tax Name that you have configured in Avaza Tax settings.
7. Import Tasks
Organize your task data in a CSV (Comma-separated values) file. (Tip: You can save an Excel file to a CSV). We recommend you use this sample file to get started. You can edit and resave it in Excel.
Please note: All users to whom tasks need to be assigned via this import should have the Project Collaborator (or Admin) role and be a member of appropriate projects.
Go to Settings > Import Data > Import Tasks to upload the file and import data.
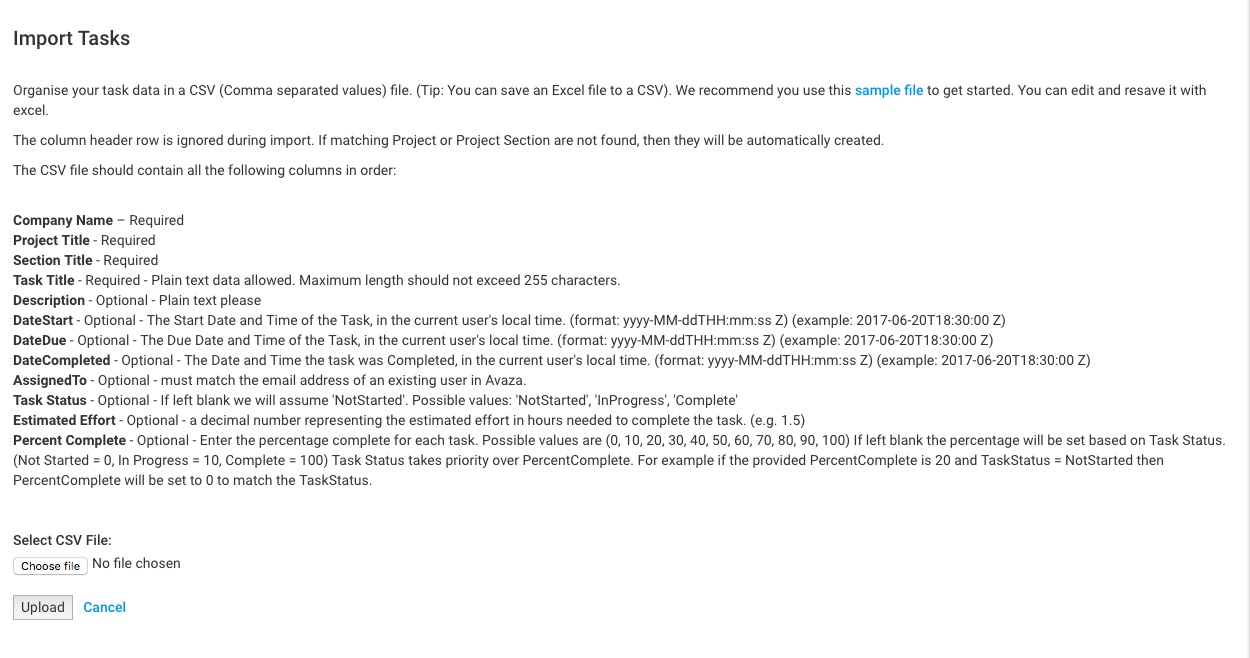 Figure: Upload the CSV File to Import Tasks
The CSV file should contain all the following columns in order:
- Company Name – Required
- Project Title – Required
- Section Title – Required
- Task Title – Required – Plain text data allowed. Maximum length should not exceed 255 characters.
- Description – Optional – Plain text please
- DateStart – Optional – The Start Date and Time of the Task, in the current user’s local time. (format: yyyy-MM-ddTHH:mm:ss Z) (example: 2017-06-20T18:30:00 Z)
- DateDue – Optional – The Due Date and Time of the Task, in the current user’s local time. (format: yyyy-MM-ddTHH:mm:ss Z) (example: 2017-06-20T18:30:00 Z)
- DateCompleted – Optional – The Date and Time the task was Completed, in the current user’s local time. (format: yyyy-MM-ddTHH:mm:ss Z) (example: 2017-06-20T18:30:00 Z)
- AssignedTo – Optional – must match the email address of an existing user in Avaza.
- Task Status – Optional – If left blank we will assume ‘NotStarted’. Possible values: ‘NotStarted’, ‘InProgress’, ‘Complete’
- Estimated Effort – Optional – a decimal number representing the estimated effort in hours needed to complete the task. (e.g. 1.5)
- Percent Complete – Optional – Enter the percentage complete for each task. Possible values are (0, 10, 20, 30, 40, 50, 60, 70, 80, 90, 100) If left blank the percentage will be set based on Task Status. (Not Started = 0, In Progress = 10, Complete = 100) Task Status takes priority over PercentComplete. For example if the provided PercentComplete is 20 and TaskStatus = NotStarted then PercentComplete will be set to 0 to match the TaskStatus.
7. Import Invoices
Organize your invoice data in a CSV (Comma-separated values) file. (Tip: You can save an Excel file to a CSV). We recommend you use this sample file to get started. You can edit and resave it in Excel.
The column header row is ignored during import. Each row in the CSV file will represent an Invoice Line Item, with the initial columns containing Invoice header fields. Invoice Header fields will only be extracted from the first line item found for any given invoice. As an example, if you wanted to import two invoices, where one invoice contained 2 line items and one invoice contained 1 line item, then the CSV file would have 3 rows in total.
The CSV file should contain all the following columns in order:
Invoice Header related columns
TransactionPrefix – Optional – A prefix for the Invoice number. e.g. ‘INV’. If left blank it will be set to the account default. Max length 20 characters.
InvoiceNumber – Required – Pass any string. The value must be unique. The invoice numbers that already exist will be skipped. Max length 60 characters.
CompanyID – Conditionally Required integer – If left blank then you must specify Company Name. If both CompanyID and CompanyName are provided, we will use CompanyID.
CompanyName – Conditionally Required – If left blank then you must specify Company ID. Specified Name will be used to match existing customer record. If the Company name appears multiple times then the invoice creation will be rejected.
ExchangeRate – Optional decimal – Exchange rate is only valid for invoices in currency other than default account currency. If not specified it will get the market rate based on the Date Issued.
InvoiceTemplateName – Optional – If provided must exactly match the name of an Invoice Template in your account. If left blank, the Customer Company default invoice template will be used.
Subject – Optional – Plain UTF8 text. (no HTML). 255 characters maximum.
CustomerPONumber – Optional – Plain UTF8 text. 100 characters max.
DateIssued – Required – The date should be specified as local date. (format: yyyy-mm-dd) (example: 2017-06-20)
PaymentTerms – Optional – If left blank we will set it to customer default. If specified then it must match one of your existing pre configured payment term periods. Your account starts with: (-1 — Custom, 0 — Upon Receipt, 7 — 7 Days, 15 — 15 Days, 30 — 30 Days, 45 — 45 Days, 60 — 60 Days)
DueDate – Optional – It will be auto calculated based on the payment term and issue date. Due Date must be greater than or equal to Issue Date. If the Due Date is specified then Payment Terms will be set to -1 (Custom)
TaxConfigCode – Optional – Possible values are “EX” for Tax Exclusive, “INC:” for Tax Inclusive. If left empty it will use the account default. Use EX if the unit price is exclusive of taxes. Use INC if the unit price is inclusive of taxes.
Notes – Optional – Plain UTF8 text. (no HTML). Max 2000 characters.
Invoice Line Item Columns
LineItemInventoryItemSKU – Conditionally Required – If not specified then LineItemInventoryItemName must be specified. If both SKU and ItemName are provided, we will use SKU.
LineItemInventoryItemName – Conditionally Required – If not specified then LineItemInventoryItemSKU must be specified. Max 200 characters.
LineItemDescription – Optional – Plain UTF8 text. (no HTML). Max 2000 characters.
LineItemQuantity – Required – The quantity for the line item.
LineItemUnitPrice – Required – The unit price for the line item.
LineItemTaxName – Required – This should match an existing Tax Name within your account’s Settings > Taxes.
LineItemDiscount – Optional – Discount for each line item. Enter 10.5 to give a 10.5% discount.
LineItemProjectTitle – Optional – the Project Title for an existing Project under the customer to link the invoice line item to. The Project title must be a unique match for the customer the invoice belongs to. If the Title is not found or more than one project is found with the same title then the entire import will be rolled back.
Note: Please avoid making any changes to the CSV files, such as deleting columns or changing the headings. You may leave the optional fields blank and fill out all the required fields before importing.
If you require further assistance with migrating your data to Avaza, we have an option for paid assistance. If you’re interested, please send your requirements to support@avaza.com; someone will contact you shortly!
If you have any further questions, please chat with us or email us at support@avaza.com.